Company vehicles Hyundai Company vehicles Kia Company vehicles Lada Company vehicles Mazda Company vehicles Mercedes-Benz Company vehicles Opel Company vehicles Mitsubishi
English Русский
Български
Беларускі
Український
Српски
Hrvatski
Română
Polski
Slovenský
Magyar
Articles   
Bookmark Contacts Sitemap
SkodaBook.ru


Fabia Rapid Octavia Superb Kodiaq Yeti Others
Octavia 1 (1996-2004) Octavia 3 (2013-2019)

Pedal mechanism — removal and installation (Skoda Octavia 1U)

  • Main
  • Octavia
  • 1U (1996-2004)
  • Body and interior
  • Interior (internal elements)
  • Pedal mechanism — removal and installation
0

Pedal console included
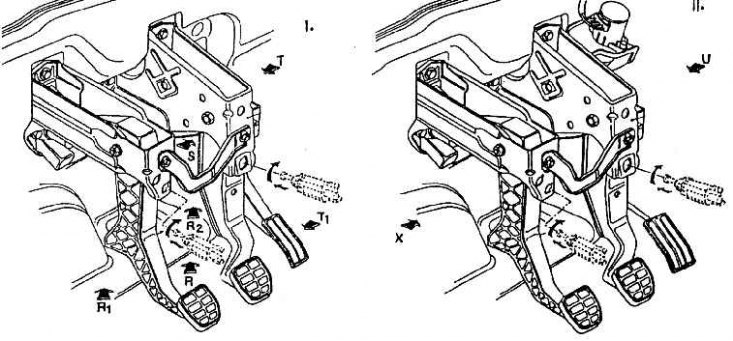


left image: pedal console assembly - mechanical…

left image: pedal console assembly - mechanical gas control;
right image: pedal console assembly - electric throttle control


Installing the brake pedal assembly (type R)


Article source: this website SkodaBook
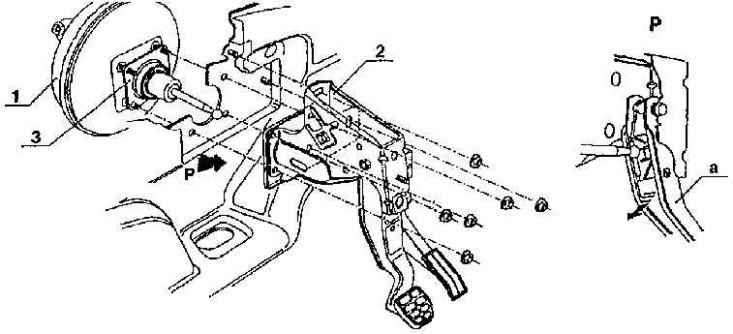
1 – brake booster; 2 – brake pedal assembly; 3 –…

1 – brake booster; 2 – brake pedal assembly; 3 – seal; a - when the pedal is pressed, the booster rod enters the plastic pedal bracket


Clutch pedal and connector mounting installation (view R1 and R2)
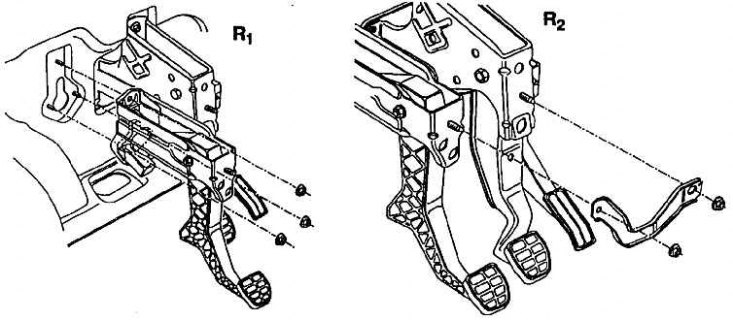


Clutch pedal and connector mounting installation…


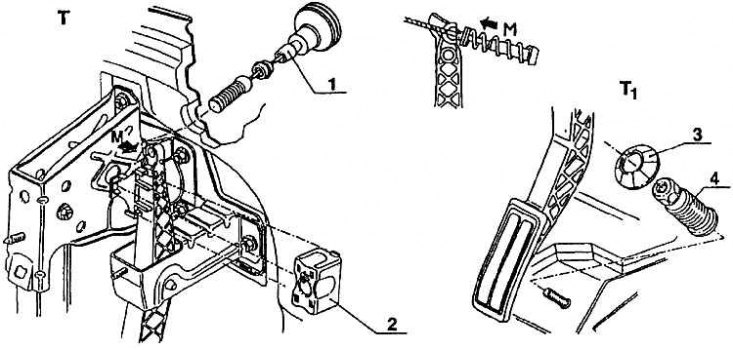
Gas pedal (type T and T1)


1 – gas thrust; 2 – counterweight; 3 – nut; 4 –…

1 – gas thrust; 2 – counterweight; 3 – nut; 4 – stop


Gas pedal with gas control via an electric motor (type U and X)
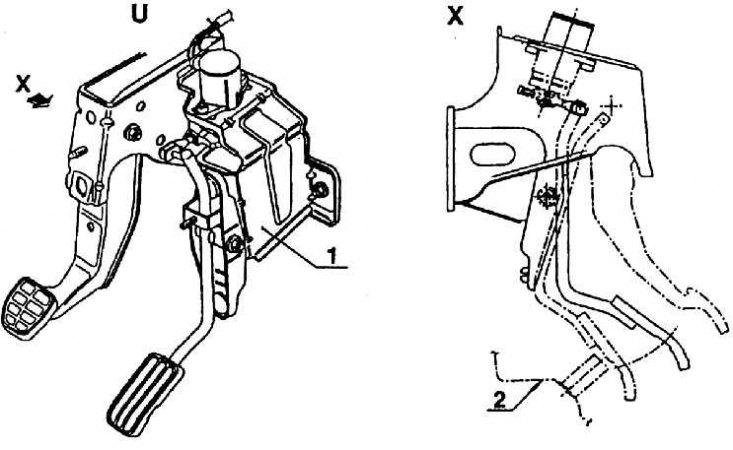


1 – gas pedal (electric control);

1 – gas pedal (electric control);
2 – pedal floor


The pedal mechanism, or pedal console assembly, is available in Skoda Octavia cars in several versions, according to the standard version and equipment. In order to simplify installation as much as possible, the console flange, secured with nuts (during pre-assembly at work stations outside the main conveyor) to the cross wall of the passenger compartment, is the same in all versions. Then the assembled console is attached with two brackets to the clamps on the central tube. One is made of steel tape, the second is in the form of a wavy deformable link. The basis of the pedal mechanism is a welded part made of steel stampings - a console, on which the clutch pedal, brake pedal and gas pedal are mounted. When using an automatic transmission, there are only two pedals on the console - brake and gas. In another version - a console with a gas pedal, controlling the engine acceleration mechanism through an electric motor. The gas and clutch pedals are made of plastic in the form of a truss. The brake pedal is welded from steel stampings in the form of a box beam. All pedals are unusually durable. The platforms have a rubber coating. The brake pedal returns to its original position with a spring. The gas and clutch pedals do not have a return spring. In the original position, they are held by a cable with a flexible sheath attached to them. The clutch pedal is 236.5 mm long and can be depressed to 150 mm (all the way to the console). The brake pedal is the same length, i.e. 236.5 mm, and the brake booster allows it to be depressed a maximum of 172 mm. The gas pedal arm before the cable mount is 196.5 mm long and it can be depressed a maximum of 65 mm to the stop installed on the pedal floor. The gas pedal, which controls acceleration electrically, is the same length, but it can only be depressed 57 mm. The pedal length is measured between the middle of the sole surface and the axis of the finger on which the pedal turns. There is a shaped hole on the console above the brake pedal, in which a push-button switch is installed in all versions. It is inserted into the shaped cutout and rotated 90°. In cars with a gasoline engine, the switch has two plugs and controls the inclusion of brake lights. In cars with a diesel engine, the switch has four connectors and has two functions. On one side it serves as a brake light switch, on the other it is connected to the engine control unit and, therefore, serves as one of the sensors for adjusting the engine operation in idle mode. There is a similar notch on the clutch pedal console (shaped hole) also for mounting a push button switch; in cars with a petrol engine, a visible switch will be installed and it will serve to control the tempo. In cars with a diesel engine, (1.9 SDI and also 1.9 TDI) the push-button switch on the clutch pedal is already installed at the present time and serves, as well as on the brake pedal, as part of the engine control unit. On the side where the flexible clutch cable is connected to the console, there is a rubber "silent block" that dampens vibration. The metal parts of the kit are covered with black enamel, the plastic parts are also black.


The console with pedals in assembly is unified with all parts of other cars of the concern.

Fig. Pedal console in the set shows the pedal console in the set with the designation of the views of the fragments presented in the other figures.
This article is available at russian, bulgarian, belarusian, ukrainian, serbian, croatian, romanian, polish, slovak, hungarian
Article verified: Eleonora Afanasyeva
Share with friends:
◀ Previous
Skoda Octavia 1: Interior (internal elements)
Next ►

Heater or air conditioner with heater assembly
Cross wall of the passenger compartment — mounting plate
Cross wall of the passenger compartment in assembly
Inner luggage compartment lid — rear shelf
Luggage compartment lighting
Central tube assembly
Steering column assembly
Instrument panel — design description
Instrument panel — general information
Parts installed after the cross wall assembly and the central tube have…
Read similar articles on other Skoda models

➧ Pedal mechanism, brake system control pedal Skoda Fabia 2 (2007-2014)
➧ Valve mechanism — external view (engine 1.2 TS) Skoda Rapid 1 (2012-2022)
➧ Work with the gas distribution mechanism Skoda Superb 2 (2008-2015)
➧ Gas distribution mechanism drive Skoda Kodiaq 1 (2016-2024)
➧ Work with the gas distribution mechanism Skoda Yeti (2009-2017)
➧ Valve mechanism — removal, inspection and installation Skoda Favorit (1987-1994)
Link to this article in various formats
Reviews and comments of visitors
No comments yet


Add two numbers: 11 + 39


Octavia 3 (2013-2019) 
  • General information
  • User manual
  • Car driving
  • Maintenance
  • Petrol engines 1.2 l
  • Engine repair
  • Cooling system
  • Supply system
  • Petrol engines 1.4 l
  • Engine repair
  • Supply system
  • Petrol engines 1.8/2.0 l
  • Engine repair
  • Cooling system
  • Supply system
  • Diesel engines 1.6/2.0 l
  • Engine repair
  • Cooling system
  • Supply system
  • Transmission
  • Mechanical gearbox 02S
  • Automatic gearbox 0CW
  • Automatic gearbox 0D9
  • Chassis (running gear)
  • Front suspension
  • Rear suspension
  • Brake system
  • Steering
  • Body and interior
  • Doors, locks and windows
  • Exterior (external elements)
  • Interior (internal elements)
  • Ventilation and air conditioning
  • Electrical equipment
  • Equipment and devices
  • Headlights and lighting
  • Wiring diagrams (basic)
  • Wiring diagrams (comfort)
Octavia 1 (1996-2004) 
  • General information
  • Vehicle details
  • Maintenance
  • Power unit
  • Petrol engines 1.6 l AEE
  • Petrol engines 1.8 l AGN
  • Diesel engines 1.9 l AGR
  • Fuel system
  • Exhaust system
  • Cooling system
  • Transmission
  • Clutch
  • Car gearbox
  • Gearbox repair 02J
  • Gearbox repair 02K
  • Chassis (running gear)
  • Wheels and tires
  • Suspension and axles
  • Brake system
  • Body and interior
  • Exterior (external elements)
  • Interior (internal elements)
  • Doors, locks and windows
  • Electrical equipment
  • Equipment and devices
  • Electrical circuits
SkodaBook.ru © 2018–2026 | Mobile version | Articles on Skoda | Sitemap EN BG BY UA RS HR RO PL SK HU | Feedback | Site search | Bookmark
Fabia 1 (1999-2007) | Fabia 2 (2007-2014) | Rapid 1 (2012-2022) | Octavia 1 (1996-2004) | Octavia 3 (2013-2019) | Superb 2 (2008-2015) | Kodiaq 1 (2016-2024) | Yeti (2009-2017) | Favorit (1987-1994) | Felicia (1994-2001) |
By continuing to use the site, you agree to the use of cookies.