Attention! When working on the airbag control unit, observe the general safety regulations for handling the pyrotechnic modules of the airbags, seat belt pretensioners and the battery disconnector.
Remove the cover of the center console in the footwell of the driver and front passenger. Disconnect battery terminals. Unscrew nut at front in footwell on driver's side -3-. Unlock connector locking mechanism -5- in front passenger footwell. Disconnect the connector from the ECU. Disconnect the connector in the footwell in front of the front passenger seat. To do this, unlock the catch and move the lock -5- -arrow-. Unscrew nuts -1, 4-. Raise the airbag control unit -2- and remove it from the studs in the direction of the front passenger.
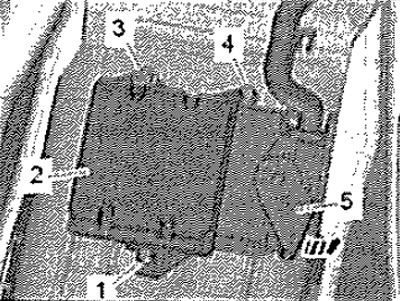
Instruction. For better clarity, the front panel and the heater and air conditioner module are not shown in the figure.
Installation
Installation in reverse order.
Note: Check that the connector of the control unit is well connected and clicks into place audibly.
Turn on the ignition. Connect battery terminals. Observe the rules for reuse and replacement of the control unit.
Note: If the airbag warning lamp -K75- indicates an error after installation, interrogate, clear and interrogate the event memory again.
Return of the loop of the pedestrian protection system after activation to its original position
Danger! When handling activators, observe the safety rules. Before working on the pyrotechnic components and before disconnecting the activation and ground wires, discharge yourself of an electrostatic charge! Electrostatic discharge can cause airbags to deploy. To do this, you can, for example, touch the body or the pawl of the door lock with your hand. After activating the pedestrian protection system, check other components and wires in the engine compartment and in the plenum box for possible damage. Repair or replace damaged components. Replace wiring. After the pedestrian protection system has deployed, the airbag control unit can continue to be used. A loop that has not been damaged by the pedestrian protection system can be used up to 3 times by returning it to its original position. The loop must not be used if it has been damaged by the pedestrian protection system. The activators must be replaced after the pedestrian protection system has been triggered. A hood that has not been damaged by the pedestrian protection system can still be used by returning the hinge to its original position. If the hood is damaged when the pedestrian protection system is activated, it must be (depending on the extent of damage) repair or replace.
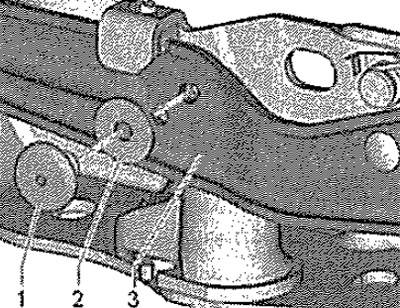
Parts and assemblies of the pedestrian protection system hinge after activation
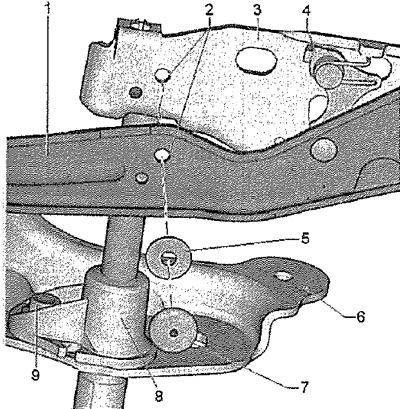
1. Middle part of the pedestrian protection loop
2. Holes from sheared rivets
3. Upper part of the pedestrian protection loop: Attached to the hood. The loop is removed in the same way as on vehicles with deactivated pedestrian protection system.
4. Top stop lock lever: Press the top stop lever by hand to its original position
5. Spacer - New: Replace
6. Lower part of the pedestrian protection hinge: Attached to the side member. The loop is removed in the same way as on vehicles with deactivated pedestrian protection system.
7. Shear rivets - new: Replace
8. Activated activator. Removal: Disconnect plug in plenum box. Loosen the nut. The activator is installed in the same way as on vehicles with a non-activated pedestrian protection system. Before working on the pyrotechnic components and before disconnecting the activation and ground wires, discharge yourself of an electrostatic charge! Electrostatic discharge can cause airbags to deploy. To do this, you can, for example, touch the body or the pawl of the door lock with your hand.
9. Nut: 9 Nm
Returning the hinges of the pedestrian protection system to their original position
Note: The hinges of the pedestrian protection system do not need to be removed to return them to their original position. The return of the loops of the pedestrian protection system to its original position is carried out on both sides of the vehicle.
Disconnect battery terminals. Remove activated activator. Raise the loop a little. Press locking lever -1- by hand in -arrow- to original position.
Returning the lock lever to its original position
I. Locking lever -1- in activated position.
II. Locking lever -1- in original position.
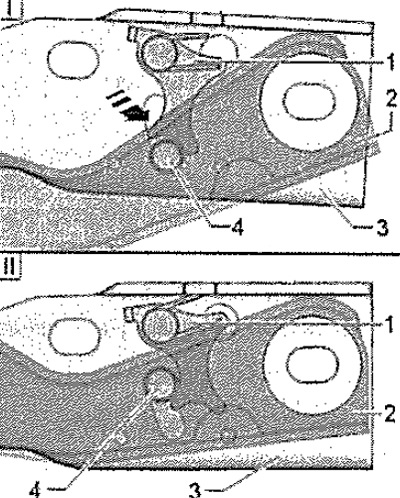
Move the upper part of the hinge -3- relative to the middle part -2- so that the pin -4- is in the upper position and the holes from the sheared rivets are covered. Install new shear rivets -1- and spacer -2- using riveting pliers, eg -VAG 1765B-. Install a new activator.
Turn on the ignition. Connect battery terminals. Check hood fit. Interrogate and clear the event recorder of the airbag control unit. After replacement, the control unit must be coded, adapted.