
KP
Follow that in "open" KP did not get contaminated. Especially when "disconnected" In the mechatronic unit of the DSG gearbox -J743- and/or the oil pump, dirt can enter the gearbox and cause it to fail. If the cover is removed from the gearbox or there is no oil in the box, do not start the engine and do not tow the vehicle. Thoroughly clean the connection points and their surroundings first before disconnecting. When installing the gearbox, pay attention to the correct position of the balance bushings between the engine and the gearbox. Lay the removed parts on a clean lining and cover so that they do not get dirty. Do not use fluffy fabrics! Install only clean parts: Do not remove original parts from the packaging until immediately before installation. Carefully cover or close open components if repairs are not urgent. If the gearbox has been replaced, check the oil level,
Mechatronic
Mechatronics is determined by the letter designation of the gearbox.
Seals, O-rings
After removing the seals, check the adjacent surfaces of the housings or shafts for burrs and damage and eliminate them. Before installing the radial shaft seal, coat the sealing lips and the space between them with sealing grease and lubricate the outer perimeter with dual clutch gear oil. The open side of the radial shaft seal faces towards the oil. Replace o-rings, lip seals and gaskets. Lubricate the O-rings lightly with DSG oil before installation to avoid damage to the O-rings during installation. Be sure to use only DSG oil in the oil area. Other lubricants lead to malfunctions of the hydraulic control of the gearbox. After installation, check the oil level.
Gearbox oil and filter with front final drive
The quality of the oil has a decisive influence on the functioning of the gearbox. The oil not only lubricates the gearbox, but also transfers small wear products from the differential to both filters, maintains a lubricant film on the differential gears and, at the same time, is the working fluid of the hydraulic gearshift drive. In addition, the oil seals the gate and helps the synchronizer rings, promotes smooth gear shifting, accumulates and removes heat, and minimizes noise. Oil performs many functions. To maintain these functions, it is necessary to change not only the oil, but also the oil filter on the gearbox during maintenance. Replace oil filter - "Yes or no". The filter must be replaced if: the maintenance interval has elapsed; coolant got into the oil; metal shavings were found in the oil; the clutch burned out or received mechanical damage. Do not replace the filter if: the transmission oil cooler was replaced, but the coolant did not get into the oil; the sealing ring of the shift control shaft was replaced; the sealing ring of the flanged or stub shaft has been replaced; a leaky mechatronics, clutch or oil pump cover has been replaced. Input shaft torque sender -G182- and clutch temperature sender -G509- were replaced.
Threaded plug for draining, filling and checking the oil level in the gearbox
The 6-speed DSG gearbox and the front final drive have a common filling port and are filled at the same time. Checking the oil level and changing the oil is carried out through the inspection hole -arrow-.
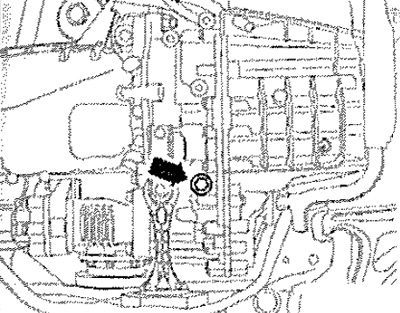
Note: Behind this plug is a plastic overflow pipe, which can be tightened with a 3 mm Allen key to a torque of 3 Nm. The length of the overflow pipe determines the oil level in the gearbox, when replacing this pipe, observe the part number.
Transfer case oil
The corner gear is equipped with an automatic oil filling system for final drives.
Carefully! Risk of damage to the transfer box. Final drives may only be filled with oil specified as a spare part. The use of other oils may result in malfunction or failure of the bevel gear.
Haldex clutch oil and rear final drive oil
Carefully! The rear final drive and the Haldex clutch have separate "oil circuits". The Haldex coupling is filled with special oil for Haldex couplings. In the rear main gear refuel "main gear oil".
The location of the holes for filling and draining oil in the rear final drive with a Haldex clutch
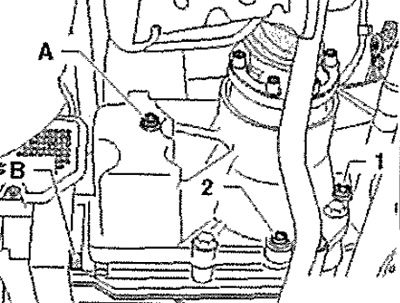
A. Oil filler plug for high performance oil for Haldex couplings
B. Oil drain plug for Haldex high performance oil
1. Final drive oil fill plug
2. Final drive oil drain plug
Retaining rings
Do not overtighten retaining rings. Replace damaged or stretched circlips. The circlips must rest against the bottom of the groove.
Screws, nuts
Loosen and tighten the screws or nuts securing the covers and the crankcase in stages in a crosswise manner. Tightening torques are given for unlubricated screws and nuts. Clean the threads of screws that are tightened with locking means with a wire brush. Then screw in screws with locking means -AMV185101 A1-. All threaded holes into which screws with locking agent were screwed must be cleaned with a tap to remove any remaining locking agent. Otherwise, there is a risk of the screws breaking during subsequent disassembly. Replace screws that are tightened with additional rotation to a given angle, as well as self-locking nuts.
Support
Always install needle bearings with the printed side (greater thickness) to the pressing mandrel. Lubricate all bearings with engine oil prior to installation.
Shims
Measure the adjusting washers in several places with a micrometer. Various tolerances allow you to accurately select the washer of the required thickness. Check for scratches and damage. Install only correct (intact) shims
Electrical components
Touching metal objects can cause electrostatic discharge. The reason is the electrostatic charge of the human body. If the electrical components of the gearbox and the shift mechanism are touched, this electrostatic charge can lead to malfunctions. Before working on electrical components, touch a grounded object such as a water pipe or hoist. Do not touch the connector pins directly. Disconnect battery.
Guided Fault Finding
Before starting repair and restoration work on the gearbox, it is necessary to carry out troubleshooting using "Guided troubleshooting".
Cleanliness rules
Thoroughly clean connection points and their surroundings before disconnecting. Install only clean parts: Remove parts from packaging only immediately before installation. Replace cardboard pads. Completely remove all seals, thoroughly clean all sealing surfaces, Place the removed parts on a clean pad and cover so that they do not get dirty. Apply film and paper. Do not use loose cloths! Carefully cover or close open components if repairs are not urgent. Protect disconnected electrical connectors from dirt and moisture and connect them only when dry.