
Removing
Note.
- Necessary special devices, control and measuring devices, as well as auxiliary means:
- Socket wrench -T10058-.
- Gasket Stripper Seal Remover (storage code GST item no. R 34402), manufacturer Retech s.r.o.
- Cleaner and degreaser -D 000 401 04-.
- Protective gloves and goggles.
- Silicone sealant -D 176 600 A1-.
- Container for collecting engine oil -VMS 6208-.
1. Remove the lower protective casing of the engine compartment.
2. Drain engine oil.
3. Remove the exhaust gas catalyst from the front of the exhaust pipe (for details, see the relevant section in chapter Intake and exhaust system).
4. Unplug wiring harness connector at oil level and oil temperature sender -G266-.
5. Unscrew the fastening screw (1) from the coolant pipe holder as shown in the figure below.
6. Remove both fixing screws (3), shown in the figure below, remove the bottom protective sheet.
7. Loosen the oil pan screws crosswise and unscrew them.
8. Remove the oil pan; loosen it if necessary by lightly tapping it with a rubber mallet.
Attention. Protective gloves and goggles must be worn when working with seal remover and degreaser!
9. Use a chemical seal remover to remove sealant residues on the cylinder block and oil pan.
10. Degrease the sealing surfaces.

Installation
Note.
- Replace M6 oil pan screws.
- The oil pan must be installed within 5 minutes of applying the silicone sealant.
1. Cut off the tip with scissors (jet) tube on the front mark (∅ jet - approx. 3 mm), as shown in the figure below.
2. Silicone sealant should be applied to the clean sealing surface of the oil pan as shown. The caterpillar belt of the sealant must be 2...3 mm wide. In the areas of the screw holes, it must pass from the inside (arrows), as shown in the figure below.
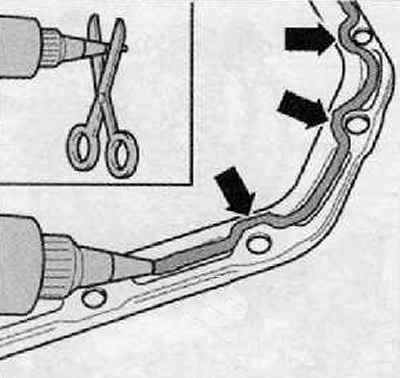
Note. It is impossible that the thickness of the layer of the caterpillar belt of the sealing agent exceeds the specified size, because the excess mastic that has come out can get into the oil pan and clog the mesh in the oil intake pipe.
3. Install the oil pan immediately and slightly tighten all the oil pan screws.
4. Tighten the oil pan screws to 13 Nm.
5. Tighten the fixing screws of the protective sheet on the gearbox with a torque of 40 Nm.
6. Further installation is carried out in the reverse order of removal.
Note. After installing the oil pan, the sealant must dry for approx. 30 minutes. Only then can the engine oil be filled.
7. Fill with engine oil.