
Note.
- Necessary special devices, control and measuring devices, as well as auxiliary means.
- Socket wrench -T10058-.
- A means to eliminate the sealing agent Gasket Stripper (storage code GST, position Nt R 34402). manufacturer Retech s.r.o.
- Cleaning and degreasing agent, e.g. -D 000 401 04-.
- Silicone sealant -D 176 600A1-.
Removing
1. Remove the lower casing of the engine compartment.
2. Drain engine oil.
3. Remove exhaust pipe (for details, see the relevant section in chapter Intake and exhaust system).
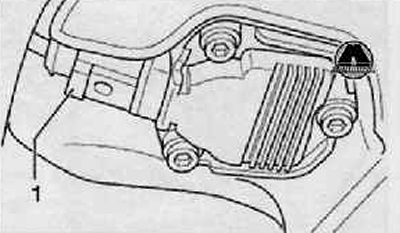
4. Disconnect wiring harness connector from oil level and oil temperature sender -G266- shown in figure below.
5. Remove the screws connecting the oil pan and gearbox.
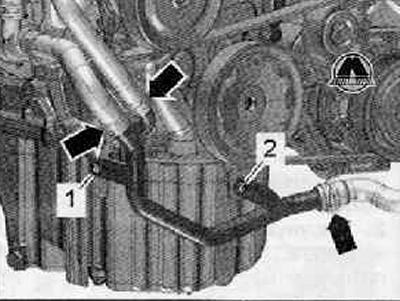
6. Unscrew the fastening screws (1) (8 Nm) And (2) (8 Nm), move aside the right pipe of the liquid cooling system towards the right.
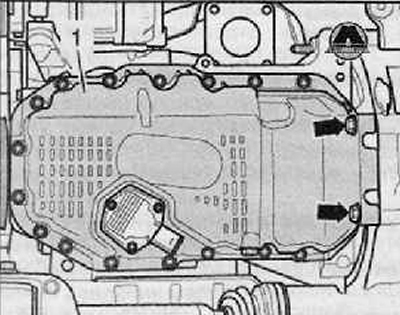
7. Unscrew the fastening screws connecting the oil pan and gearbox (arrows), as shown in the figure below.
8. Oil pan screws (1) should be loosened crosswise and unscrewed completely.
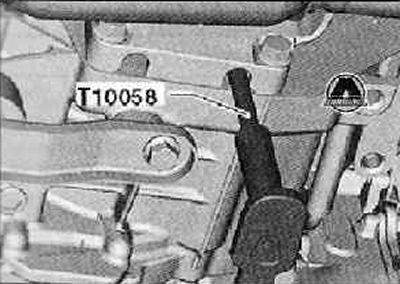
Note. Loosen screws on gearbox side with socket wrench -T10058-.
Note.
- Using a special tool (Т10058) unscrew the fixing screws on the gearbox side.
- It is possible that access to the mounting screws is blocked and it is not possible to install the key head. In this case, it is necessary to turn the crankshaft in the direction of its working rotation until access to the mounting screws is opened.
9. Remove the oil pan: if necessary, loosen it by lightly tapping it with a rubber mallet.
Attention. Protective gloves and goggles should be used when working with seal remover and degreaser.
10. Use a chemical seal remover to remove sealant residues on the cylinder block and oil pan.
11. Degrease the sealing surfaces.
Installation
Note.
- Replace M6 oil pan screws.
- Be guided by the period of application of the sealing agent.
- The oil pan must be installed within 5 minutes of applying the silicone sealant.
Attention. Be extremely careful not to damage the cylinder block.
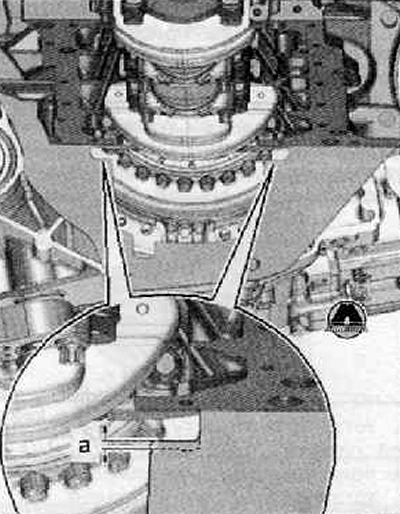
1. Move the intermediate plate located between the engine and gearbox by a distance «A», as shown in the figure below. Distance «A» = 5 mm.
2. Cut off the tip with scissors (jet) tube on the front mark (∅ jet - approx. 3 mm), as shown in the figure below.
3. Silicone sealant should be applied to the clean sealing surface of the oil pan as shown. The caterpillar belt of the sealing agent must have a thickness of 2-3 mm. In the screw hole areas must run on the inside (arrows), as shown in the figure below.
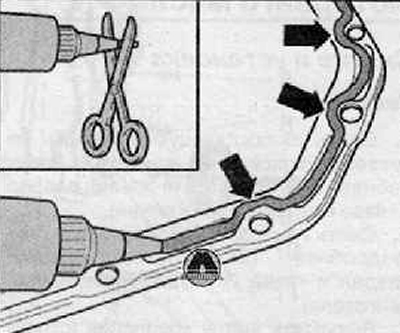
Note. It is impossible that the thickness of the layer of the caterpillar belt of the sealing agent exceeds the specified size, because the excess mastic that has come out can get into the oil pan and clog the mesh in the oil intake pipe.
4. Install the oil pan immediately and slightly tighten the two opposite oil pan screws
Note.
- When installing the oil pan on a remote engine, make sure that the oil pan on the flywheel side is matched to the cylinder block.
- Be careful when inserting the oil pan screws from the flywheel side. so that the screws go into the holes and not into the space between the cylinder block and the flywheel. If the screws were erroneously installed in the space between the cylinder block and the flywheel and could not be removed, the oil pan would have to be removed again, the sealing surfaces cleaned and silicone sealant applied.
5. Slightly tighten both M6 oil pan screws on the flywheel side.
6. Slightly tighten both M10 screws for securing the oil pan and gearbox.
7. Slightly tighten the remaining oil pan screws.
8. Tighten the oil pan screws. Screws M6: 13 Nm. M10 screws: 40 Nm.
Note. After installing the oil pan, the sealant must dry for approx. 30 minutes. Only then can the engine oil be refilled.