



Contents: Removal ⬇ Installation ⬇
Parking brake lever
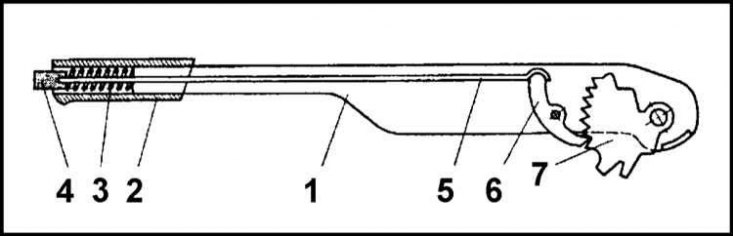
1 - Lever; 2 - Handle; 3 - Spring for releasing the lock; 4 - Lock release button; 5 - Lock release drive rod; 6 - Ratchet pawl of the locking mechanism; 7 - Ratchet mechanism toothed sector
Removal
1. To gain access to the parking brake control lever, remove the rear section of the center console. On models without a console, remove the lever trim cover. The lever design is shown in the illustration.
2. Loosen the locknuts completely, then loosen the adjusting nuts to provide maximum slack in both drive cables. Remove the cotter pin and release the equalizer plate from the lever.
3. Remove the pivot pin retaining ring. Remove the pin and remove the arm assembly from the vehicle.
Note: Worn ratchet components may be replaced individually.
Installation
1. Before installation, make sure the ratchet components are correctly positioned. Lightly lubricate the mechanism and the seat for the axle pin with a general-purpose grease.
2. Bring the lever to its regular place and insert the axle pin. Secure the pin with a locking ring, making sure it is seated correctly in its groove.
3. Attach the cable tension equalizer plate to the lever and secure it with a new cotter pin.
4. Adjust the parking brake drive (see section Adjusting the parking brake).