
Company vehicles Hyundai Company vehicles Kia Company vehicles Lada Company vehicles Mazda Company vehicles Mercedes-Benz Company vehicles Opel Company vehicles Mitsubishi
English Русский
Български
Беларускі
Український
Српски
Hrvatski
Română
Polski
Slovenský
Magyar
Articles   
Bookmark Contacts Sitemap
SkodaBook.ru


Fabia Rapid Octavia Superb Kodiaq Yeti Others
Favorit (1987-1994) Felicia (1994-2001)

Removal, checking and installation the vacuum booster valve with hose (Skoda Felicia)

  • Main
  • Skoda
  • Felicia (1994-2001)
  • Chassis (running gear)
  • Brake system
  • Removal, checking and installation the vacuum booster valve with hose
0
Contents: Removal ⬇ Examination ⬇ Installation ⬇

Removal


1. The check valve is built into the brake booster servo vacuum hose.
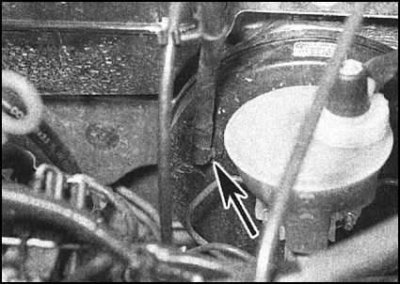
2. Carefully release the vacuum hose from the…


2. Carefully release the vacuum hose from the servo unit, remove the rubber grommet.
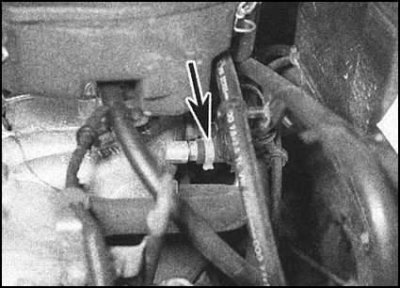
3. Working backwards along the hose, release it…


3. Working backwards along the hose, release it from all intermediate retainers, then release the clamp and disconnect the hose from the inlet manifold/vacuum pump. Remove the hose assembly from the engine compartment. Do not attempt to remove the valve from the hose.

Examination


1. Carefully inspect the valve with the hose for signs of mechanical damage. Replace if necessary. The valve can be checked for proper operation by blowing through it in both directions. Air should pass through the assembly only in one direction - from the vacuum booster side. Otherwise, the valve must be replaced.


2. Check the rubber valve bushing for damage and signs of material aging. Replace if necessary.

Installation


1. Installation is carried out in the reverse order. Make sure that the hose is laid correctly and that the fastening clamp is securely tightened.

2. Firmly seat the bushing into the servo unit and thread the vacuum hose end fitting through it (try not to damage the bushing).

3. Finally, start the engine and check the relevant components for signs of air leaks.

(Text obtained from the website: SkodaBook.ru)
This article is available at russian, bulgarian, belarusian, ukrainian, serbian, croatian, romanian, polish, slovak, hungarian
Article verified: Ekaterina Blinova
Share with friends:
◀ Previous
Skoda Felicia: Brake system
Next ►

Checking, removing and installing the brake booster
Removal and installation the foot brake pedal
Removal, repair and installation of the master brake cylinder (MBC)
Removal, repair and installation of rear brake wheel cylinders
Removal, repair and installation of front wheel brake calipers
Adjusting the parking brake
Removal and installation the parking brake lever
Removal and installation parking brake cables
Checking, removing and installing the pressure regulator valve in the rear…
Removal, installation and adjustment of the brake light switch sensor
Read similar articles on other Skoda models

➧ Checking the hydraulic valve lifters of 1.0 L and 1.4 L engines Skoda Fabia 1 (1999-2007)
➧ Disconnecting the brake pedal from the vacuum booster rod Skoda Rapid 1 (2012-2022)
➧ Vacuum System — Checking the Check Valve Skoda Octavia 3 (2013-2019)
➧ Removal and installation the vacuum pump and sensor G608, checking… Skoda Superb 2 (2008-2015)
➧ Vacuum booster assembly Skoda Kodiaq 1 (2016-2024)
➧ Removal and installation the vacuum pump and sensor G608, checking… Skoda Yeti (2009-2017)
Link to this article in various formats
Reviews and comments of visitors
No comments yet


Add two numbers: 43 + 25


Favorit (1987-1994) 
  • General information
  • Maintenance
  • Troubleshooting
  • Power unit
  • Engine in car
  • Engine overhaul
  • Cooling and heating
  • Fuel and exhaust system
  • Fuel injection system
  • Ignition system
  • Transmission
  • Clutch
  • Manual gearbox
  • Drive shafts
  • Chassis (running gear)
  • Brake system
  • Car suspension
  • Steering
  • Body and interior
  • Exterior (external elements)
  • Interior (salon)
  • Electrical equipment
  • Equipment and devices
  • Power devices
  • Electrical circuits
Felicia (1994-2001) 
  • General information
  • Introduction to guide
  • User manual
  • Maintenance (petrol)
  • Maintenance (diesel)
  • Power unit
  • Petrol engine 1.3 l
  • Petrol engine 1.6 l
  • Diesel engine
  • Engine overhaul
  • Cooling system
  • Fuel system (carburetor)
  • Central injection (SPFI)
  • Multipoint injection (MPFI)
  • Diesel power system
  • Decreased toxicity
  • Engine electrics
  • Transmission
  • Clutch
  • Car gearbox
  • Drive shafts
  • Chassis (running gear)
  • Brake system
  • Car suspension
  • Steering
  • Body and interior
  • Exterior (external elements)
  • Interior (salon)
  • Doors, locks and windows
  • Electrical equipment
  • Equipment and devices
  • Headlights and lighting
  • Electrical circuits
SkodaBook.ru © 2018–2026 | Mobile version | Articles on Skoda | Sitemap EN BG BY UA RS HR RO PL SK HU | Feedback | Site search | Bookmark
Fabia 1 (1999-2007) | Fabia 2 (2007-2014) | Rapid 1 (2012-2022) | Octavia 1 (1996-2004) | Octavia 3 (2013-2019) | Superb 2 (2008-2015) | Kodiaq 1 (2016-2024) | Yeti (2009-2017) | Favorit (1987-1994) | Felicia (1994-2001) |
By continuing to use the site, you agree to the use of cookies.