
Examination
1. To check the proper functioning of the vacuum brake booster, depress the foot brake pedal several times to release the vacuum, then, while holding the pedal down, start the engine. Almost immediately after starting the engine, as soon as the necessary vacuum is created in the intake manifold, the pedal should noticeably "fail". Let the engine idle for at least two minutes, then turn it off. Now, with each subsequent pressing, the pedal should move tighter and tighter with a simultaneous reduction in travel.
2. If the vacuum booster does not provide the mode of operation described above, first of all, check the condition of its control valve (see Section Removal, condition check and installation of the control valve of the vacuum amplifier of brakes with a hose).
3. If the control valve is OK, then there is an internal defect in the servo. Restorative repair of a failed vacuum booster is not possible, and therefore the faulty unit must be replaced.
Removing
Note. When assembling, new nuts for fastening the servo unit will be required.
1. Remove GTZ (see Section Removal, overhaul and installation of the main brake cylinder (GTZ)). On models with ABS, move the hydraulic modulator away from the servo box and secure it there, being careful not to overload the brake lines.
2. Carefully release the vacuum hose from the servo grommet. Check the condition of the bushing, replace the defective one.
3. On right-hand drive models, while working in the passenger footwell, remove the latch and trim cover from the left pedal assembly bracket.
Note. To release the latch, pull out its central part. Now release the carpet latches and fold back the edge of the carpet to expose the bottom pedal bracket nuts. Give nuts of fastening of the left arm. In the engine compartment, remove the mounting plate from the bulkhead.
4. On all models, remove the retainer and release from the foot brake pedal / pedal axle of the tip of the fastening rod of the pusher rod of the brake booster servo.
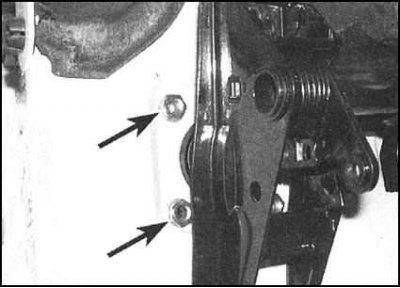
5. Loosen the servo block mounting nuts, remove the washers, then release the rubber protective boot with foam cover (if provided) from the back of the block.
Note. During assembly, the nuts must be replaced without fail.
6. Return to the engine compartment and remove the brake booster servo assembly from its location on the bulkhead. Remove the gasket along with the block. Check the condition of the gasket, in case of defects, replace. A failed amplifier cannot be repaired and must also be replaced.
Installation
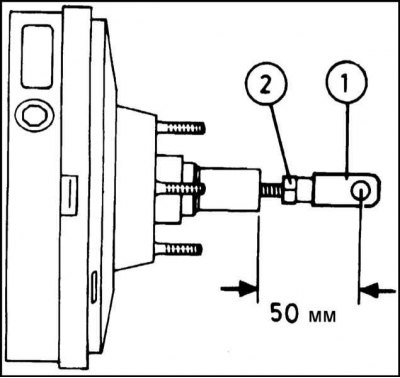
1. Before installing the block, make sure that the protrusion of the pusher rod of its piston is correct, if necessary, correct the position on the rod of the mounting tip accordingly. Don't forget to tighten the locknut when finished.
2. Thoroughly clean all mating surfaces, then install a new seal on the back of the servo assembly. Get the block to its regular place on the bulkhead of the engine compartment.
3. From inside the vehicle, install a foam sealing cover or protective cover on the back of the unit, then properly connect the pusher rod to the brake pedal/pedal shaft.
4. Install the washers, screw on the new block fastening nuts and tighten them to the required torque.
5. Align the stem tip with the pedal and secure with the retainer.
6. On right-hand drive models, have an assistant hold the bottom mounting plate and install the pedal assembly bracket mounting nuts until firmly tightened. Straighten the carpet and secure its edge with clamps.
7. In an impellent compartment check up reliability of landing in the block of a sealing through plug, then pass a vacuum hose in it.
8. Install the GTZ (see Section Removal, overhaul and installation of the main brake cylinder (GTZ)).
9. In conclusion, check the correct functioning of the brake system.