
Fuel filter components
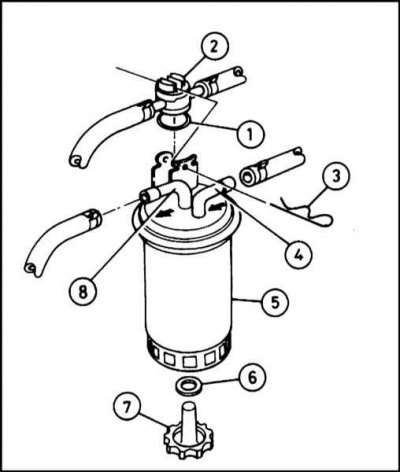
1 - O-ring; 2 - Control valve; 3 - R-shaped clip; 4 - Fitting; 5 - Fuel filter; 6 - Washer; 7 - Drain valve; 8 - Fitting
1. The fuel filter is installed on the right at the rear of the engine compartment.
2. Place a drain container under the filter, place a rag to collect spilled fuel.
3. Remove the R-clamp and remove the control valve from the top of the filter without disconnecting the fuel hoses.
4. Release the clamps and disconnect the fuel hoses from the filter fittings. If twist-type clamps are used to fasten the hoses, you will have to bite them with side cutters, and replace them with more practical screw or worm during assembly. Try to remember the order of connecting the hose in order to maintain the orientation of the replaceable filter in relation to the direction of fuel flow.
Attention! Be prepared to collect spilled fuel.

5. Using a wrench, remove the mounting bracket screw and remove the filter.
6. Fill the replacement filter with clean diesel fuel prior to installation to help ease the initial start of the engine. Place the filter in the mounting bracket and fix it firmly with the screw.
7. Put a new o-ring on the control valve and install the latter in its regular place on top of the fuel filter. Secure the valve with the R-clip.
8. Connect the fuel hoses to the filter (pay attention to the arrows on the filter housing near its fittings, indicating the correct direction of flow. Secure the hoses with new clamps. Remove the drain pan and rags. If removed, connect the air hose to the air cleaner and intake manifold.
9. Run the engine to idle and check the filter for signs of fuel leaks.
Note. Starting the engine may take a little longer than usual, due to the need to fill the tract cavities with fuel, especially if the new filter has not been previously filled.
10. Raise the rpm several times to 2000 per minute, immediately dropping back to idle. Make sure that there are no air bubbles in the fuel flow inside the translucent hose connected to the injection pump.