



Contents: Draining the cooling system ⬇ Flushing the cooling system ⬇ Filling the cooling system ⬇ Coolant layout ⬇
Draining the cooling system
Note. Wait until the engine has completely cooled down before proceeding with the procedure. Avoid contact with eyes, exposed areas of the body, or painted surfaces of body panels. Wash away accidental splashes immediately with plenty of water. Never leave antifreeze unattended in an open container - its sweet smell can easily attract the attention of children and animals. Remember that ingesting antifreeze can be fatal.
Models 1.3 l
1. After the engine has cooled down completely, firmly set the parking brake, then jack up the front of the car and place it on supports.
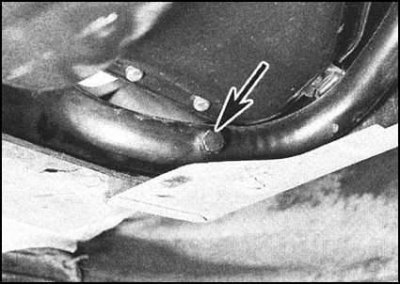
2. Remove the cap from the filler neck of the expansion tank (by turning the cap counterclockwise to the first stop, release the residual pressure in the system, then remove the cap completely). Place a collecting container under the drain plug screwed into the base of the metal tube running under the crankshaft pulley.
3. Unscrew the drain plug and drain the coolant into the prepared container.
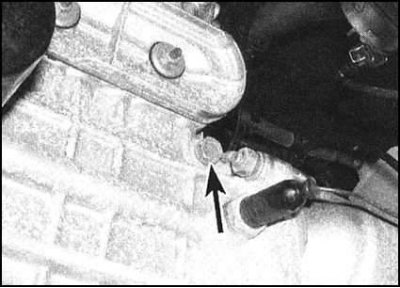
4. When the fluid stops leaking, move the container under the drain plug at the front left end of the cylinder block, directly under the oil pressure switch. Unscrew the plug and drain the remaining coolant into the container.
5. If the system is being drained for purposes other than replacing the coolant, check the condition of the coolant. Make sure that the drained coolant has not been in use for more than three years. If all is well, the coolant can be reused, although this manual does not recommend this practice. Have replacement sealing washers for the drain plugs available.
6. Clean the plug threads and put new sealing washers on them. Lightly lubricate the plugs with fresh sealant, then screw them into their regular places and tighten with the required force.
1.6L models
1. After the engine has cooled down completely, remove the cap from the filler neck of the expansion tank. Place a suitable drain container under the nipple of the lower radiator hose.
2. Loosen the mounting clamp, disconnect the lower hose from the radiator and drain the coolant into a prepared container.
3. If the system is drained for purposes other than replacing the coolant, check the condition of the coolant. Make sure that the drained coolant has not been in use for more than two years. If everything is in order, the fluid can be reused, although the authors of this Manual do not recommend this practice.
4. When the fluid stops leaking, reconnect the hose and secure it with a clamp.
Article published on the website: www.SKODABOOK.ru
Flushing the cooling system
1. If the regular replacement of the coolant is carried out carelessly, as well as in the case of strong dilution of the antifreeze as a result of frequent addition of plain water to the system, a gradual decrease in the efficiency of engine cooling occurs due to the deposition of scale and corrosion products on the walls of the channels and galleries of the system. Restoration of the original performance of the cooling system can be done by flushing it.
2. The radiator is flushed separately from the engine cooling system to avoid the risk of contamination of the entire system.
Radiator
1. Disconnect the upper and lower large-section hoses from the radiator, as well as all other hoses related to the operation of the cooling system (see Chapter Cooling and heating systems).
2. Insert a garden hose into the inlet of the upper hose on the radiator and turn on the water supply. Continue flushing until the water flowing out of the lower hose becomes completely transparent.
3. If the output stream is not clear, one of the many proprietary cleaning agents currently available should be used to flush the radiator. In cases of particularly severe contamination, the radiator should be removed from the vehicle and subjected to reverse flow flushing.
Engine block
1. Remove the thermostat (see Chapter Cooling and heating systems), then temporarily replace its cover.
2. Disconnect the upper and lower hoses from the radiator, thread a garden hose through the first end and apply water. Continue flushing until the stream flowing out of the lower hose becomes absolutely clean and transparent.
3. After completing the flushing, reinstall the thermostat and restore the original connection of the cooling system hoses (see Chapter Cooling and heating systems).
Filling the cooling system
Before you start filling the cooling system, make sure that all hoses related to its operation are in good condition and securely fastened to their fittings and pipes. Do not forget that the system must be filled with the required mixture of antifreeze and water at any time of the year. Otherwise, corrosion of the internal walls of the tract channels will begin to develop quickly.
Models 1.3 l
1. Make sure both drain plugs are tightly tightened.
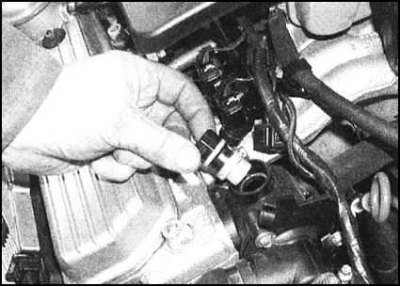
2. Lower the vehicle to the ground and remove the coolant temperature sensor (CTS) from the top of the thermostat housing (see Chapter Cooling and heating systems).
3. Remove the filler cap of the expansion tank and slowly begin pouring the mixture of the required composition (see below) into the tank, watching the thermostat housing. When the mixture free of air bubbles begins to flow out through the hole for installing the CTS, screw the sensor back into place.
4. Having installed the CTS in place, continue pouring the mixture until its level in the expansion tank rises to the MAX mark on the translucent wall of the latter.
5. Replace the filler cap and tighten it securely.
6. Start the engine and warm it up to normal operating temperature (the cooling system fan should turn on and off again).
7. Turn off the engine, let it cool down, then check the coolant level in the expansion tank again. Adjust if necessary.
1.6L models
1. Make sure the lower radiator hose is in good condition and securely fastened to your fitting. Remove the expansion tank filler cap.
2. Remove the filler cap of the expansion tank and slowly pour the mixture of the required composition into the neck until its level in the expansion tank rises to the MAX mark on the translucent wall of the latter.
3. Replace the filler cap and tighten it securely.
4. Start the engine and warm it up to normal operating temperature (the cooling system fan should turn on and off again).
5. Turn off the engine, let it cool down, then check the coolant level in the expansion tank again. Adjust if necessary.
Coolant layout
1. The coolant must be replaced in accordance with the vehicle's routine maintenance schedule (see above). Only regular antifreeze replacement can minimize corrosion of the cooling system and ensure the required frost resistance of the mixture in winter.
2. Use only ethylene glycol-based antifreeze for the mixture, which is best suited for filling automotive cooling systems whose tract consists of dissimilar metals. The requirements for the mixture composition, depending on the required level of protection, are given in Specifications.
3. Before starting to fill, the system must be completely emptied, preferably flushed, and the condition and reliability of all cooling system hoses must be carefully checked.
4. After filling the system, attach a label to the neck of the expansion tank with the date of filling and the composition of the mixture added. For all subsequent adjustments to the level, only the mixture of the same composition as indicated on the information label should be added to the system.
5. Never use antifreeze intended for use in the cooling system as a frost-resistant additive to windshield washer fluid - this practice will inevitably lead to damage to the paintwork of the body panels.