



Contents: Removal ⬇ Installation ⬇
Removal
Note: The gearbox assembly must first be removed (for more details, see the relevant section in the chapter "Manual transmission/Automatic transmission").
1. Remove the lower part of the oil pan (for more details, see the relevant section in this chapter).
2. Remove the crankshaft rear flange sealing cuff.
3. Remove the oil pump assembly (for more details, see the relevant section in this chapter).
4. Disconnect the wiring harness connector (1) shown in the figure below.
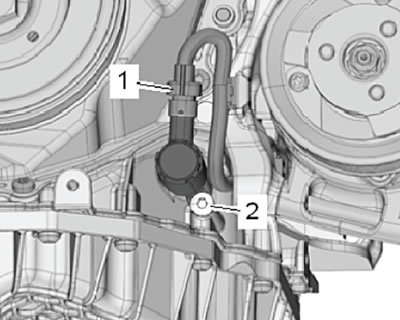
5. Unscrew the mounting screws (arrows) shown in the figure below.
6. Using a flat putty knife, cut through the sealant between the lower timing chain cover and the top of the oil pan.
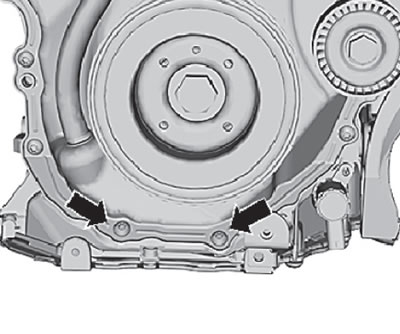
7. Unscrew the mounting bolts in the sequence shown in the figure below, then remove the upper part of the oil pan assembly. If necessary, you can use a rubber hammer to pry the oil pan away from the engine crankcase.
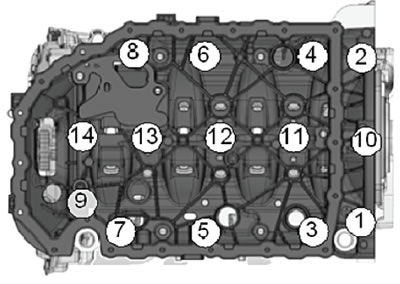
Important: First, you need to remove the oil pan from the transmission side. When removing the top of the oil pan, be careful not to damage the lower timing chain cover.
Installation
Note:
- Replace the mounting bolts, which must be tightened additionally to a certain angle. Always replace gaskets, sealing rings and self-locking nuts after disassembly.
- Check the manufacturing date of the sealant.
- The top of the oil pan must be installed within 5 minutes of applying the sealant.
- Always replace gaskets, sealing rings and self-locking nuts after disassembly.
Caution: Wear safety glasses and gloves before starting work.
1. Remove any remaining old sealant from the mating surfaces on the cylinder block, top of the oil pan and bottom of the oil pan using a suitable solvent.
Note: Check the lower timing chain cover for deformation. To do this, you need to install the top of the oil pan on the engine, only without the gasket, and measure the gap between the top of the oil pan and the cover. If it is possible to visually determine that the upper part of the oil pan is deformed and does not fit tightly against the timing chain cover, the cover must be replaced after installing the upper part of the oil pan.
2. Wash all mating surfaces. Then dry and degrease.
3. Check the oil passages in the upper part of the oil pan and in the engine crankcase for blockages.
4. Cut the end of the dispenser on the tube to form a hole with a diameter of 2 mm.
5. Apply a bead of sealant to the clean surface of the top of the oil pan, as shown in the figure below (arrow). The diameter of the bead should be 2-3 mm.
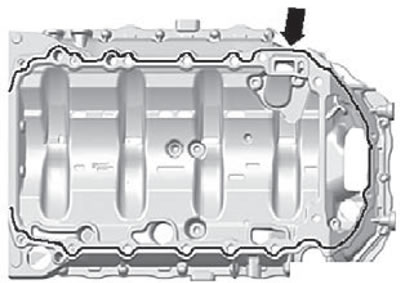
6. Apply silicone sealant as shown in the figure below (arrows) to the mating surface between the cylinder block and the top of the oil pan for the timing chain cover.
Attention:
- The top of the oil pan must be installed within 5 minutes of applying the sealant.
- The diameter of the sealant bead must not exceed the specified size range, otherwise excess sealant may enter the oil pan and clog the oil passages.
- First of all, it is necessary to install the upper part of the oil pan from the gearbox side.
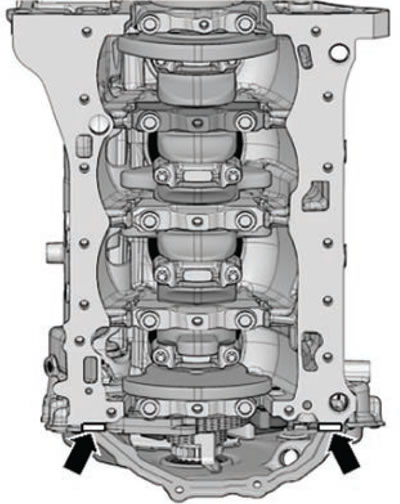
7. Install the oil pan onto the engine crankcase, pressing it evenly against the crankcase. Tighten the oil pan upper mounting bolts to the required torque.
8. Install and tighten the mounting bolts (arrows) shown in the figure in two steps.
- first approach: tighten the mounting bolts to a torque of 8 Nm.
- second approach: tighten the mounting bolts, turning them an additional 90°.
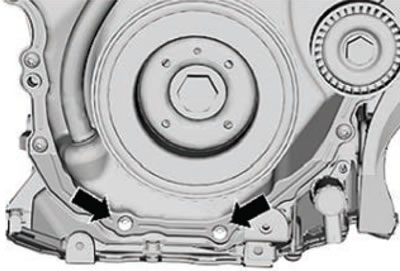
9. Install the crankshaft rear oil seal housing.
10. Install the oil pump (for more details, see the relevant section in this chapter).
11. Install a new oil deflector plate, install and tighten its mounting bolts to the required tightening torque.
12. Install the lower part of the oil pan (for more details, see the relevant section in this chapter).
13. Further installation is carried out in the reverse order of removal.
14. Fill the lubrication system with fresh engine oil.