
Company vehicles Hyundai Company vehicles Kia Company vehicles Lada Company vehicles Mazda Company vehicles Mercedes-Benz Company vehicles Opel Company vehicles Mitsubishi
English Русский
Български
Беларускі
Український
Српски
Hrvatski
Română
Polski
Slovenský
Magyar
Articles   
Bookmark Contacts Sitemap
SkodaBook.ru


Fabia Rapid Octavia Superb Kodiaq Yeti Others
Octavia 1 (1996-2004) Octavia 3 (2013-2019)

Removal and installation the bearing unit (Skoda Octavia 5E)

  • Main
  • Octavia
  • 5E (2013-2019)
  • Chassis (running gear)
  • Front suspension
  • Removal and installation the bearing unit
0
Remove the bolt securing the drive shaft to the hub.

Note: If the drive shaft mounting bolt is unscrewed more than 90°, the wheel bearing must not be loaded with the weight of the vehicle, i.e. the vehicle must not stand on the wheels. If the wheel bearing is loaded with the weight of the vehicle when the drive shaft mounting bolt is unscrewed, the inner bearing will be damaged, which will reduce its service life. If the vehicle must be mounted on wheels or moved, the following must be observed: install the outer joint instead of the joint shaft. Tighten the mounting bolt (use old) outer CV joint with a torque of 120 Nm.


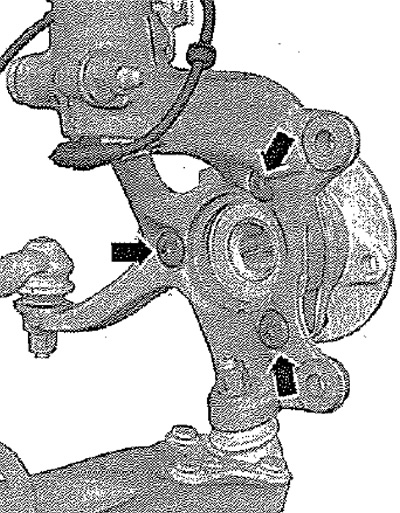
Remove the wheel. Remove the bracket with the brake caliper and tie it to the body with wire. Remove the speed sensor for the ABS system. Remove the brake disc. On a car with an automatic headlight range control, unscrew the "1" connector of the left front ground clearance sensor "G78". Unscrew the "arrow" mounting nuts. Press out the ball joint from the wishbone. Push the drive shaft out of the hub and secure it, for example, by tying it to the body with wire. Screw the ball joint back to the wishbone. Unscrew the "arrow" bolts. Remove the wheel bearing from the steering knuckle.
Remove the wheel. Remove the bracket with the…


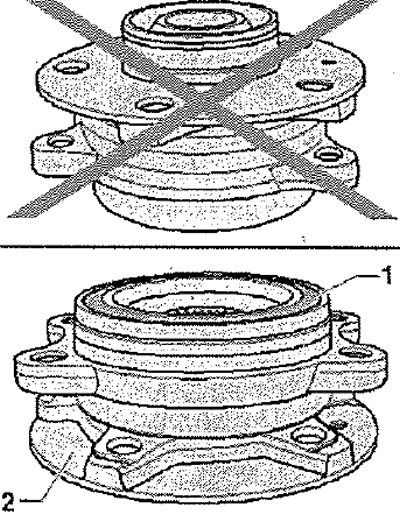
Caution! Avoid contamination and damage to the seal during work and storage.


View the original on the website skodabook.ru

Bearing "1" should be stored facing upwards. The hub with the bearing should always be placed on hub "2".
Bearing «1» should be stored facing upwards. The…


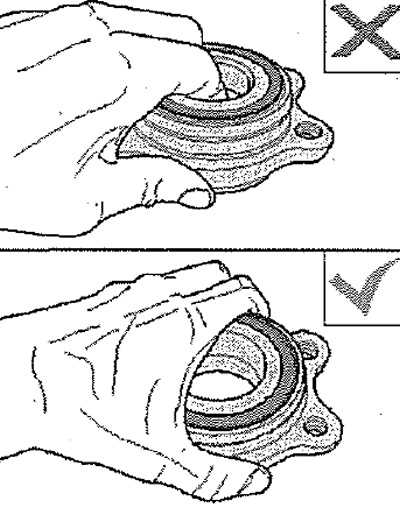
Do not handle the bearing by the inner race. Remove the bearing from the packaging, always laying it on the outer side.
Do not handle the bearing by the inner race.…


Installation


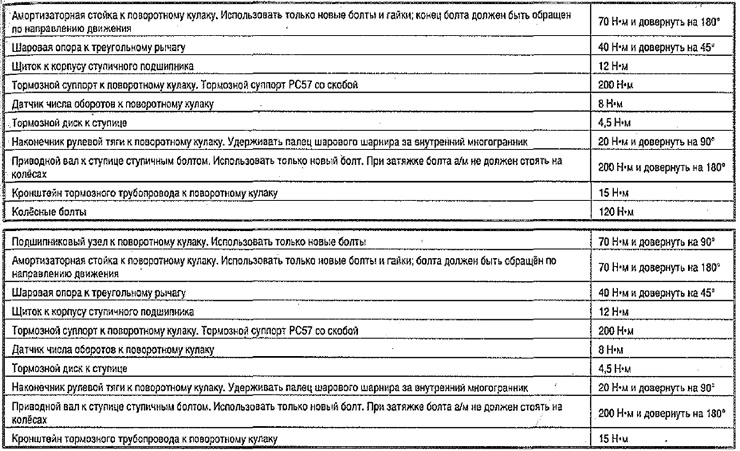
Installation in reverse order. Tighten the drive shaft to hub mounting bolt. After replacing the steering knuckle, it is necessary to adjust the wheel alignment angles.
Installation in reverse order. Tighten the drive…
This article is available at russian, bulgarian, belarusian, ukrainian, serbian, croatian, romanian, polish, slovak, hungarian
Article verified: Anatoly Ovchinnikov
Share with friends:
◀ Previous
Skoda Octavia 3: Front suspension
Next ►

Removal and installation the steering knuckle
Removal and installation the drive shaft mounting bolt
Steering knuckle — design description
Removal and installation the stabilizer bar
Removal and installation the subframe with steering gear
Shock absorber strut — design description
Shock absorber strut — removal and installation
Triangular lever — design description
Removal and installation the triangular lever
Removal and installation the ball joint
Read similar articles on other Skoda models

➧ Pump unit — inspection and replacement Skoda Fabia 1 (1999-2007)
➧ Manual Air Conditioner — Adjusting the Unit Skoda Rapid 1 (2012-2022)
➧ Features of major engine repair, replacement of needle bearing and… Skoda Superb 2 (2008-2015)
➧ Removal and installation the wheel hub bearing unit Skoda Kodiaq 1 (2016-2024)
➧ Features of major engine repair, replacement of needle bearing and… Skoda Yeti (2009-2017)
➧ Checking the vacuum booster unit Skoda Favorit (1987-1994)
Link to this article in various formats
Reviews and comments of visitors
No comments yet


Add two numbers: 37 + 12


Octavia 3 (2013-2019) 
  • General information
  • User manual
  • Car driving
  • Maintenance
  • Petrol engines 1.2 l
  • Engine repair
  • Cooling system
  • Supply system
  • Petrol engines 1.4 l
  • Engine repair
  • Supply system
  • Petrol engines 1.8/2.0 l
  • Engine repair
  • Cooling system
  • Supply system
  • Diesel engines 1.6/2.0 l
  • Engine repair
  • Cooling system
  • Supply system
  • Transmission
  • Mechanical gearbox 02S
  • Automatic gearbox 0CW
  • Automatic gearbox 0D9
  • Chassis (running gear)
  • Front suspension
  • Rear suspension
  • Brake system
  • Steering
  • Body and interior
  • Doors, locks and windows
  • Exterior (external elements)
  • Interior (internal elements)
  • Ventilation and air conditioning
  • Electrical equipment
  • Equipment and devices
  • Headlights and lighting
  • Wiring diagrams (basic)
  • Wiring diagrams (comfort)
Octavia 1 (1996-2004) 
  • General information
  • Vehicle details
  • Maintenance
  • Power unit
  • Petrol engines 1.6 l AEE
  • Petrol engines 1.8 l AGN
  • Diesel engines 1.9 l AGR
  • Fuel system
  • Exhaust system
  • Cooling system
  • Transmission
  • Clutch
  • Car gearbox
  • Gearbox repair 02J
  • Gearbox repair 02K
  • Chassis (running gear)
  • Wheels and tires
  • Suspension and axles
  • Brake system
  • Body and interior
  • Exterior (external elements)
  • Interior (internal elements)
  • Doors, locks and windows
  • Electrical equipment
  • Equipment and devices
  • Electrical circuits
SkodaBook.ru © 2018–2026 | Mobile version | Articles on Skoda | Sitemap EN BG BY UA RS HR RO PL SK HU | Feedback | Site search | Bookmark
Fabia 1 (1999-2007) | Fabia 2 (2007-2014) | Rapid 1 (2012-2022) | Octavia 1 (1996-2004) | Octavia 3 (2013-2019) | Superb 2 (2008-2015) | Kodiaq 1 (2016-2024) | Yeti (2009-2017) | Favorit (1987-1994) | Felicia (1994-2001) |
By continuing to use the site, you agree to the use of cookies.