
Company vehicles Hyundai Company vehicles Kia Company vehicles Lada Company vehicles Mazda Company vehicles Mercedes-Benz Company vehicles Opel Company vehicles Mitsubishi
English Русский
Български
Беларускі
Український
Српски
Hrvatski
Română
Polski
Slovenský
Magyar
Articles   
Bookmark Contacts Sitemap
SkodaBook.ru


Fabia Rapid Octavia Superb Kodiaq Yeti Others
Octavia 1 (1996-2004) Octavia 3 (2013-2019)

Setting/adjusting valve timing (Skoda Octavia 5E)

  • Main
  • Octavia
  • 5E (2013-2019)
  • Petrol engines 1.2 l
  • Engine repair
  • Setting/adjusting valve timing
0
Note: Replace the screws that are tightened to the specified angle. If the sealing ring of the threaded plug is damaged, replace the sealing ring.


Check the TDC position of the camshaft and crankshaft. Install the camshaft locking tool "T10494" on the camshaft housing.

Caution! Risk of damage to camshafts. Do not use the "T10494" camshaft locking tool as a stop.


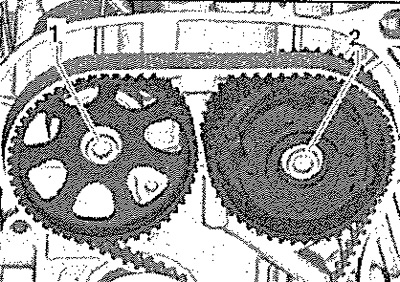
The locking bolt "T10340" is screwed into the cylinder block until it stops and tightened to a torque of 30 Nm. The crankshaft is turned forward until it touches the locking screw "T10340" = the "TDC" position. Screw in new screws -1, 2- of the camshaft pulleys by hand. The camshaft pulleys should still turn on the camshafts, but should not wobble.
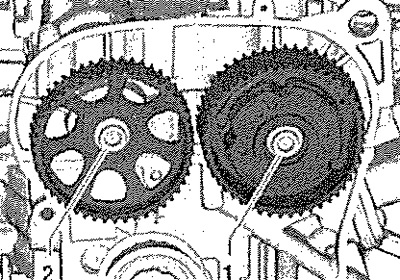
The locking bolt «T10340» is screwed into the…


The projection of the tension roller "arrow" must enter the cast recess of the cylinder head.
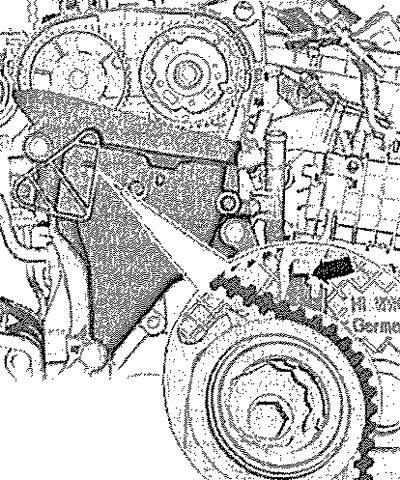
The projection of the tension roller «arrow» must…


When installing/reeving the toothed belt, observe the correct sequence. Lift the toothed belt up and install it on the guide roller "1" and tension roller "2", and then on the camshaft pulleys "3" and "4".
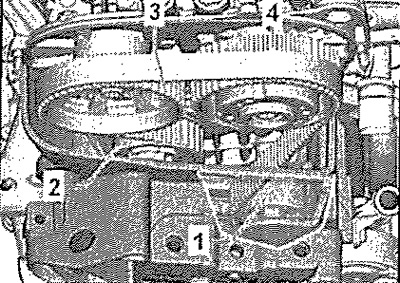


When installing/reeving the toothed belt, observe…


Turn the eccentric "2" of the tension roller with the key "T10499" in the direction of the arrow - so much so that the arrow "3" goes approximately 10 mm to the right beyond the notch. Turn the eccentric back so much so that the arrow is exactly opposite the notch.

Caution! Use the torque wrench "VAS 6583" to tighten! When setting the tightening torque on the torque wrench -UAZ 6583-, it is necessary to enter the length parameter specified on the "T10500" attachment!


Holding the eccentric in this position, tighten bolt "1" to 25 Nm. To do this, use the "T10500" attachment on the "VAS 6583" torque wrench.

Note: Later, after turning the crankshaft or starting the engine, there may be slight deviations of the arrow "3" from the position opposite the notch. This is normal and does not have a negative effect on the tension of the toothed belt.
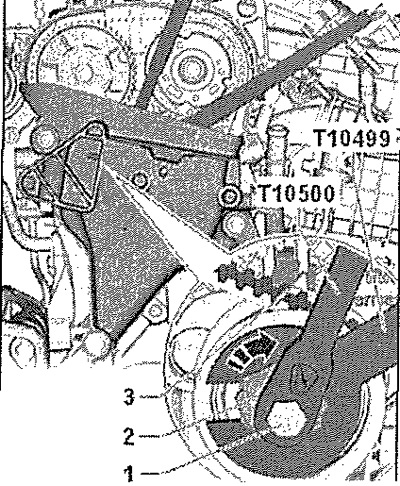

Note: Later, after turning the crankshaft or…


Tighten screws -1, 2- with a preliminary torque of 50 Nm, using the stopper "T10172" with adapters -110172/1- and "T10172/2". Unscrew the stop bolt "T10340". Unscrew the screw "arrow" and remove the camshaft lock "T10494".


Checking the installation of the timing phases


Turn the crankshaft 2 revolutions in the direction of engine rotation. Screw the locking bolt "T10340" into the cylinder block until it stops and tighten to a torque of 30 Nm. Turn the crankshaft further in the direction of engine rotation until it stops. The counterweight of the crankshaft is now adjacent to the locking bolt.

Note: The locking bolt "T10340" locks the crankshaft only in the working direction of rotation. The camshaft lock "T10494" must be easy to insert. The camshaft lock must not be installed with an impact tool.


Insert the "T10494" locking tool into the camshafts until it stops and tighten the "arrow" screw by hand. If the "T10494" camshaft locking tool cannot be inserted, the valve timing is not correct: repeat the valve timing adjustment. If the camshaft locking tool can be repositioned, the valve timing is correct. Unscrew the "T10340" locking bolt. Unscrew the "arrow" screw and remove the "T10494" camshaft locking tool. Tighten bolts -1, 2- to the final tightening torque, using the "T10172" stop with the "T10172/1" and -710172/2- adapters.
Insert the «T10494» locking tool into the…


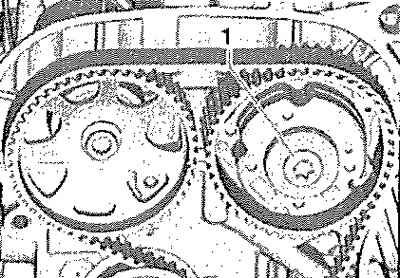
Tighten the threaded plug "1" to a torque of 20 Nm, using the stop "T10172" with the adapter "T10172/1".


Caution! Risk of engine damage. After completing the work, be sure to ensure that the locking bolt "T10340" and the camshaft lock "T10494" are not left on the engine.

Caution! Risk of engine damage. After completing…


Installation in reverse order.
This article is available at russian, bulgarian, belarusian, ukrainian, serbian, croatian, romanian, polish, slovak, hungarian
Article verified: Anatoly Ovchinnikov
Share with friends:
◀ Previous
Skoda Octavia 3: Engine repair
Next ►

Removal the timing belt from the camshaft
Checking the valve timing
Toothed belt drive — parts and components
Compression check
Removal and installation the camshaft housing
Removal and installation the timing belt
Timing Belt Installation/Adjustment
Valve mechanism parts and components
Removal and installation cuff seals
Removal and installation oil seals with the cylinder head installed
Read similar articles on other Skoda models

➧ Adjusting the initial position of the hydraulic valve lifters Skoda Fabia 1 (1999-2007)
➧ Variable valve timing (1.4 TSI engine) Skoda Rapid 1 (2012-2022)
➧ Checking and adjusting the timing phases (setting TDC) Skoda Superb 2 (2008-2015)
➧ Upper timing chain cover Skoda Kodiaq 1 (2016-2024)
➧ Checking and adjusting the timing phases (setting TDC) Skoda Yeti (2009-2017)
➧ Adjusting valve clearance Skoda Favorit (1987-1994)
Link to this article in various formats
Reviews and comments of visitors
No comments yet


Add two numbers: 13 + 42


Octavia 3 (2013-2019) 
  • General information
  • User manual
  • Car driving
  • Maintenance
  • Petrol engines 1.2 l
  • Engine repair
  • Cooling system
  • Supply system
  • Petrol engines 1.4 l
  • Engine repair
  • Supply system
  • Petrol engines 1.8/2.0 l
  • Engine repair
  • Cooling system
  • Supply system
  • Diesel engines 1.6/2.0 l
  • Engine repair
  • Cooling system
  • Supply system
  • Transmission
  • Mechanical gearbox 02S
  • Automatic gearbox 0CW
  • Automatic gearbox 0D9
  • Chassis (running gear)
  • Front suspension
  • Rear suspension
  • Brake system
  • Steering
  • Body and interior
  • Doors, locks and windows
  • Exterior (external elements)
  • Interior (internal elements)
  • Ventilation and air conditioning
  • Electrical equipment
  • Equipment and devices
  • Headlights and lighting
  • Wiring diagrams (basic)
  • Wiring diagrams (comfort)
Octavia 1 (1996-2004) 
  • General information
  • Vehicle details
  • Maintenance
  • Power unit
  • Petrol engines 1.6 l AEE
  • Petrol engines 1.8 l AGN
  • Diesel engines 1.9 l AGR
  • Fuel system
  • Exhaust system
  • Cooling system
  • Transmission
  • Clutch
  • Car gearbox
  • Gearbox repair 02J
  • Gearbox repair 02K
  • Chassis (running gear)
  • Wheels and tires
  • Suspension and axles
  • Brake system
  • Body and interior
  • Exterior (external elements)
  • Interior (internal elements)
  • Doors, locks and windows
  • Electrical equipment
  • Equipment and devices
  • Electrical circuits
SkodaBook.ru © 2018–2026 | Mobile version | Articles on Skoda | Sitemap EN BG BY UA RS HR RO PL SK HU | Feedback | Site search | Bookmark
Fabia 1 (1999-2007) | Fabia 2 (2007-2014) | Rapid 1 (2012-2022) | Octavia 1 (1996-2004) | Octavia 3 (2013-2019) | Superb 2 (2008-2015) | Kodiaq 1 (2016-2024) | Yeti (2009-2017) | Favorit (1987-1994) | Felicia (1994-2001) |
By continuing to use the site, you agree to the use of cookies.