
Removing
Note. When working on the power supply system, safety precautions must be observed.
1. Remove the top decorative engine cover.
2. If present, the soundproofing on the fuel injectors should be removed.
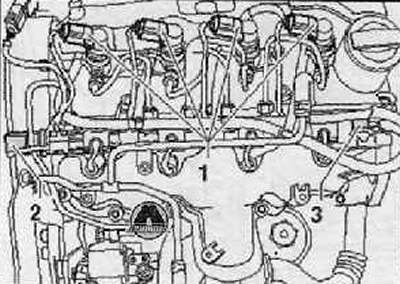
3. Disconnect the wiring harness connector (1) from the fuel injectors to be removed, as shown in the figure below.
Note.
- The preferred sequence for loosening the high pressure lines on cylinders is 4-3-2-1.
- During loosening, hold the high pressure pipe connection on the fuel injectors.
4. Remove the pressure line between the fuel dispenser and fuel injector pairs.
5. Remove the high pressure fuel line between the high pressure pump and the fuel rail.
6. Loosen the fuel return connections using a screwdriver and pliers as shown in the figure below.
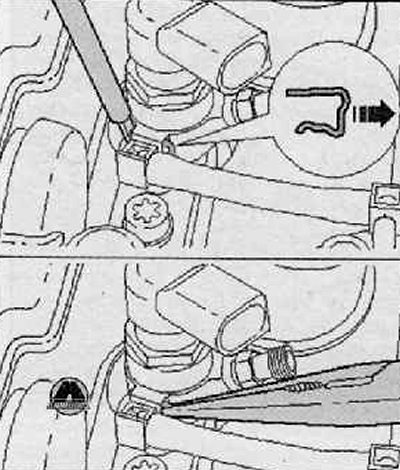
7. Disconnect the fuel return line connections on the fuel injectors towards (arrows), as shown in the figure below.
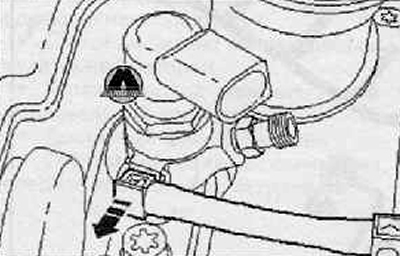
8. Unscrew the fixing screw.
Attention. Be very careful to prevent unnecessary assembly work or subsequent damage.
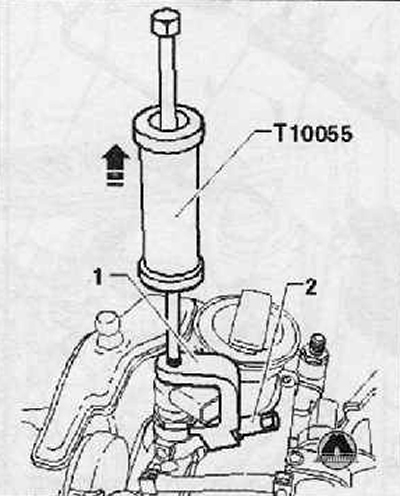
9. Fitting puller -T10055- with puller -T10402- (1) And (2), as shown in the figure below, remove the fuel injectors by tapping upwards.
Installation
Note.
- List of components and seals or O-rings to be replaced:
- Clamping bar.
- Clamp screw.
- Copper sealing washer.
- O-ring for cylinder head bore.
- O-ring for fuel return line.
- New fuel injector only: high pressure fuel line.
- During refitting, the fuel injectors and the high pressure fuel line in the cylinder head can only be used for the same cylinder.
- Before proceeding with installation, the cleanliness of the fuel injectors and assembly areas should be checked.
- The fuel injectors must not be damaged in any way.
- Lubricate all O-rings with engine oil before proceeding with installation.
When installing an already used fuel injector
1. Spray the tip of the fuel injector with an anti-rust spray. After about 5 minutes, remove soot or oil particles with a rag.
2. To remove the old copper seal from the fuel injector, carefully clamp the copper seal ring in a vise until it just stops turning. The high pressure fuel pump section should be pulled out with a slight hand twist from the copper o-ring.
Continued for all fuel injectors
3. Install a new copper o-ring with a plastic bushing.
4. To eliminate soot on the sealing surface of the fuel injector in the cylinder head, clean the hole with engine oil or with a rag moistened with rust solvent. Take care not to damage the sealing surfaces.
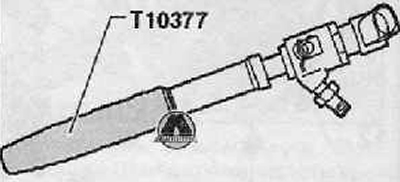
5. Replace the O-ring for the injector opening using assembly sleeve -T10377- as shown in the figure below.
Note.
- Before proceeding with the installation of the injector, the clamps must be installed. Lubricate them lightly with grease.
- Before proceeding with installation, make sure that the hole for the injector is clean.
6. Put the clamping bar on the fuel injectors, making sure that they are in the correct position for assembly.
7. Insert 2 injectors with clamping bar carefully into the injector holes in the cylinder head.

Attention.
- Be very careful to prevent unnecessary assembly work or subsequent damage.
- It is necessary to prevent damage to the injectors and their contact with the cylinder head.
- New mounting plate bolts are only tightened to the final torque after the high pressure pipes have been installed.
8. Tighten the new fixing screws first with maximum torque; 1-2 Nm.
9. Install high pressure pipes.
10. Tighten the fixing screws with a torque of 8 Nm + turn an additional 180° (½ turn).
11. Further installation is carried out similarly in the reverse order of actions.
Note. After replacing one or more pumping (plunger) sections must be entered in the engine control unit "injection quantity setting (IMA) " And "injection voltage setting (ISA) ".
12. Fill the power system.