



Note: Do not leave the lights on for a long time with the engine off, to avoid discharging the battery. Follow the legal regulations for the use of lighting devices. The automation of the external lighting is an auxiliary function and does not relieve the driver from the obligation to use the external lighting devices properly.
Note: In cold or damp weather, the headlights may temporarily fog up on the inside due to the temperature difference between the inside and outside of the headlight. After the headlights are turned on, the fogging disappears quickly or remains for some time at the edges. Fogging may also occur on the rear combination lights. Fogging is not a sign of a malfunction and does not affect the service life of the headlights.
The switch for the exterior lighting devices and the exterior lighting function is located to the left of the steering wheel (17 in illustration 12.1). If the switch is faulty, the low beam headlights are turned on.
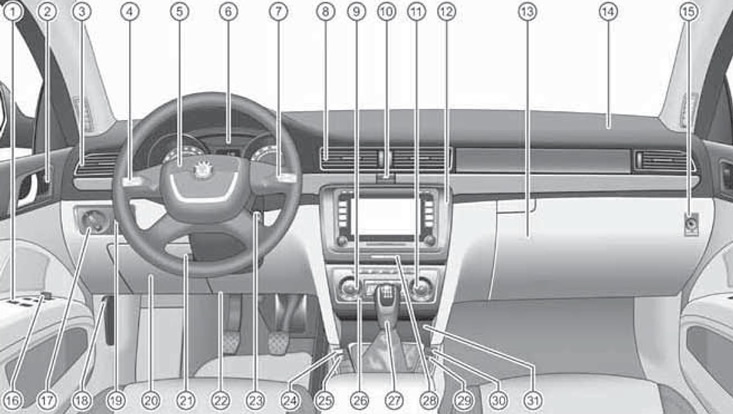
12.1 Location of controls
1 Electric window lifter control switches (see Section 5)
2 Single lock key (see Section 1)
3 Side deflectors of the climate system (see Section 14)
4 Left steering column switch
5 Steering wheel with horn switches, driver's front airbag (see Section 10), audio system/navigation system/phone control keys (see Section 15) and display control keys in the instrument cluster (see Section 13)
6 Instrument cluster (see Section 13)
7 Right steering column switch
8 Central air conditioning deflectors (see Section 14)
9 Driver's seat heating switch (see Section 9)
10 Hazard warning switch
11 Front passenger seat heating switch (see Section 9)
12 Audio/navigation system unit (see Section 15)
13 Main storage compartment
14 Front passenger front airbag (see Section 10)
15 Airbag switch 14 (see Section 10)
16 Switch for adjusting/heating/folding outside rearview mirrors (see Section 9)
17 Switch for external lighting devices and instrument lighting
18 Hood release handle (see Section 3)
19 Headlight range and instrument lighting brightness controls
20 Driver's storage compartment
21 Steering column adjustment lever (see Section 9)
22 Driver's knee airbag (see Section 10)
23 Ignition switch
24 ASR switch (see Section 24)
25 Tire inflation pressure monitoring system switch (see Section 19)
26 Climate control panel (see Section 14)
27 Transmission control lever (see Section 23)
28 K/L pillow condition 14 (see Section 8)
29 Parking autopilot switch (see Section 17)
30 Parking assistance switch (see Section 17)
31 Niche for small items or ashtray
If the driver's door is open, the key is removed from the ignition switch and the exterior lights are on (parking lights, side lights or low beam headlights), an audible signal sounds to warn of the possibility of a low battery. If the driver's door is then closed, the warning signal turns off and the parking lights continue to light.
[Information taken from this resource Skodabook.ru]
In the zero position of the switch ("O") with the ignition off, the exterior lighting is off, and with the ignition on, the daytime running light (DRL) is on. To turn the DRL lighting off/on again, within 3 seconds after turning on the ignition, pull the left steering column switch towards the steering wheel and simultaneously down or up (respectively), and hold it in this position for at least 3 seconds. On models with a multifunctional display in the instrument cluster, you can also turn off/on the DRL lighting via the menu "Settings>Lighting and overview". To implement the DRL function, separate lamps are provided in the fog lights. When the DRL is turned on, only these lamps and the instrument lighting light up (in some country variants, rear side lights are also included).
If there is a light sensor, there is an "AUTO" position to the right of the "0" position. In automatic mode, when the ignition is on, the "AUTO" position is illuminated, and the headlights turn on and off automatically depending on the light level (illumination is determined by a sensor in the support of the interior rear-view mirror). When the ignition is in the "AUTO" position, the DRL lighting is constantly on (see paragraph above). If the low beam headlights are automatically switched on, the position is additionally illuminated
 switch. In automatic mode, the headlights turn on regardless of the illumination if the speed exceeds 140 km/h for 10 seconds, and turn off if the speed does not exceed 65 km/h for two minutes. In addition, the parking lights and low beam headlights are automatically turned on if the windshield wipers operate for more than 10 seconds according to the rain sensor or for more than 15 seconds in continuous mode, and turn off if the windshield wipers do not operate for four minutes after that.
Note: The light sensor may not respond to rain or fog; do not stick any stickers on the windshield in front of the light sensor, so as not to disrupt the operation of the automatic system.
The side lights can be turned on regardless of the presence and position of the key in the ignition switch. To do this, turn the switch to the position
 . When the parking lights are switched on, in addition to the corresponding lamps in the headlights and rear combination lights, the number plate light and instrument light are switched on when the ignition is switched on.
To turn on the low beam headlights manually, turn the switch to the position
 with the ignition on. When the low beam is on, use the left steering column switch to switch to high beam (see the relevant subsection above). If the exterior lighting switch is left in the low beam position, only the parking lights remain on after the ignition is turned off, and after the key is removed from the ignition switch, the exterior lighting is turned off completely.
To turn on the fog lights (if available) pull the switch from the parking lights or low beam position towards you to the first fixed position. Switching on the fog lights is accompanied by the corresponding indicator in the instrument cluster.
If fog lights with static cornering light function are installed, their control (switching on the corresponding fog lamp lamp) is carried out depending on the angle of rotation of the steering wheel or on the inclusion of direction indicators, subject to the following conditions:
- the engine is running and the vehicle speed does not exceed 40 km/h;
- dRL lighting not on;
- low beam headlights are turned on manually or automatically;
- fog lights not on;
- reverse gear is not engaged.
The cornering light illuminates the area around the bend before the car turns. If you engage reverse gear with the cornering light function activated, both fog lights are switched on. If both options conflict, (for example, if the steering wheel is turned to the left and the right turn signals are on), direction indicators have priority.
To turn on the rear fog light, pull the switch from the parking light or low beam position towards you until it stops. When the rear fog light is turned on, the corresponding indicator in the instrument cluster comes on. When towing a trailer connected via a branded towing hitch, only the rear fog light on the trailer comes on.
To turn off the fog lights and rear fog lights, press the switch all the way down or turn it to the "0" position.
Some models have an Adaptive Headlight System (AFS) function that operates when the switch is in the AUTO position. AFS is activated when low light levels are detected and when Reverse or Touring mode is not engaged (see paragraph below). AFS allows you to adjust the range and width of the headlight beam, changing them automatically depending on the speed of the car and the operating mode of the headlight. In addition, the AFS function improves road illumination when turning, shifting the light beams of xenon headlights at speeds above 10 km / h (in addition to static cornering lighting). The following AFS modes are provided. The main mode is "country" - the shape of the light beam is close to the shape of the low beam. This mode is activated if the following modes are not activated. In the "rain" mode, the light beam is wider and its range is shorter in order to reduce the blinding effect of the headlights on oncoming drivers in bad weather (in rain). This mode is activated at a speed of 15-70 km / h, if the windshield wipers have worked continuously for more than 2 minutes. This mode is deactivated if the speed goes beyond the specified limits, or if the windshield wipers do not work for more than 8 minutes. In the "city" mode, the light beam in front of the car is wider and its range is shorter in order to illuminate nearby sidewalks, intersections, pedestrian crossings, etc. This mode is activated at a speed of 15-50 km / h. In the "highway" mode, the light beam of the headlight is expanded so much that it illuminates the left (and, accordingly, the right one) lane so that the driver can react to an obstacle or other danger in a timely manner. This mode is activated in stages, starting at a speed of 90 km/h. The greatest influence is established at a speed of over 120 km/h. In the event of a malfunction of the AFS function, the headlights are automatically set to an emergency position, preventing blinding oncoming drivers. At the same time, the illuminated section of the road is reduced.
When driving to a country where traffic is on the other side of the road, asymmetrical low beam headlights may blind oncoming drivers. Therefore, you should first switch the xenon headlights (via the "Settings → Tourist mode" menu on the instrument cluster display), or cover the halogen headlights with a special film of the appropriate shape. Upon leaving such a country, switch the headlights back or remove the film from them.
Function "Coming home" allows you to light the way home after leaving the car, leaving the side lights, low beam headlights, lamps in the outside mirrors and license plate lighting on for a while (depending on equipment). To use this function, set the exterior light switch to the "AUTO" position (to have the low beam headlights on), switch off the ignition, open the driver's door, exit the vehicle and lock it. The lighting turns off 10 seconds after all doors and the luggage compartment are closed. If any doors or the luggage compartment are left open, the lighting turns off 60 seconds after the ignition is switched off. The duration of the function "Coming home" can be changed via the menu of the multifunction display in the instrument cluster. Function "Coming home" controlled by a light sensor (is located in the support of the interior rearview mirror), therefore, if the illumination is above the set level, the function does not turn on.
Function "Leaving home" includes side lights, low beam headlights, lamps in outside mirrors and license plate lighting (depending on the configuration) when unlocking the vehicle's single lock, when the exterior lighting switch is in the "AUTO" position, and the light sensor detects darkness. The headlights turn off when the timer expires (standard - 10 seconds), or when locking the vehicle, or when the ignition is turned on. If no door is opened within 30 seconds after unlocking, the vehicle will be automatically locked and the lighting "Leaving home" will turn off. The duration of the function "Leaving home" can be changed via the menu of the multifunction display in the instrument cluster.