
Company vehicles Hyundai Company vehicles Kia Company vehicles Lada Company vehicles Mazda Company vehicles Mercedes-Benz Company vehicles Opel Company vehicles Mitsubishi
English Русский
Български
Беларускі
Український
Српски
Hrvatski
Română
Polski
Slovenský
Magyar
Articles   
Bookmark Contacts Sitemap
SkodaBook.ru


Fabia Rapid Octavia Superb Kodiaq Yeti Others
Octavia 1 (1996-2004) Octavia 3 (2013-2019)

Removal and installation the drive cable (Skoda Octavia 5E)

  • Main
  • Octavia
  • 5E (2013-2019)
  • Transmission
  • Automatic gearbox 0CW
  • Removal and installation the drive cable
0
Contents: Emergency release of the shift…⬇ Perform an emergency lockout ⬇ Replace the O-ring for the gear…⬇ Removal and installation the…⬇ Removal and installation the…⬇ Removal and installation the…⬇ Removal and installation of the…⬇ Checking the connectors in the…⬇
Filming is not allowed (disconnect) drive cable from the shift mechanism, it is replaced together with the shift mechanism as a single unit.

Emergency release of the shift mechanism from position "P"


The solenoid for locking the gearbox control lever "N110" locks the control lever in the "P" position. The control lever can then be switched from the "P" position only when the ignition is on or the engine is running, with the brake pedal depressed and the button on the control lever pressed. If there is a power failure in the selector lever lock magnet (Battery is discharged or faulty) or if the magnet is faulty, the selector lever does not shift from the "P" position; i.e. the car cannot be moved when the gearbox is locked when parked. In this case: Check the fuse. Check the battery voltage. If in this case the selector lever does not switch from the "P" position, it is necessary to emergency unlock the magnets. If the control lever is then moved back to the "P" position, it will again be locked in the "P" position.

Perform an emergency lockout


Remove the gearshift mechanism cover. Press the brake pedal or pull the parking brake lever. Press the yellow plastic wedge "A" in the "direction of arrow 1". Now press the button on the control lever handle and move the control lever "B" in the "direction of arrow 2" from the "P" position.
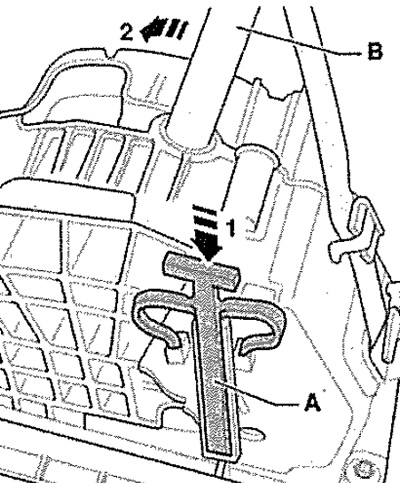


Remove the gearshift mechanism cover. Press the…


Note: If the control lever is then moved back to position "P", it will again be locked in this position.


Replace the O-ring for the gear shift rod


The gearshift rod sealing ring can only be replaced together with the gearshift lock cover,

Removal and installation the tiptronic switch "F189"


The tiptronic switch "F189" is integrated into the shift mechanism and cannot be replaced separately. If the tiptronic switch "F189" is faulty, the shift mechanism must be replaced.

Removal and installation the selector lever lock magnet "N110"


The selector lever lock magnet "N110" is integrated into the shift mechanism and cannot be replaced separately. If the selector lever lock magnet "N110" is defective, the shift mechanism must be replaced.

Removal and installation the selector lever lock switch in P "F319"


The selector lever lock switch in the "F319" is integrated into the shift mechanism and cannot be replaced separately. If the selector lever lock switch in position P "F319" is faulty, the shift mechanism must be replaced.

Removal and installation of the selector lever sensor ECU "J587"


The selector lever sensor control unit "J587" is integrated into the shift mechanism and cannot be replaced separately. If the selector lever sensor control unit "J587" is faulty, the shift mechanism must be replaced.


Checking the connectors in the switching mechanism


Before repairing or checking connectors, it is necessary to perform a troubleshooting using the "Guided Troubleshooting". Before checking connectors, it is necessary to check all ECUs of the car, if necessary, eliminate the faults. Check connectors.
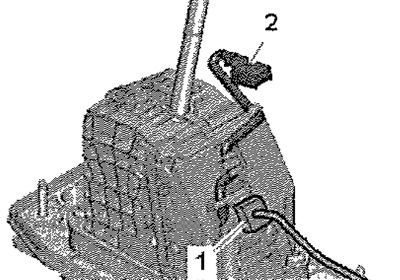
Before repairing or checking connectors, it is…


1. Electrical connector of the wiring harness from the gear shift mechanism to the gearbox (with CAN bus wire), to the selector lever lock solenoid "N110" and to the selector lever lock switch in position P "F319"

2. Connector of the selector lever position indicator "Y6".
This article is available at russian, bulgarian, belarusian, ukrainian, serbian, croatian, romanian, polish, slovak, hungarian
Article verified: Anatoly Ovchinnikov
Share with friends:
◀ Previous
Skoda Octavia 3: Automatic gearbox 0CW
Next ►

Removal and installation the shift mechanism
Removal and installation the selector lever handle
Removal and installation the gearshift housing
General assembly diagram — gear shift mechanism
Switching mechanism
Safety instructions for mechatronics for dual clutch transmission «J743»
General installation diagram — mechatronics for dual clutch gearbox «J743»
Removal the mechatronics for the dual clutch gearbox «J743» (gearbox…
Install mechatronics for dual clutch gearbox «J743» (gearbox installed)
Adjusting the gear shifter
Read similar articles on other Skoda models

➧ Replacing the alternator drive belt Skoda Fabia 1 (1999-2007)
➧ Attachment Drive Belt — 1.2L MPI Engine Skoda Rapid 1 (2012-2022)
➧ Replacement of brake fluid, bleeding of the brake system and clutch… Skoda Superb 2 (2008-2015)
➧ Maintenance — attachment drive belt Skoda Kodiaq 1 (2016-2024)
➧ Replacement of brake fluid, bleeding of the brake system and clutch… Skoda Yeti (2009-2017)
➧ Speedometer Drive Cable — Removal and Installation Skoda Favorit (1987-1994)
Link to this article in various formats
Reviews and comments of visitors
No comments yet


Add two numbers: 40 + 18


Octavia 3 (2013-2019) 
  • General information
  • User manual
  • Car driving
  • Maintenance
  • Petrol engines 1.2 l
  • Engine repair
  • Cooling system
  • Supply system
  • Petrol engines 1.4 l
  • Engine repair
  • Supply system
  • Petrol engines 1.8/2.0 l
  • Engine repair
  • Cooling system
  • Supply system
  • Diesel engines 1.6/2.0 l
  • Engine repair
  • Cooling system
  • Supply system
  • Transmission
  • Mechanical gearbox 02S
  • Automatic gearbox 0CW
  • Automatic gearbox 0D9
  • Chassis (running gear)
  • Front suspension
  • Rear suspension
  • Brake system
  • Steering
  • Body and interior
  • Doors, locks and windows
  • Exterior (external elements)
  • Interior (internal elements)
  • Ventilation and air conditioning
  • Electrical equipment
  • Equipment and devices
  • Headlights and lighting
  • Wiring diagrams (basic)
  • Wiring diagrams (comfort)
Octavia 1 (1996-2004) 
  • General information
  • Vehicle details
  • Maintenance
  • Power unit
  • Petrol engines 1.6 l AEE
  • Petrol engines 1.8 l AGN
  • Diesel engines 1.9 l AGR
  • Fuel system
  • Exhaust system
  • Cooling system
  • Transmission
  • Clutch
  • Car gearbox
  • Gearbox repair 02J
  • Gearbox repair 02K
  • Chassis (running gear)
  • Wheels and tires
  • Suspension and axles
  • Brake system
  • Body and interior
  • Exterior (external elements)
  • Interior (internal elements)
  • Doors, locks and windows
  • Electrical equipment
  • Equipment and devices
  • Electrical circuits
SkodaBook.ru © 2018–2026 | Mobile version | Articles on Skoda | Sitemap EN BG BY UA RS HR RO PL SK HU | Feedback | Site search | Bookmark
Fabia 1 (1999-2007) | Fabia 2 (2007-2014) | Rapid 1 (2012-2022) | Octavia 1 (1996-2004) | Octavia 3 (2013-2019) | Superb 2 (2008-2015) | Kodiaq 1 (2016-2024) | Yeti (2009-2017) | Favorit (1987-1994) | Felicia (1994-2001) |
By continuing to use the site, you agree to the use of cookies.