



Contents: General description ⬇ Check - General Description ⬇ Reverse toe-in on turns - checking…⬇ Alignment - checking and adjustment ⬇
General description
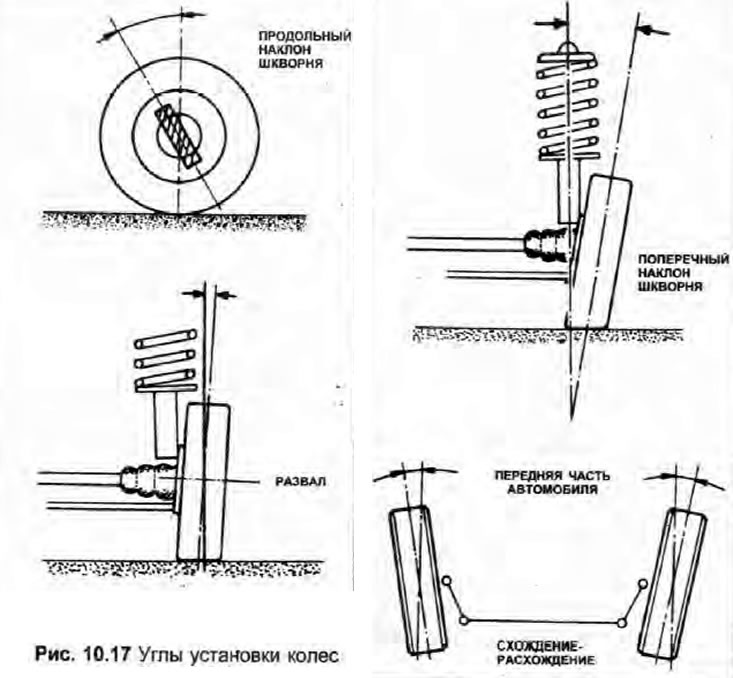
1. The geometry of the steering mechanism and suspension of the car is determined by five main parameters, all angles are expressed in degrees, the axis of the steering pin is defined as an imaginary line drawn through the centers of the upper mount of the front suspension strut and the ball joint of the lower arm to the ground.
2. Camber is the angle at which the wheels are turned relative to an imaginary vertical line drawn between the front or rear wheels. Positive camber is the angle (expressed in degrees), by which the upper part of the wheels is tilted from the vertical.
3. The camber is not adjustable and is provided for information only; but it can be checked with a special template. If the camber value is significantly different from the one specified by the manufacturer, contact a professional for an accurate check, the malfunction can only be caused by wear or damage to suspension or body components.
4. Kingpin caster - the angle between the kingpin axis and a vertical line drawn through the center of the wheel when viewed from the side of the vehicle. Positive kingpin caster - when the kingpin axis is tilted so that the wheel touches the ground just before the vertical; negative kingpin caster - when the wheel touches the ground behind the vertical.
5. The longitudinal inclination of the kingpin is not adjustable and is provided for information only; but it can be checked with a special template. If the value differs from the manufacturer's, contact a professional for an accurate check, the malfunction can only be caused by wear or damage to suspension or body components.
6. Kingpin inclination is the angle formed by the vertical and an imaginary line drawn through the upper and lower mounts of the front suspension strut.
7. The transverse inclination of the kingpin is not adjustable and is provided for information only.
8. Toe-in is the amount by which the distance between the inner edges of the front wheel rims differs from the distance between the inner edges of the rear wheel rims. If the distance between the front edges is smaller, then we speak of toe-in, and if it is larger, then we speak of divergence.
9. To adjust the toe-in of the front wheels, the transverse steering rods are screwed into the ball joints or unscrewed from them, thereby changing the overall length of the rod assemblies.
10. Rear wheel alignment is not adjustable and is provided for information only; this value can be checked as described below, and if the result obtained differs significantly from the one specified by the manufacturer, contact a professional for an accurate check, the malfunction can only be caused by wear or damage to the suspension or body components.
11. Toe-in is the difference between the turning angles of the inner and outer front wheels when they are turned through a certain angle.
12. The reverse toe-in on turns is set during the production of the car, and it is not possible to adjust it except by unevenly changing the length of the tie rods. Therefore, it is essential to check the equality of the length of the tie rods after adjusting the toe-in.
Check - General Description
13. Since precise instruments are required for measuring, it is recommended that the check be carried out by a Skoda dealer or a specialist with the necessary equipment.
14. For accurate measurement the vehicle must be at normal net weight (not loaded). Before starting work, check the tire sizes and types, then check the tire pressure and tread wear, the condition of the wheel bearings, the steering wheel play and the condition of the front suspension components (Section 1). Correct any faults found.
15. Park the car on a level place (not downhill). Make sure the front wheels are in the straight ahead position, then rock the front and rear of the car to ensure the suspension components are properly seated. Release the handbrake and roll the car backwards about 1 metre, then forwards again to relieve stress on the steering and suspension components.
Text taken from this website www.SKODABOOK.ru
Reverse toe-in on turns - checking and adjustment
16. The toe-in on turns can be checked using only a couple of special templates.
17. Prepare the car as described in steps 14 and 15 above. Roll the car backwards and make sure the front wheels are in the straight ahead position, then roll it forward onto the special templates so that the front wheels are centered on the plates.
18. Turn the steering wheel first in one direction until the outer wheel turns to the specified Specifications corner; record the steering angle of the inside wheel. Then turn the steering wheel back through the straight-ahead position and repeat the check on the other side.
19. If it turns out that the inner wheel is not turned to the specified Specifications angle, make sure both tie rods are the same length. If the length is different, adjust it, but this will affect the toe-in (see below) and the position of the steering wheel.
20. If the angles are incorrect, but the tie rods are the same length and the steering components are in good condition, then the front suspension components or bodywork are damaged. For a thorough check, contact a Skoda dealer or specialist as soon as possible.
Alignment - checking and adjustment
21. The following procedure applies to the front wheels only. As noted in point 10 above, although rear toe can be checked, it cannot be adjusted and any change will be caused by wear or damage to the suspension or body.
22 Toe-in can only be checked using a special template, measuring the distance between the inner edges of the wheels at the front and rear. Purchase a toe-in template, or make one from a piece of steel tubing, bend it to fit around the clutch housing and suspension, and attach a set screw and lock nut to the end.
23. Prepare the vehicle as described in points 14 and 15 above.
24. First measure the distance between the inner edges of the front wheel rims at the height of the hub center at the rear; call this quantity "A".
25. Roll the car forward so that the wheels turn exactly 180° (half a turn) and measure the distance again, but now at the height of the center of the hub at the front; call this quantity "B".
26. To ensure maximum accuracy, repeat the measurements three times at points on the wheel rims spaced 120° apart and calculate the average value.
27. To determine toe-in, subtract "B" from "A"; the result must be within the limits specified in Specifications permissible deviations.
28. If adjustment is necessary, jack up the front of the car and secure it on axle stands. First, clean the threads of the steering rods. Release the outer clamps of the rubber protective boots, lift the boots slightly and lubricate their edges so that they move freely and do not deform when the transverse steering rods rotate.
29. Using the edge of a ruler and a marking tool, mark the position of the rods relative to the ball joints, then hold the ball joint and loosen the lock nuts.
30. Change the length of both steering rods (by the same amount), by screwing them into the ball joints or vice versa by unscrewing them a quarter of a turn and checking the toe-in until you get the correct value; shortening of transverse steering rods (screwing into ball joints) will result in a decrease in toe-in and an increase in divergence when turning. If there is nothing to turn the tie rods with a wrench (see photo), turn them with a self-locking wrench.
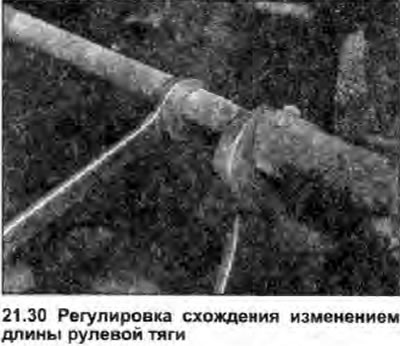
31. To keep the length of the tie rods equal, always rotate them in the same direction (if you look from the center of the car).
32. Once the toe is adjusted correctly, hold the ball joints and tighten the locknuts securely. Make sure the ball joints are seated correctly in the sockets and count the number of threads on the protruding parts to check the length of both tie rods. If the lengths are not the same, the adjustment is incorrect and the tires will wear when cornering; and the steering wheel will not be in the straight ahead position.
33. If the length of the steering rods is the same, lower the car to the ground and prepare it (points 14 and 15 above), and then check the alignment (points 24-27); if necessary, repeat the adjustment. If the alignment is correct, check that the rubber protective boots are correctly positioned and not distorted, then secure them with the clamps.