
Company vehicles Hyundai Company vehicles Kia Company vehicles Lada Company vehicles Mazda Company vehicles Mercedes-Benz Company vehicles Opel Company vehicles Mitsubishi
English Русский
Български
Беларускі
Український
Српски
Hrvatski
Română
Polski
Slovenský
Magyar
Articles   
Bookmark Contacts Sitemap
SkodaBook.ru


Fabia Rapid Octavia Superb Kodiaq Yeti Others
Favorit (1987-1994) Felicia (1994-2001)

Removal, condition check and installation of the flywheel (Skoda Felicia)

  • Main
  • Skoda
  • Felicia (1994-2001)
  • Power unit
  • Petrol engine 1.6 l
  • Removal, condition check and installation of the flywheel
0
Contents: General information ⬇ Removal ⬇ Examination ⬇ Installation ⬇

General information


The flywheel is made of steel and is equipped with a toothed rim. It is fastened to the crankshaft flange with six M10x1 bolts with TORX heads. The flywheel is designed for installation of a clutch assembly with a diameter of 190 mm. The bolt holes are located asymmetrically, which determines the uniqueness of the fit of the flywheel, the balancing of which is carried out in assembly with the crankshaft. The threaded part of the bolts is lubricated with a fixing sealant such as Loctite 574 or Loctite 270 during assembly.

When installing the ring gear on the flywheel, the latter must be heated to a temperature of 400°C.

Removal


1. Remove the gearbox (see Chapter Transmission) and clutch assembly (see Chapter Clutch).
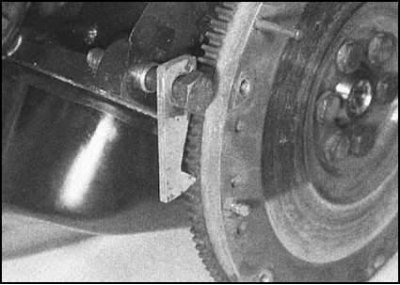
2. Using a retainer made from a thick metal plate…


2. Using a retainer made from a thick metal plate (see accompanying illustration) jam the flywheel ring gear, blocking the latter from turning while loosening its mounting bolts. Alternatively, the flywheel can be blocked using a metal plate bolted between it and the clutch dome. To avoid imbalance during assembly, mark the position of the flywheel relative to the end face of the crankshaft journal


3. Remove the mounting bolts and, with the help of an assistant, remove the heavy flywheel.

Examination


1. Check the condition of the flywheel surface mating with the clutch disc. If deep scratches, cracks, scoring and other mechanical damage are detected, the flywheel must be replaced or given a turning (consult with car service specialists).

2. Carefully inspect the flywheel ring gear. If the teeth are worn or missing, the ring gear should be replaced at a car service workshop.

Installation


1. Carefully clean the mating surfaces of the flywheel and crankshaft journal. Using a tap, run the threaded holes in the end of the crankshaft journal, removing any remaining sealant and corrosion products from them.

Data Copied from the portal: www.skodabook.ru

Note: If you do not have a suitable tap handy, the holes can be cleaned using an old bolt with the threaded part sawn off lengthwise, similar to the one described in Section Replacing crankshaft seals (but with a head).
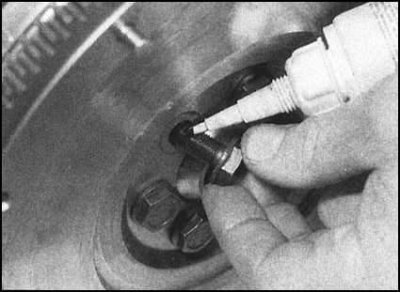

2. If new mounting bolts are not coated with a…


2. If new mounting bolts are not coated with a locking compound at the factory, lightly lubricate their threads with a suitable sealant.


3. Install the flywheel on the crankshaft journal in accordance with the mounting marks applied during dismantling.

Note: The new flywheel can be installed in any position. Install the bolts and tighten them finger tight for now.
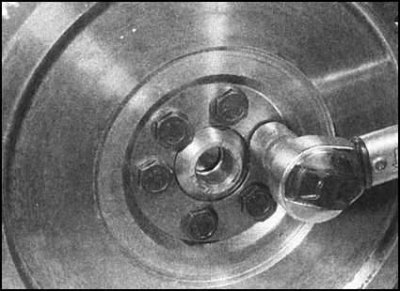

4. Using one of the methods suggested above, lock…


4. Using one of the methods suggested above, lock the flywheel from turning, then tighten the mounting bolts to the required force.

5. Install the clutch and gearbox assemblies in place (see Chapters Clutch and Transmission).
This article is available at russian, bulgarian, belarusian, ukrainian, serbian, croatian, romanian, polish, slovak, hungarian
Article verified: Ekaterina Blinova
Share with friends:
◀ Previous
Skoda Felicia: Petrol engine 1.6 l
Next ►

Checking the serviceability of hydraulic tappets
Removal and installation the cylinder head assembly with the intake and…
Replacing crankshaft seals
Replacing the camshaft seal
Removal and installation the cylinder head cover
Checking the condition and replacing the power unit supports
Removal and installation the engine oil pan
Removal and installation the oil pump and oil intake
Read similar articles on other Skoda models

➧ Exhaust gas recirculation solenoid valve check Skoda Fabia 1 (1999-2007)
➧ Technical condition check (1.2L MPI engine) Skoda Rapid 1 (2012-2022)
➧ Camshaft — Check Skoda Octavia 1 (1996-2004)
➧ Coolant — checking and adjusting the level and condition, identifying… Skoda Superb 2 (2008-2015)
➧ Identifying engine faults by the condition of spark plugs Skoda Kodiaq 1 (2016-2024)
➧ Checking the condition and replacing hoses and tubes in the engine… Skoda Yeti (2009-2017)
Link to this article in various formats
Reviews and comments of visitors
No comments yet


Add two numbers: 30 + 10


Favorit (1987-1994) 
  • General information
  • Maintenance
  • Troubleshooting
  • Power unit
  • Engine in car
  • Engine overhaul
  • Cooling and heating
  • Fuel and exhaust system
  • Fuel injection system
  • Ignition system
  • Transmission
  • Clutch
  • Manual gearbox
  • Drive shafts
  • Chassis (running gear)
  • Brake system
  • Car suspension
  • Steering
  • Body and interior
  • Exterior (external elements)
  • Interior (salon)
  • Electrical equipment
  • Equipment and devices
  • Power devices
  • Electrical circuits
Felicia (1994-2001) 
  • General information
  • Introduction to guide
  • User manual
  • Maintenance (petrol)
  • Maintenance (diesel)
  • Power unit
  • Petrol engine 1.3 l
  • Petrol engine 1.6 l
  • Diesel engine
  • Engine overhaul
  • Cooling system
  • Fuel system (carburetor)
  • Central injection (SPFI)
  • Multipoint injection (MPFI)
  • Diesel power system
  • Decreased toxicity
  • Engine electrics
  • Transmission
  • Clutch
  • Car gearbox
  • Drive shafts
  • Chassis (running gear)
  • Brake system
  • Car suspension
  • Steering
  • Body and interior
  • Exterior (external elements)
  • Interior (salon)
  • Doors, locks and windows
  • Electrical equipment
  • Equipment and devices
  • Headlights and lighting
  • Electrical circuits
SkodaBook.ru © 2018–2026 | Mobile version | Articles on Skoda | Sitemap EN BG BY UA RS HR RO PL SK HU | Feedback | Site search | Bookmark
Fabia 1 (1999-2007) | Fabia 2 (2007-2014) | Rapid 1 (2012-2022) | Octavia 1 (1996-2004) | Octavia 3 (2013-2019) | Superb 2 (2008-2015) | Kodiaq 1 (2016-2024) | Yeti (2009-2017) | Favorit (1987-1994) | Felicia (1994-2001) |
By continuing to use the site, you agree to the use of cookies.