
Front oil seal
1. Drain the engine oil.
2. Remove the accessory drive belt (see Section Removing, installing and adjusting the tension force of the auxiliary drive belt).
3. Remove the crankshaft pulley, timing belt outer covers, timing belt itself and crankshaft gear.
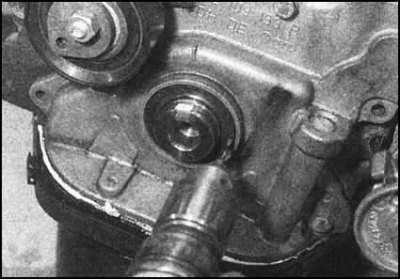
4. Try to remember the depth of the gland in your housing. Taking care not to damage the casing or the surface of the shaft journal, drill a small hole in the end surface of the stuffing box.

5. Screw a self-tapping screw into the hole,...
... grasp the screw head with pliers and remove the oil seal from the casing.
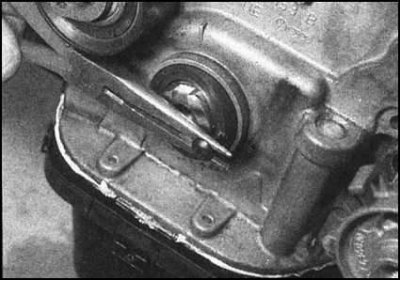
6. Without using any solvents, wipe the housing walls and shaft journal surface with a clean, lint-free cloth. Remove burrs, burrs and roughness from the working surfaces that can lead to the failure of a new oil seal.
7. Tape the sealing surface of the crankshaft trunnion with tape.
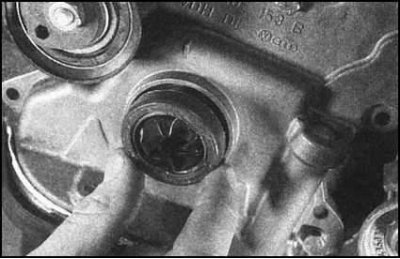
8. Lubricate the sponges of the new oil seal with clean engine oil, and press the latter into the inlet in the casing.
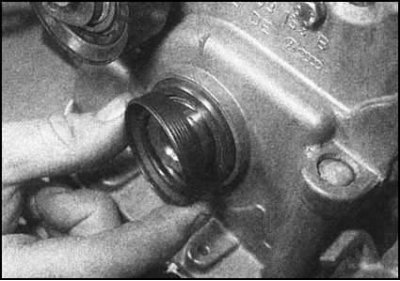
9. The new oil seal must be seated in the casing to the same depth as the old one removed from the engine. Tap the stuffing box into the casing with a hammer and a mandrel, which can be used as a suitable socket head or a piece of pipe of the appropriate diameter.
Note. The mandrel should only rest against the hard outer edge of the stuffing box. Alternatively, place the old seal on top of the new one.
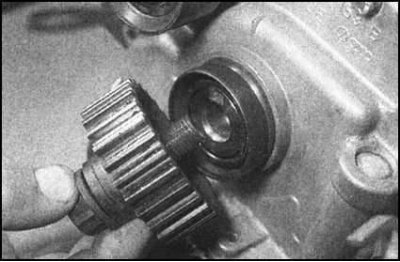
then install the gear wheel and start tightening it up a little with the bolt. Continue tightening the bolt until the new seal is fully seated in the housing.
10. Reinstall the gear and timing belt (see Sections Bringing the piston of the first cylinder to the top dead center position (TDC) end of compression stroke, Removal and installation of the timing belt and its covers, Removing, checking the condition and installing gears and timing belt tensioner). Adjust belt tension (see Section Removal and installation of the timing belt and its covers).
11. Further installation is carried out in the reverse order of dismantling. A description of the procedures for installing and adjusting the tension of the auxiliary drive belt is given in Section Removing, installing and adjusting the tension force of the auxiliary drive belt. Finally, fill the engine with the required amount of engine oil of the required grade.
Replacement of a laying of a casing of a forward epiploon
1. Follow the procedures in paragraphs 1 to 3, then remove the engine oil pan (see Section Removal and installation of the pallet crankcase of the engine).
2. In several steps, remove the bolts securing the stuffing box to the cylinder block.
3. With rotational-translational movements, separate the casing assembly with the oil seal from the block and remove it from the crankshaft trunnion.
4. Remove the old gasket from the stuffing box/cylinder block. Thoroughly clean the mating surfaces of the housing and block, removing all traces of old gasket material and traces of sealant from them (if necessary, use a scraper or penknife). Be careful not to damage mating surfaces.
5. Remove the grommet installed between the stuffing box and block. Replace the defective bushing by lightly lubricating the new bushing with liquid machine oil before installation.
6. Using a strong screwdriver, remove the old oil seal from the casing.
7. Wipe the casing thoroughly and check for cracks or signs of deformation. Lay the shroud mating surface down on the work surface of the workbench. Using a block of wood as a mandrel, hammer the new oil seal perpendicularly into its seat.
8. Grease an interfaced surface of the block of cylinders with universal sealant and lay on it a new sealing lining.
9. Wrap the neck of the crankshaft with adhesive tape.
10. Lubricate the inner lips of the stuffing box with clean engine oil and carefully slide the assembly onto the shaft journal. Rotate the oil seal along the trunnion, pressing the casing firmly against the surface of the cylinder block. Follow the correct mating of the sealing sleeve planted in the casing with the block.
11. Screw in new fixing bolts and in several steps tighten them with the required effort.
Note. Remember that the holder is made of soft aluminum alloy and can be easily damaged if the bolts are not tightened evenly.
12. Reinstall the oil pan (see Section Removal and installation of the pallet crankcase of the engine).
13. Install the crankshaft gear and timing belt (see Sections Bringing the piston of the first cylinder to the top dead center position (TDC) end of compression stroke, Removal and installation of the timing belt and its covers, Removing, checking the condition and installing gears and timing belt tensioner). Adjust belt tension (see Section Removing, checking the condition and installing gears and timing belt tensioner).
14. Install the accessory drive belt and adjust its tension (see Section Removing, installing and adjusting the tension force of the auxiliary drive belt). Fill the engine with the correct amount of engine oil of the correct grade.
Rear oil seal
1. Drain the engine oil.
2. Remove the gearbox from the engine (see chapter Transmission).
3. Remove the flywheel (see Section Removal, check of a condition and installation of a flywheel). Remove the disc and clutch basket assembly (see chapter Clutch).
4. Loosen the stuffing box mounting bolts in several steps.
5. With rotational-translational movements, separate the casing assembly with the oil seal from the block and remove it from the crankshaft trunnion.
6. The rear oil seal is replaceable as an assembly with the casing and is not supplied individually. If the replacement assembly is not equipped with an integral seal, the latter must be purchased separately.
7. Thoroughly clean the mating surface of the cylinder block, completely removing all traces of old gasket material and sealant from it (if necessary, use a scraper or penknife - try not to damage the surface).
8. Lubricate the mating surface of the block with fresh universal type sealant and install a new gasket.
9. Skoda branded oil seals are equipped with a plastic insert that protects the oil seal lips from damage on the edges of the keyway when the assembly is put on the shaft trunnion. If an insert is not provided, wrap the shaft stub with tape.
10. Lubricate the inner lips of the new oil seal with clean engine oil and rotate the assembly onto the shaft journal.
11. Screw in new fixing bolts and in several steps tighten them with the required force.
Note. Remember that the holder is made of soft aluminum alloy and can be easily damaged if the bolts are not tightened evenly.
12. Reinstall the oil pan (see Section Removal and installation of the pallet crankcase of the engine).
13. Install the flywheel (see Section Removal, check of a condition and installation of a flywheel), then the friction disc and clutch basket assembly (see chapter Clutch).
14. Reinstall the gearbox (see chapter Transmission).
15. Finally, fill the engine with the required amount of engine oil of the required grade.