
Warning! Remember that the dust produced during the wear of friction linings can contain asbestos, which is extremely harmful to human health! Never blow off dust with compressed air. Do not use petroleum-based solvents to clean clutch components - use only special brake cleaner or pure methanol. The used cleaning cloth should be stored in a sealed container.
Although some new friction materials do not contain asbestos, clutch maintenance procedures should be performed on the assumption that they do contain asbestos.
Removing
1. If the power unit is not removed from the vehicle and not dissected, access to the clutch assembly can be provided by dismantling the gearbox.
2. Before disassembling the clutch, mark the landing position of the clutch basket on the flywheel with chalk or a marker.
3. Moving in a diagonal order, in several steps (half a turn per approach) evenly loosen the bolts securing the basket to the flywheel so that they can be turned out by hand.
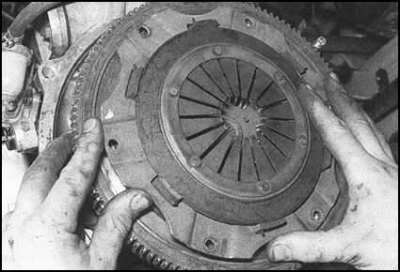
4. Pry off the basket assembly from the guide pins,...
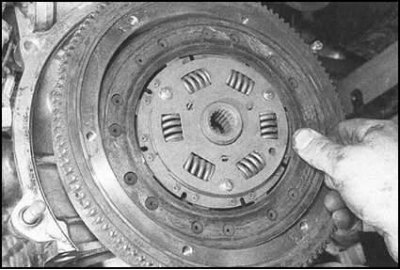
...then remove the friction disc. Try to remember the correct mounting position of the friction disc.
Status check
Note. Due to the complexity of the assembly removal and installation procedures, it is usually customary to replace the friction disc, basket and release bearing as a set, even if only one of the components is worn out. Strictly speaking, it is wise to replace the clutch assembly as a preventive measure every time the gearbox/engine is removed.
1. Remove the clutch assembly.
2. Before cleaning components, read the warning at the beginning of this Section. Working in a well ventilated area, preferably outdoors, thoroughly clean the components by wiping them with a clean cloth dampened with brake cleaner or methanol.
3. Assess the degree of wear of the friction linings, check them for signs of mechanical damage or signs of oiling. If cracks, signs of overheating, deep scratches, oil stains or other defects are found, the friction disc must be replaced as an assembly. Car manufacturers (Skoda company) does not put forward any friction linings of the clutch disc in terms of the maximum thickness. It is generally accepted that rivet heads should be sunk below the surface of the lining by at least 3 mm.
4. If the friction linings are in working order, evaluate the degree of wear of the splines of the disc hub, check the condition and tightness of the fit of the torsion springs and rivets. If defects are found, the disk must be replaced.
5. If the friction linings are contaminated with oil, check the condition of the left crankshaft oil seal. In addition, the joint of the oil pan with the engine block, as well as the input shaft of the gearbox, can be a source of oil leaks. Replace defective sealing components before installing a new friction disc.
6. Check basket assembly for signs of mechanical damage. Shake the pressure plate to check that the rivets are firmly seated. Make sure that there are no signs of overheating of the shells that attach the pressure plate to the basket. Replace the basket assembly if damage, wear, or weakening of diaphragm spring force is found.
7. Check the condition of the contact surfaces of the flywheel and the friction disc - they must be absolutely flat, clean and free from cavities, deep scratches and burrs. Minor defects can be eliminated by treating the surface with fine-grained sandpaper. In more serious cases, replace the defective component.
8. Check the free rotation of the release bearing. Assess the condition of its work surface. If deep scratches, cavities, scoring or other damage are found, replace the bearing.
Installation
1. When assembling, make sure that the contact surfaces of the friction disc and flywheel are in good condition. From new components carefully remove traces of preservative.
2. Lubricate the clutch friction disc splines with a light coat of high temperature grease such as Kluber Microlube GL202, GL261 or GL262 or Mobil lithium 932 or 933. Be careful not to get grease on the friction linings. Remove excess grease.
3. Install the friction disc with the spring-loaded side of the hub away from the flywheel. Some discs have a special marking that allows you to determine which side to the flywheel should be installed.
4. Install the clutch basket assembly. When installing the old basket, make sure that the landing marks applied during the dismantling process are aligned. Screw in the mounting bolts and tighten them until only by hand, so that it remains possible to adjust the position of the assembly.
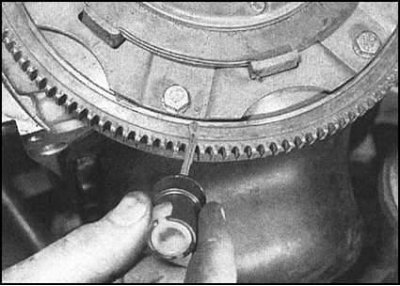
5. Now it is necessary to center the friction disc so that when installing the gearbox, the splines of the input shaft pins fall into the center of the disc hub.
6. For centering, insert a screwdriver or other suitable rod into the hole in the end of the crankshaft. The friction disc can now be centered in relation to the shaft. Alternatively, you can use a special tool, which can significantly reduce the time associated with fitting. The tool can be made at home from a suitable metal rod or block of wood that fits snugly into a hole in the end of the crankshaft. In the place where the rod is threaded into the hub, tape should be wound on it, ensuring a tight fit in the hub hole.
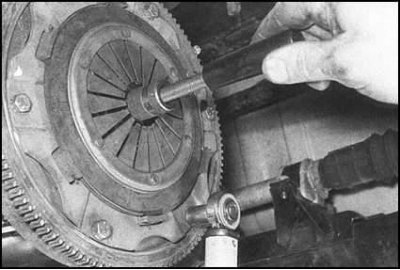
7. Having finished centering the friction disc, tighten the basket fastening bolts with the required force - act in a diagonal order, tighten evenly, in several steps.
8. Install the gearbox assembly (see Section Removal and installation of a transmission).