



View from the passenger compartment to the fuel level sensor with a fuel receiver
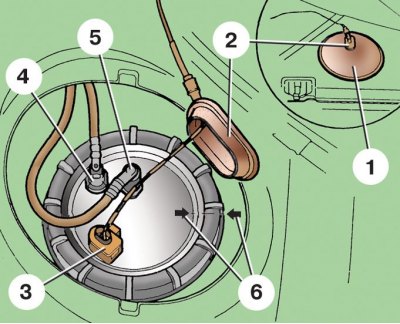
1 - manhole cover; 2 - wire seal; 3 - connecting block; 4 – fuel return hose; 5 – fuel supply line; 6 - marks on the fuel tank and fuel receiver flange
Details of the power supply system of the carburetor engine
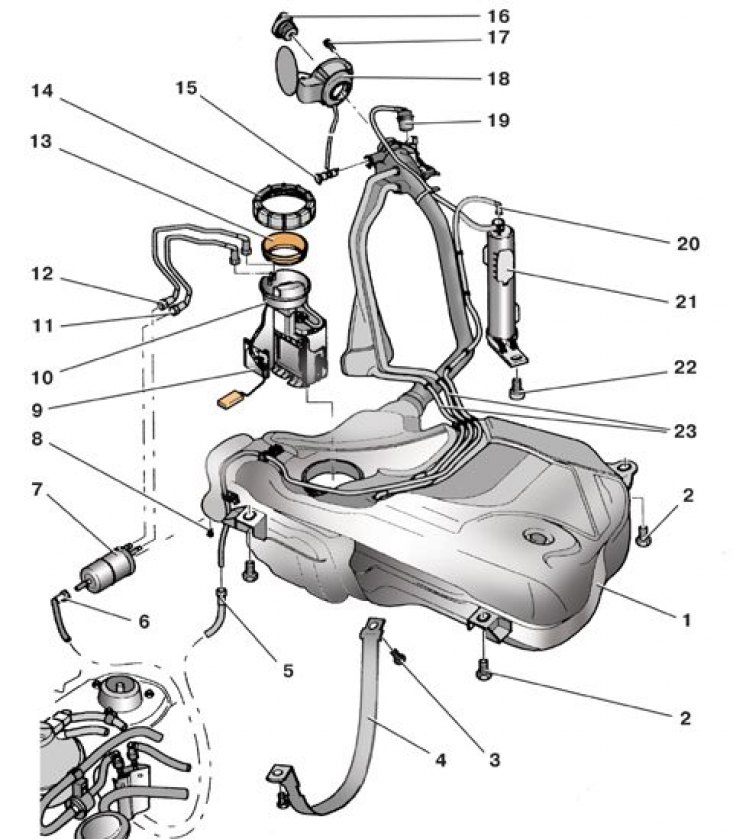
1 - fuel tank; 2 – a bolt of fastening of a tank; 3 – a bolt of fastening of a collar; 4 – a collar of a fuel tank; 5 – adsorber purge tube; 6 - fuel supply line; 7 - fuel filter; 8 – fuel filter fastening screw; 9 - fuel gauge sensor; 10 - fuel pump; 11 - fuel return fuel drain; 12 - fuel supply pipe to the fuel filter; 13 - sealing ring; 14 - nut; 15 - air valve; 16 - filler cap; 17 - bolt; 18 - filler neck; 19 - gravity valve; 20 – adsorber purge tube; 21 - adsorber of the fuel vapor recovery system; 22 – a bolt of fastening of an adsorber; 23 - tank ventilation tube
1. Disconnect the wire from the terminal «-» battery.
2. Remove the rear seat cushion (see subsection 11.4.3).
3. Remove cover 1 (see fig. View from the passenger compartment to the fuel level sensor with a fuel receiver) hatch in the floor above the fuel tank.
4. Disconnect block 3 with wires from the fuel level sensor.
5. By pressing the buttons of the clamps, disconnect the hoses 4 and 5 from the fittings on the flange of the fuel receiver.
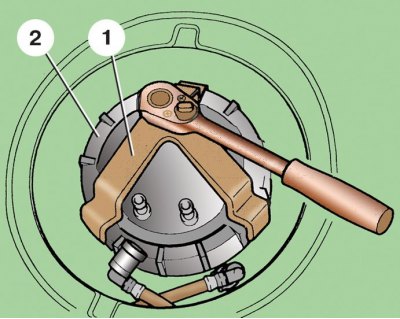
6. Using a special wrench 1, unscrew the nut 2 and remove the fuel receiver assembly with the fuel gauge sensor from the fuel tank. Remove the flange seal.
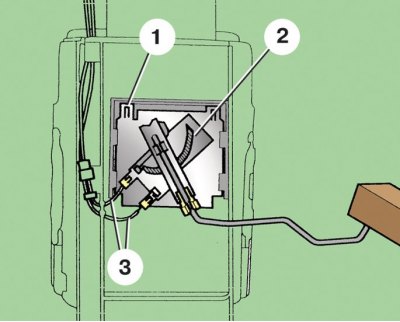
7. Disconnect wires 3 from sensor 2 of the fuel gauge (1 - latch). Mark the wires so as not to mix up during installation.
8. Having picked up the latch 1 with a screwdriver, slide the sensor 2 down and remove it from the fuel receiver.
9. Insert a new sensor into the fuel receiver and press it from below so that the latches 1 fix it. Connect the wires to the sensor.
10. Lubricate the flange sealing ring with fuel and install the fuel pickup with the sensor in the fuel tank in the reverse order of removal.
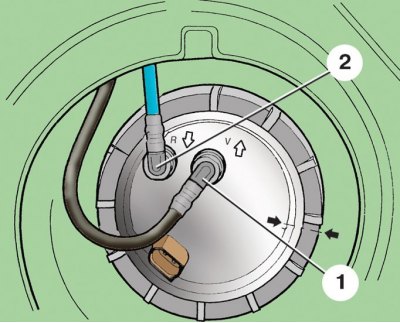
11. Turn the fuel pickup so that the arrows on the flange of the fuel pickup and the fuel tank match, as shown in the figure.
12. Connect the fuel line 1 fuel supply (black color) to the fitting marked with the letter V, and the fuel return hose 2 (of blue color) to port R.
13. Similarly, replace the sensor on vehicles with gasoline engines, mounted on the fuel pump 10 (see fig. Details of the power supply system of the carburetor engine), which is removed and installed in the same way as a diesel engine fuel inlet. When installing the pump, lubricate the O-ring 13 with fuel.