



Manual gearbox 02R of car Skoda Fabia 2

Gearbox markings
Location on the gearbox The letter designation and date were produced by "arrow 1". Gearbox designation 02R "arrow 2". Letter designation and date of production of the gearbox arrow 2-. Size: EMD 12 04 0 I I I I letter...
Location on the gearbox The letter designation and date were produced by "arrow 1". Gearbox designation 02R "arrow 2". Letter designation and date of production of the gearbox arrow 2-. Size: EMD 12 04 0 I I I I letter...

Transmission diagram
Designation and transmission Important: The arrows indicate the direction of vehicle movement. 1 - engine; 2 - clutch; 3 - manual transmission; 4 - drive shaft; 5 - driven/secondary shaft; 6 - differential; I - 1 gear;...
Designation and transmission Important: The arrows indicate the direction of vehicle movement. 1 - engine; 2 - clutch; 3 - manual transmission; 4 - drive shaft; 5 - driven/secondary shaft; 6 - differential; I - 1 gear;...
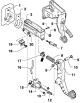
Clutch control
Assembly diagram - pedal mechanism Important: Disconnect the wire connecting the battery terminal to the ground (body) of the vehicle. Lubricate all working surfaces of bearings and contact areas with polyurea grease "G...
Assembly diagram - pedal mechanism Important: Disconnect the wire connecting the battery terminal to the ground (body) of the vehicle. Lubricate all working surfaces of bearings and contact areas with polyurea grease "G...

Removal, installation and adjustment of the angular switch for the clutch pedal «F36»
Important: To ensure a sufficiently strong installation in the pedal support bracket, the "F36" clutch pedal switch only needs to be installed once. Remove the lower cover on the driver's side. Disconnect the connector...
Important: To ensure a sufficiently strong installation in the pedal support bracket, the "F36" clutch pedal switch only needs to be installed once. Remove the lower cover on the driver's side. Disconnect the connector...

Removal, installation and adjustment of the cylindrical switch for the clutch pedal «F36»
Important: To ensure a sufficiently strong installation in the pedal support bracket, the "F36" clutch pedal switch only needs to be installed once. Remove the lower cover on the driver's side. Disconnect the plug...
Important: To ensure a sufficiently strong installation in the pedal support bracket, the "F36" clutch pedal switch only needs to be installed once. Remove the lower cover on the driver's side. Disconnect the plug...

Removal and installation the return spring
Remove the lower cover on the driver's side. Remove the safety support "arrow" in front of the clutch pedal (if it is installed). Remove the clutch pedal switch, if equipped. Disconnect the clutch master cylinder...
Remove the lower cover on the driver's side. Remove the safety support "arrow" in front of the clutch pedal (if it is installed). Remove the clutch pedal switch, if equipped. Disconnect the clutch master cylinder...

Removal and installation the clutch pedal
Remove the lower cover on the driver's side. Remove the safety support "arrow" in front of the clutch pedal (if it is installed). Remove the clutch pedal switch, if equipped. Disconnect the clutch master cylinder...
Remove the lower cover on the driver's side. Remove the safety support "arrow" in front of the clutch pedal (if it is installed). Remove the clutch pedal switch, if equipped. Disconnect the clutch master cylinder...
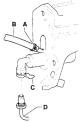
Removal and installation the clutch booster master cylinder
Remove the upper engine cover. Before disconnecting the battery in vehicles with a car radio equipped with an anti-theft jamming code, you must know this code. With the ignition off, disconnect the wire connecting the...
Remove the upper engine cover. Before disconnecting the battery in vehicles with a car radio equipped with an anti-theft jamming code, you must know this code. With the ignition off, disconnect the wire connecting the...

Removal and installation the clutch release slave cylinder
Remove the upper engine cover. Before disconnecting the battery in vehicles with a car radio equipped with an anti-theft jamming code, you must know this code. With the ignition off, disconnect the wire connecting the...
Remove the upper engine cover. Before disconnecting the battery in vehicles with a car radio equipped with an anti-theft jamming code, you must know this code. With the ignition off, disconnect the wire connecting the...

Bleeding the clutch system
Important: When performing the following work, ensure that no brake fluid comes into contact with the longitudinal beam or the gearbox. Pre-filling of the system is not necessary. Before disconnecting the battery in...
Important: When performing the following work, ensure that no brake fluid comes into contact with the longitudinal beam or the gearbox. Pre-filling of the system is not necessary. Before disconnecting the battery in...

Removal and installation the clutch release lever with the clutch release bearing and guide sleeve
Unhook the spring "arrow 1" in the upward direction. Remove the clutch release lever "arrow 2" from the ball joint. Installation First install the "arrow" spring onto the clutch release lever. Press the clutch release...
Unhook the spring "arrow 1" in the upward direction. Remove the clutch release lever "arrow 2" from the ball joint. Installation First install the "arrow" spring onto the clutch release lever. Press the clutch release...

Clutch repair
Important: Clutch discs and pressure plates with damaged or loose riveted connections must be replaced. Clean and remove rust from the splines of the drive shaft and the already used clutch disc - also the fine-spline...
Important: Clutch discs and pressure plates with damaged or loose riveted connections must be replaced. Clean and remove rust from the splines of the drive shaft and the already used clutch disc - also the fine-spline...

Gear shift mechanism
Position for assembling the gear shift mechanism Arrow A - movement when shifting gears; Arrow B - movement during preselective gear shift control; A - Bowden cable gear shift drive; B - Cable drive for the preselective...
Position for assembling the gear shift mechanism Arrow A - movement when shifting gears; Arrow B - movement during preselective gear shift control; A - Bowden cable gear shift drive; B - Cable drive for the preselective...

I — Gear shift lever head and housing — assembly diagram
1 - Gear shift lever head with boot, the gear shift lever ball head and boot cannot be separated from each other; 2 - Middle panel (protruding part of the floor between the front seats) Removal the boot from the gear...
1 - Gear shift lever head with boot, the gear shift lever ball head and boot cannot be separated from each other; 2 - Middle panel (protruding part of the floor between the front seats) Removal the boot from the gear...

II — Gear shift lever and gear shift housing — assembly diagram
Important: The areas under the bushings and sliding surfaces must be lubricated with grease "G 000 450 02" 1 - Retaining ring; 2 - Compression spring; 3 - Seal, between the gearshift housing and the body, self-adhesive,...
Important: The areas under the bushings and sliding surfaces must be lubricated with grease "G 000 450 02" 1 - Retaining ring; 2 - Compression spring; 3 - Seal, between the gearshift housing and the body, self-adhesive,...

III — Bowden cable drives — assembly diagram
Important: The areas under the bushings and sliding surfaces must be lubricated with grease "G 000 450 02" 1 - Bowden cable drive for gear shifting, mounted on the gear shift lever guide; 2 - Cable drive for the...
Important: The areas under the bushings and sliding surfaces must be lubricated with grease "G 000 450 02" 1 - Bowden cable drive for gear shifting, mounted on the gear shift lever guide; 2 - Cable drive for the...

Removal and installation the gear shift mechanism
Before disconnecting the battery in vehicles with a car radio equipped with an anti-theft jamming code, you must know this code. The wire connecting the battery terminal to the ground (body) of the vehicle should be...
Before disconnecting the battery in vehicles with a car radio equipped with an anti-theft jamming code, you must know this code. The wire connecting the battery terminal to the ground (body) of the vehicle should be...

Adjusting the gear shift mechanism
Important: The following points are a prerequisite for correct adjustment of the gear shift mechanism: The gear shift controls and those for transmitting gear shift movements are in perfect condition. Easy operation of...
Important: The following points are a prerequisite for correct adjustment of the gear shift mechanism: The gear shift controls and those for transmitting gear shift movements are in perfect condition. Easy operation of...

Removal and installation the gearbox
Before disconnecting the battery in vehicles with a car radio equipped with an anti-theft jamming code, you must know this code. The wire connecting the battery terminal to the ground (body) of the vehicle should be...
Before disconnecting the battery in vehicles with a car radio equipped with an anti-theft jamming code, you must know this code. The wire connecting the battery terminal to the ground (body) of the vehicle should be...

Disassembly and assembly of the gearbox
Gearbox - overview of parts 1 - 1st gear (speed); 2 - 2nd gear (transmission); 3 - 3rd speed stage (gear).; 4 - 4th gear (gear); 5 - 5th gear (speed); 6 - gearbox housing; 7 - gear shift drive, gear shift forks; 8 -...
Gearbox - overview of parts 1 - 1st gear (speed); 2 - 2nd gear (transmission); 3 - 3rd speed stage (gear).; 4 - 4th gear (gear); 5 - 5th gear (speed); 6 - gearbox housing; 7 - gear shift drive, gear shift forks; 8 -...

Replacement of sealing rings (oil seals) of flanged shafts (integrated gearbox)
Replacing the left shaft seal with flange After removing the left front wheel, lift the car. Remove the lower engine cover, remove the liner (lining) of the wing from under the steering wheel. Turn the steering wheel...
Replacing the left shaft seal with flange After removing the left front wheel, lift the car. Remove the lower engine cover, remove the liner (lining) of the wing from under the steering wheel. Turn the steering wheel...

Replacing the right shaft seal with a split flange
Remove the lower engine cover. Turn the steering wheel all the way to the right. Remove the propeller shaft protective cap from the engine, if equipped. Unscrew the cardan shaft from the flange shaft. Suspend the cardan...
Remove the lower engine cover. Turn the steering wheel all the way to the right. Remove the propeller shaft protective cap from the engine, if equipped. Unscrew the cardan shaft from the flange shaft. Suspend the cardan...

Replacing the right shaft oil seal with a flange in a non-separable design (together with the bushing)
Remove the lower engine cover. Turn the steering wheel all the way to the right. Remove the propeller shaft protective cap from the engine, if equipped. Unscrew the cardan shaft from the flange shaft. Suspend the cardan...
Remove the lower engine cover. Turn the steering wheel all the way to the right. Remove the propeller shaft protective cap from the engine, if equipped. Unscrew the cardan shaft from the flange shaft. Suspend the cardan...
This section is available on russian, bulgarian, belarusian, ukrainian, serbian, croatian, romanian, polish, slovak, hungarian
Link to this section in various formats
TEXTHTMLBB Code
- General information
- User manual
- Maintenance
- Petrol engines 1.2 l
- Engine repair
- Cooling and lubrication system
- Power and control system
- Petrol engines 1.4 l
- Engine repair
- Cooling and lubrication system
- Power and control system
- Petrol engines 1.6 l
- Engine repair
- Cooling and lubrication system
- Power and control system
- Diesel engines 1.4 l
- Engine repair
- Cooling and lubrication system
- Power and control system
- Diesel engines 1.9 l
- Engine repair
- Cooling and lubrication system
- Power and control system
- Transmission
- Manual gearbox 02R
- Manual gearbox 02T
- Automatic gearbox 09G
- Cardan shaft
- Chassis (running gear)
- Front suspension
- Rear suspension
- Wheels and tires
- Brake system
- Steering system
- Body and interior
- Exterior (external elements)
- Interior (internal elements)
- Heating and air conditioning
- Electrical equipment
- Equipment and devices
- Headlights and lighting
- Power devices
- Electrical circuits
- User manual
- Introduction to manual
- Governing bodies
- Salon equipment
- Driving and maintenance
- Power unit
- Engine repair
- Lubrication system
- Supply system
- Cooling system
- Exhaust system
- Transmission
- Mechanical gearbox 002
- Mechanical gearbox 02T
- Chassis (running gear)
- Front suspension
- Rear suspension
- Steering
- Steering gear without power
- Power steering
- Brake system
- Body and interior
- Body and interior repair
- Interior heating
- Electrical equipment
- Equipment and devices
- Ignition system
- Windshield wipers
- Electrical circuits