



Wheel Cylinder Components
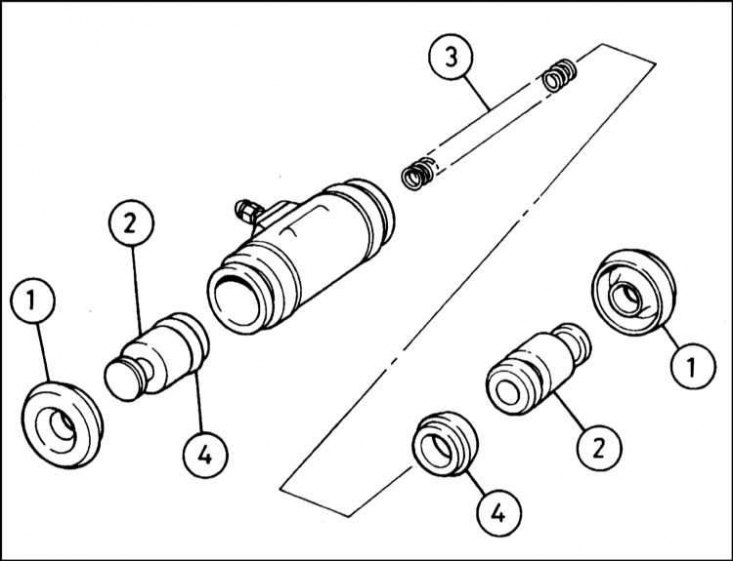
1 - Dust cover; 2 - Piston; 3 - Expansion spring; 4 - Cuff
Attention! Before proceeding with the procedures, carefully read the warning text at the beginning of the Sections System design, description of individual units and mechanisms, Replacing the front disc brake pads, Removal, condition check and installation of rear wheel brake drums.
Removal
1. Remove the brake drum (see section Removal, condition check and installation of rear wheel brake drums).
2. In order to minimize the loss of brake fluid, remove the cap from the master brake cylinder reservoir, then, placing a polyethylene film under it, screw it back onto its neck. This will ensure proper sealing of the reservoir, preventing the fluid level from dropping too much due to the resulting vacuum. Alternatively, fluid loss can be minimized by pinching the flexible hose of this brake mechanism with a special clamp or clamp.
3. Carefully detach the upper tension spring from both shoes and remove it from the brake mechanism. Spread the upper ends of the shoes apart, disconnecting them from the wheel cylinder pistons.
4. Carefully wipe the union nut of the brake pipe from the rear of the wheel cylinder. Loosen the union nut. Carefully move the pipe away from the cylinder and plug its end to prevent dirt from getting into the system. Immediately collect traces of spilled fluid with a rag.
5 Remove the mounting bolts from the rear of the brake shield and remove the wheel cylinder - be careful not to spill any brake fluid onto the friction linings of the shoes.
Major repairs
1. Use a brush to remove traces of dirt and dust from the surface of the wheel cylinder - to avoid inhaling the latter, put on a protective mask or respirator.
2. Remove the rubber boots from the ends of the wheel cylinder housing.
3. The pistons are usually pressed out of the cylinder by the pushing force of the expansion coil spring. Otherwise, tap the cylinder body from the end with a hammer through a wooden block, or pump air into the cylinder under low pressure through a hydraulic nipple (for example, using a foot pump for a car).
4. Check the condition of the piston surfaces and cylinder bores. If scratches, scoring or traces of metal contact are found, replace the cylinder assembly.
5. If the condition of the pistons and cylinder mirrors is found to be satisfactory, discard the old seals and prepare a repair kit with a complete set of necessary components.
6. Remove the old piston seals (try to remember their installation position), then wet the new ones with clean brake fluid and push them into the cylinder with your fingers (large diameter forward).
7. Dip the pistons in fresh brake fluid and insert the expansion spring into the cylinder.
8. Using rotary and reciprocating movements, insert the pistons into the cylinder.
9. Install the dust boots and check the freedom of movement of the pistons in the cylinder.
Installation
1. Make sure the mating surfaces of the wheel cylinder and brake shield are clean. Move the shoes apart and tuck the cylinder into its regular place. Connect the brake pipe to the cylinder and tighten the union nut of the union nut one or two turns. Now screw in the wheel cylinder mounting bolts and tighten them to the required force.
2. Finally tighten the union nut and remove the clamp from the flexible brake hose/remove the plastic film from under the brake master cylinder reservoir cap.
3. Make sure that the brake shoes are correctly positioned in the wheel cylinder pistons. Install the upper tension spring, making sure that it is correctly engaged on the shoes.
4. Reinstall the brake drum (see section Removal, condition check and installation of rear wheel brake drums).
5. Bleed the hydraulic system (see section Bleeding the hydraulic system).
Note: If proper measures have been taken to minimize brake fluid loss, it may be sufficient to bleed only that particular wheel cylinder.