
Front wheel brake caliper components
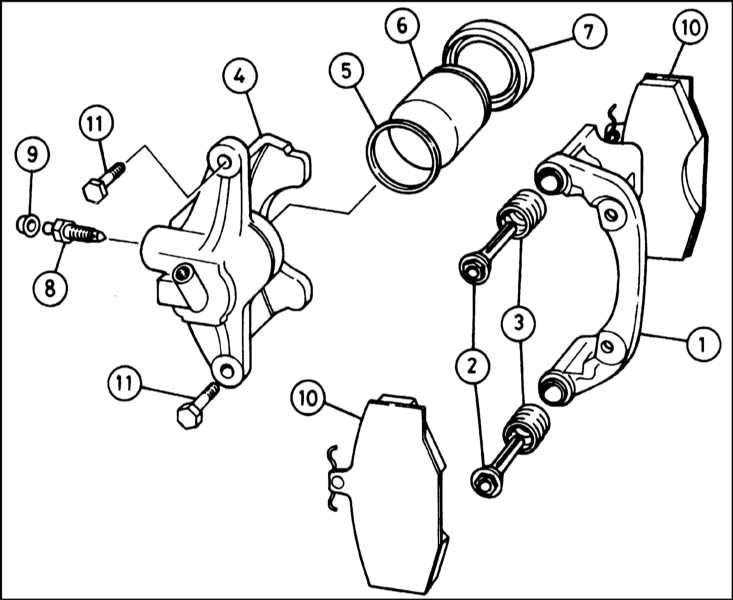
1 - Anchor bracket; 2 - Guide pin; 3 - Protective cover; 4 - Caliper body; 5 - Sealing cuff; 6 - Piston; 7 - Anther; 8 - bleed valve; 9 - Dust cap; 10 - Brake pads; 11 - Guide pin bolts
Note. On models equipped with ABS, be sure to disconnect the battery before disconnecting the hydraulic brake lines. Connect the battery only after connecting all the hydraulic lines of the brake path. Violation of this requirement is fraught with air entering the hydraulic modulator, the removal of which during the normal bleeding of the system (see the text of Section) is not possible and requires the use of a special electronic tester (VAG 1552).
Please read the warnings at the beginning of the Sections carefully before proceeding with the procedures System design, description of individual components and mechanisms, Replacement of hoses and tubes of the hydraulic path of the brake system.
Removing
1. Apply the parking brake. Jack up the front of the car and place it on jack stands. Remove the corresponding front wheel.
2. In order to minimize the loss of brake fluid, remove the cap from the GTZ reservoir, then, placing a plastic film under it, screw it back onto your neck. At the same time, proper sealing of the tank is achieved, due to the resulting rarefaction, which does not allow the liquid level to drop excessively. Alternatively, fluid loss can be minimized by clamping a flexible brake hose connected to a given caliper with a special clamp or clamp.
3. Wipe thoroughly, then loosen the union on the caliper to be disengaged.
4. Turn out bolts of the top and lower directing fingers of a support, keeping fingers from turning by a thin rozhkovy wrench. Remove the caliper from the brake disc and disconnect it from the brake hose, immediately capping the open end of the latter to minimize leaks and prevent dirt from entering the hydraulic system.
Note. The pads can be left in place in the caliper anchor bracket.
Overhaul
1. Lay the removed caliper on a workbench, and carefully clean it from dirt and dust - try not to inhale brake dust, use a protective mask or respirator!
2. Remove the partially protruding piston from the caliper cylinder, remove the boot.
Note. If the piston cannot be removed by hand, it can be pushed out with compressed air supplied to the union connecting the flexible brake hose. A slight pressure created by a foot pump to inflate tires will be enough. Make sure that your fingers at the moment of pushing the piston are not between its end face and the caliper body!
3. Using a small screwdriver, remove the piston collar - try not to scratch the cylinder mirror.
4. Thoroughly wash all components with methyl or isopropyl alcohol or clean brake fluid (never use petroleum-based solvents such as gasoline or kerosene to wash parts - they are aggressive towards rubber parts!), then immediately and thoroughly dry them with a clean, lint-free cloth, or with compressed air - the latter is especially convenient for blowing through small channels and holes.
Attention! Remember to wear protective goggles when using compressed air!
5. Check the condition of all components, replace worn or damaged parts. Particular attention should be paid to the condition of the piston and the mirror of its cylinder - if scratches or the slightest sign of corrosion are found, the components must be replaced, which in practice means replacing the entire assembly of the caliper body. In a similar manner, check the condition of the guide pins and their bolts. Both the pins and the bolts, when cleaned, should slide freely in their sockets, while being sufficiently tight in them at the same time. In the absence of confidence in determining the condition of any of the components, it is better to play it safe and replace it.
6. If, during the inspection, the condition of the assembly components is found to be satisfactory, prepare the appropriate repair kit, which can always be purchased in several different combinations at Skoda service centers.
7. During assembly, carefully check the quality of cleaning and drying of all installed components.
8. Moisten the piston and its new cuff with clean brake fluid. Lubricate the mirror of the cylinder with it.
9. Using your fingers, without using any tools, insert the new seal into the groove inside the cylinder.
10. Put a new boot on the back of the piston. Insert the inner lips of the anther into the groove in the cylinder mirror, then carefully, with rotational and translational movements, fill the piston into the cylinder. Having deepened the piston to the stop, fill the outer lips of the anther into the groove, follow the perpendicularity of the piston landing in the cylinder. Push the piston into the cylinder until it stops, then pull the dust boot over the caliper body and seat it in the specially provided groove.
11. When installing the guide pins of the caliper, lubricate them with the special grease included in the kit, such as Lukosan M11 or M 14). Install the protective boots, correctly seating them in the grooves on the guide pins and anchor bracket.
Installation
1. Thoroughly clean the threads of the guide pins and their bolts from the old sealant. If damaged coils are found, the bolts should be replaced.
2. Screw a support on the union of a flexible brake hose.
3. Make sure that the brake pads are seated correctly in the anchor bracket, then install the caliper in its original place, making sure that the anti-squeal springs of the pads are correctly placed in it.
4. Lightly lubricate the bolt threads with Loctite 243. Press the caliper and screw the bolts into your guide pins, tightening them to the required torque (keep your fingers from turning with a wrench).
5. Tighten the union nut firmly and remove the clamp / clamp from the flexible brake hose, or remove the plastic film from under the GTZ reservoir cap.
6. Bleed the hydraulic system (see Section Bleeding the hydraulic system).
Note. If all measures have been taken to seal the system during the dismantling of the caliper, it will be enough to pump only this particular brake mechanism.
7. Replace the wheel, lower the vehicle to the ground and tighten the wheel bolts to the required torque.