



Contents: Removal ⬇ Installation ⬇
Note: New axle bolt nuts and lower strut mount nuts will be required for assembly.
Removal
1. Support the front wheels with chocks, then jack up the rear of the car and place it on stands. Disconnect the negative cable from the battery and remove both rear wheels.
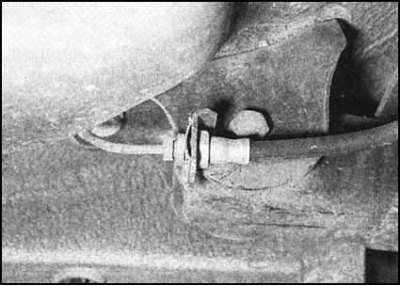
2. Acting in accordance with the instructions given in Chapter Brake system, perform the following procedures:
- a) Loosen the locking and adjusting nuts of the parking brake cables and disconnect the latter from the equalizer plate. Under the car, release the front ends of both cables from the intermediate clamps on the bottom of the car so that they can be freely removed together with the rear axle;
- b) Follow the hydraulic lines from the brake shields to the union nut connections secured to brackets on the underbody of the vehicle just forward of the rear axle assembly. Wipe the connections thoroughly, then loosen the union nuts and disconnect the lines. Loosen the clamps and release the hoses from the brackets. Immediately plug the open ends of the line to minimize brake fluid loss and to prevent dirt from entering the hydraulic system;
- c) On ABS equipped models, follow the wiring harness from the wheel sensors to the connectors. Disconnect both connectors. Release the wiring harness from the intermediate clips so that it can be removed without obstruction along with the axle;
- d) On non-ABS models equipped with a load-sensitive control valve, mark the position of the bolt head in the valve spring relative to the axle. Loosen the nut, remove the bolt and disconnect the spring.
3. Make sure that all components that interfere with the work are disconnected, then support the rear axle assembly with a dolly jack.
4. Loosen the nuts of the bolts securing the lower suspension strut supports to the bridge.
Note: During assembly, nuts must be replaced without fail.
5. With the help of an assistant, loosen the axle bolt nuts and carefully remove the axle from under the car.
Note: The axle bolt nuts must be replaced.
6. Check the condition of the axle bushings. Replace them if necessary. Replacement of axle bushings is performed using a hydraulic press and should be entrusted to auto service specialists. If you have the necessary equipment at hand, press out the bushings and press new ones into their place, using a mandrel resting against the outer edge of the bushing.
7. If it is necessary to replace the axle mounting brackets, mark their position on the underbody of the vehicle, then loosen the mounting bolts and remove the brackets. Install new brackets in place of the removed brackets, screw in the mounting bolts, align the brackets according to the marks made during dismantling, then tighten the fasteners to the required force.
[Data taken from this portal www.SkodaBook.ru]
Note: If the mounting brackets have been replaced, the parallelism of the bridge installation must be checked after assembly is complete (see section Car Wheel Alignment Angles - General Information).
Installation
1. Place the axle in its original position and insert the axle bolts. Screw on new nuts and tighten them lightly.
2. Insert the bolts of the lower mounts to the suspension strut bridge. Screw on new nuts, also without tightening them at this stage.
3. In accordance with the instructions given in Chapter Brake system, perform the following procedures:
- a) If equipped, connect the working spring of the load-sensitive control valve to the axle. Ensure that the washers are installed correctly. Once the marks made during dismantling are aligned, tighten the fastening nut to the required torque;
- b) On ABS equipped models, connect the wiring to the wheel sensors. Make sure the wires are routed correctly and securely fastened to the intermediate clamps;
- c) Secure the brake hoses to their brackets with clamps. Connect the tubes and tighten the union nuts of the union connections securely;
- d) Make sure that both parking brake cables are routed correctly. Connect the cables to the lever. Screw on the adjusting nuts and secure them with the lock nuts. Do not reinstall the lever cover/center console yet.
4. Reinstall the rear wheels, lower the vehicle to the ground and tighten the wheel bolts to the specified torque.
5. Rock the vehicle while it is standing on its wheels to settle the components, then tighten the axle bolt nuts and suspension strut mounts to the required torque.
6. Bleed the entire brake system (see Chapter Brake system), on appropriately equipped models, the proper functioning of the pressure regulator valve should be checked by a car service specialist.