
If a node or component is identified that is on the verge of failure, the owner of the car leaves it at its discretion to decide whether an appropriate correction is necessary. This decision is usually based on the general condition of the car. If the vehicle is presented clean and well maintained for inspection, the inspector may turn a blind eye to minor anomalies and near-boundary wear on certain components. At the same time, a technical inspector with an experienced eye can always identify signs of the owner's negligent attitude towards his vehicle and take this into account as an aggravating factor.
It should be noted that the list of checks and adjustments provided to the reader's attention is complete only at the time of the preparation of this Guide, and the norms and requirements adopted at a later time could not be taken into account by the authors.
We also note that for the complete and high-quality implementation of many of the procedures listed below, the help of an assistant will be required.
The full list of checks can be conditionally divided into several categories, which would be correctly titled as follows:
- a) Checks made from the driver's seat;
- b) Checks performed on the vehicle standing on the ground;
- c) Checks carried out on a vehicle whose wheels are off the ground;
- d) Check of a condition of the fulfilled gases.
Checks made from the driver's seat
Parking brake
1. Check up serviceability of functioning of a parking brake. Excessive lever travel (too many clicks) indicates that the drive cable needs to be adjusted.

2. Make sure that when lightly tapping on the control lever, the parking brake does not release spontaneously.
Foot brake
1. Depress the foot brake pedal as far as it will go and make sure that it does not continue to slowly sink to the floor. Otherwise, check the condition of the GTZ. Release the pedal, wait a few seconds and depress it again. If noticeable resistance to depressing occurs only when the pedal has dropped almost to the floor, the brakes should be adjusted or repaired. The soft stroke of the brake pedal indicates the ingress of air into the hydraulic path. In this case, the system must be pumped (see chapter Brake system).
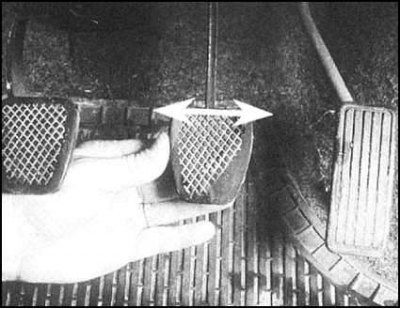
2. Check up serviceability of a condition and reliability of fastening of a brake pedal. Also make sure there are no fluid leaks under the pedal on the mat or floor panel. The presence of moisture under the pedal indicates a malfunction of the GTZ.
3. Check the functioning of the vacuum brake booster (with appropriate vehicle equipment), to do this, press the brake pedal several times, then squeeze it all the way and start the engine. If the vacuum booster is in order, the pedal will noticeably fall down after starting the engine, otherwise check the condition of the vacuum hose and the vacuum booster unit itself.
Steering wheel and column
1. Check the condition and strength of the fastening of the hub, spokes and steering wheel rim.
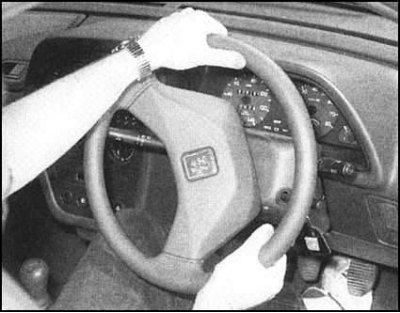
2. Pull the steering wheel from side to side and up and down. The presence of a noticeable play indicates wear of the column components, or loosening of the fixing nut. Continue to jerk the steering wheel as before, while simultaneously turning it slightly to the right and left.
3. Make sure that the steering wheel is securely attached to the column shaft and that there is no excessive play indicating wear on the thrust bearings or steering column couplings.
Windshield and mirrors
The windshield must be free of cracks and other defects that restrict the driver's view. It is permissible to have only small cavities left by blows of small stones flying out from under the wheels. Rear-view mirrors must be securely fastened, free from cracks and other defects, in addition, the drive for their adjustment must work properly.
Seats and seat belts
Note. The checks listed below apply to both the front and rear seat belts.
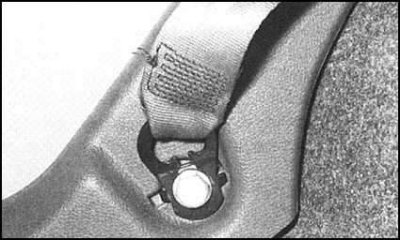
1. Check the fabric structure of the belt for cuts, severe abrasions and other damage. Inspect the belts along their entire length, do not forget about the rear ones, if they are provided. Check the operation of the belt buckles - the buckles should be freely fastened and not less freely released, while ensuring a secure fit in the latched state. In the case of belts of inertial type, check the correct functioning of the return mechanism. Check the condition of all seat belt anchors that can be accessed from inside the vehicle.
2. The front seats must be securely fastened to the skids, and their backs must be fixed in an upright position.
Doors
Both front doors must open and close freely from both outside and inside the vehicle. Latches of locks should reliably fix doors in the closed position.
Checks to be performed with the vehicle on the ground
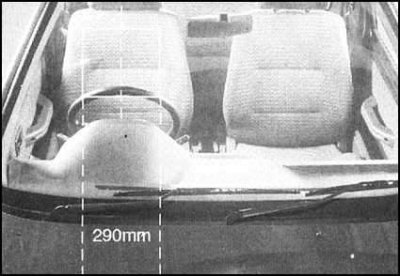
Vehicle identification numbers
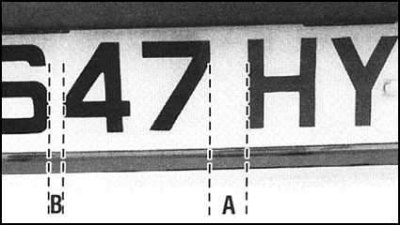
License plates must be clear and legible. The distance A between the characters of the sign must be twice the distance B.
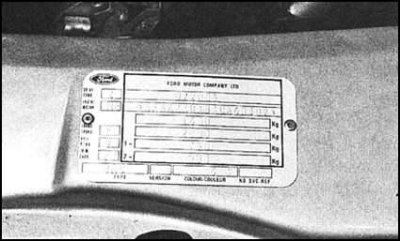
The information on the VIN nameplate and/or the homology label must be legible and legible.
Electrical equipment
1. Turn on the ignition and check that the horn is working properly.
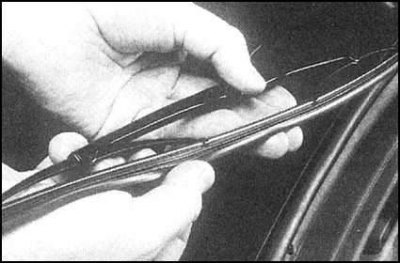
2. Check up a condition of brushes of screen wipers, replace defective brushes.
3. Check up serviceability of operation of screen washers.
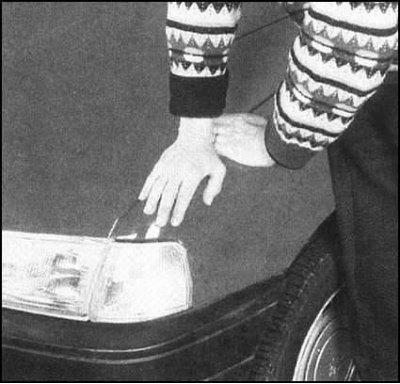
4. Check up serviceability of functioning of stoplights, dimensional fires and illumination of license plate. Lenses and reflectors of lamps must be securely fastened and free from traces of dirt and damage.
5. Check up functioning of head headlights and correctness of adjustment of the direction of their beams. Reflectors should not be dull, the presence of cracks in the lenses is also unacceptable.
6. Turn on the ignition and check the operation of the direction indicators (including control lamps on the instrument panel) and emergency signaling. Turning on the side and rear marker lights should not affect the operation of the direction indicators, otherwise you should check the grounding in the rear combination lamp.
7. Check the operation of the rear fog lamp (headlights) and its control lamp on the instrument panel or inside the switch.
Foot brake
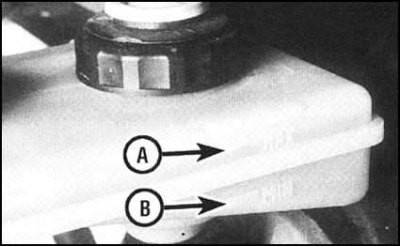
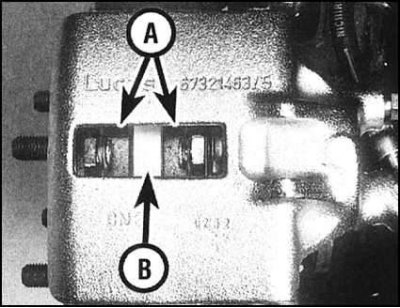
1. Inspect the GTZ, brake pipes and vacuum booster unit for signs of leakage, loose fasteners, signs of corrosion and mechanical damage. The GTZ tank must be securely fixed, and the liquid level in it must be between the top (A) and lower (IN) marks.
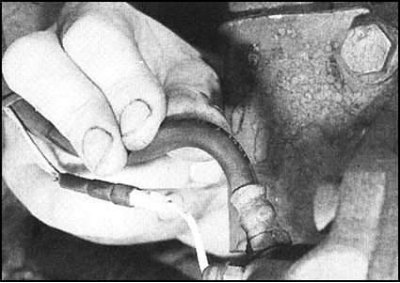
2. Check both front flexible brake hoses for cracks, signs of material aging and other damage.
3. Turn the steering wheel from lock to lock and make sure that the hoses do not come into contact with the suspension and steering components. While firmly depressing the brake pedal, make sure that pressure does not form swellings on the hoses and that there are no signs of leaks.
Suspension and steering
1. Ask an assistant to turn the steering wheel from side to side in a small range - until the steered wheels of the car begin to respond. Assess the amount of steering wheel free play - excessive play indicates wear or loosening of the steering column hinges, the column coupling with the steering mechanism, or the rack and pinion itself.
2. Ask the assistant to turn the steering wheel a little harder in both directions - so that the steered wheels begin to turn. At this time, try to visually assess the condition of the hinges, rods and steering gear bearings. On vehicles equipped with power steering, check the reliability and condition of the steering pump, its drive belt and connecting hydraulic hoses.
3. Make sure the vehicle is level and the ground clearance is adequate.
Shock absorbers
Alternately press each of the corners of the car body, then abruptly release them. The body must return to its original state without swaying. Otherwise, carefully check the condition of the relevant shock absorber. A jammed shock absorber can cause more serious damage to the vehicle's suspension components and bodywork.
Exhaust system
1. Start the engine. Ask an assistant to press a lump of rags against the cut of the exhaust pipe and check the system path for signs of gas leaks. Repair or replace defective sections.
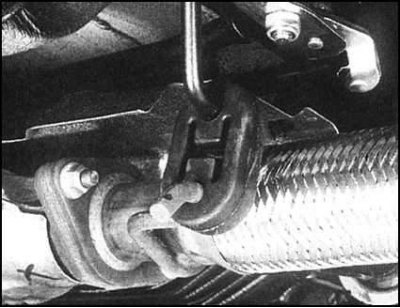
2. Check the serviceability of the condition of the rubber hangers of the supports of the system sections.
Checks to be performed with the vehicle off the ground
Jack up the vehicle and place it on jack stands that are not under the vehicle's suspension components. Make sure the wheels are completely off the ground and the steering wheel can turn through its full range of travel (from end to end).
Steering gear
1. Have an assistant turn the steering wheel from lock to lock. Check for smooth running of the steering gear components. No components, including wheels, should come into contact with brake hoses, tubes or body parts.
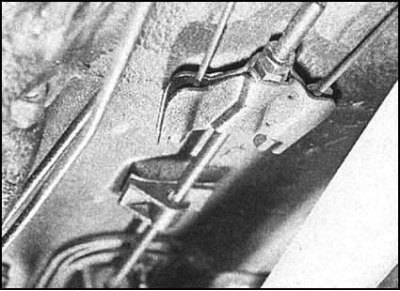
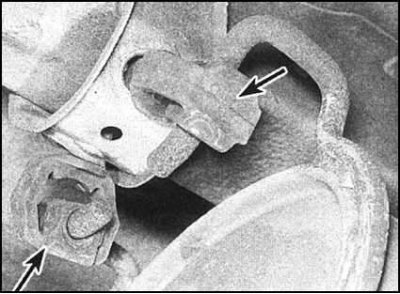
2. Check up a condition of protective covers of a steering rack. On models with power steering, inspect the hydraulic lines and their fittings for signs of leaks. Make sure that there is no jerking or jamming of the components when the steering gear is actuated. Check for the presence and serviceability of cotter pins, locking flags and other fastener locking parts. Body panels must not be damaged or corroded within a radius of 30 cm around the mounting points of the steering gear components.
Front and rear suspension and wheel bearings
1. Start with the right front wheel. Grasp it at the 3 and 9 o'clock points and pull sharply. The presence of backlash indicates wear or weakening of the wheel bearing preload, wear of ball bearings and hinges, brackets and rubber-metal bushings for attaching suspension components.
2. Now grab the wheel at the 12 and 6 o'clock points and repeat the previous check. Rotate the wheel by hand, checking the wheel bearing for jerks and pinch points.
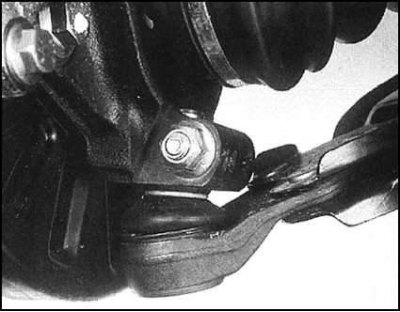
3. If there are signs of wear on the suspension component mountings, check them by prying with a screwdriver or flat mount. The presence of a noticeable backlash will indicate wear on the rubber-metal bushing, mounting bolt, or the support bracket itself (bolt holes often become oval).
4. Repeat all of the above checks for the remaining vehicle wheels.
Springs and dampers
1. Inspect suspension struts (with appropriate equipment) for signs of serious leaks, corrosion development and mechanical damage to casings. Also check the reliability of the fastening of the rack supports.
2. If the vehicle is equipped with coil springs, make sure they are properly seated in their seats and are not cracked, deformed, or corroded.
3. In case of leaf spring suspension (springs) check the serviceability of the condition of the springs, the reliability of fastening the bridge to them, as well as the condition of the rubber-metal bushings of the anchor supports and the spring earrings.
4. The same checks apply to vehicles equipped with other types of suspension such as torsion bar suspension, hydraulic displacers, etc. Check the tightness of all supports and brackets. Check for signs of excessive wear, corrosion and mechanical damage. Suspended hydraulic (active) type, inspect the hydraulic lines for signs of leakage or damage.
5. Check shock absorbers for leaks. Assess the degree of wear of the bushings of the supports, inspect the shock absorber housings for signs of mechanical damage.
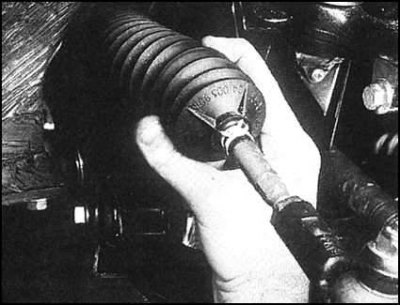
Drive shafts (only for front wheel drive vehicles)
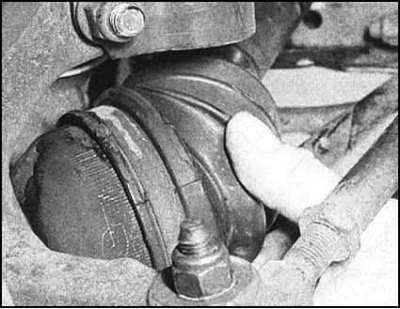
Rotate both front wheels in turn, visually checking the condition of the protective covers of the CV joints of the halts. Also check both drive shafts for signs of deformation or other damage.
Brake system
1. If possible, without disassembling the brake mechanisms, assess the degree of wear of the pads and check the condition of the brake discs. Make sure the material of the friction linings (A) not worn beyond the allowable limit, and the brake disc (IN) free from cavities, chips, furrows and other damage.
2. Check the condition of all rigid brake lines and flexible hoses at the rear of the vehicle. Pay attention to traces of corrosion, loosening of fitting connections, abrasions, swelling (under pressure), cracks cuts and signs of material aging.
3. Check brake calipers and shields for signs of leakage. Repair or replace defective components.
4. Slowly rotating each of the wheels in turn, ask the assistant to squeeze out and release the foot brake pedal at this time. Make sure the brakes work properly and that the wheel turns freely when the pedal is released.
5. Check the parking brake drive mechanism for breaks and damage to cables, corrosion, wear and loosening of rods, etc. Make sure that the parking brake securely blocks both rear wheels and fully releases them when the lever is released.
6. It is not possible to check the efficiency of the braking system without special equipment, however, it is necessary to carry out small road tests of the car, checking the serviceability of its braking without loss of directional stability.
Power supply and exhaust systems
1. Check the condition of the gas tank (including filler neck), fuel pipes, hoses and their fittings. All components must be securely attached and free from damage or signs of leakage.
Inspect the entire length of the exhaust system path. Check pipes and system components for traces of exhaust gas leaks, mechanical damage and signs of corrosion. Also check the reliability of the fastening of the sections between themselves and in the hangers of the supports.
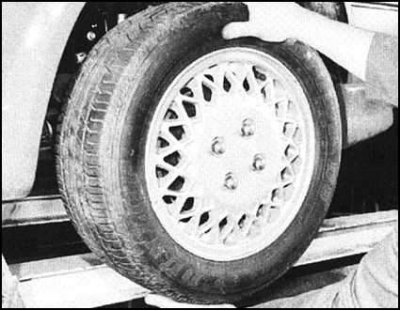
Wheels and tires
1. Carefully inspect the sidewalls and tire treads of all vehicle wheels, including the spare. Check tires for cuts, bulges, cord exposure, tread separation and uneven tread wear. Make sure the tires are properly seated on the rims. Check the condition and correct fit of the inflation valves.
2. Make sure that the wheels installed on the vehicle are of the correct size for the class and model of the vehicle. Tires of the same size must be installed on both wheels of each of the axles of the vehicle.
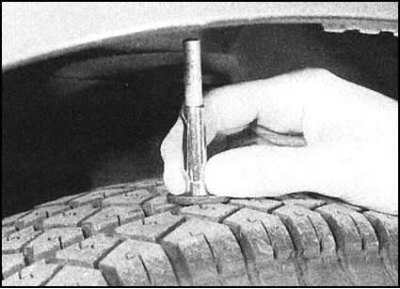
3. Measure the remaining tread depth. The minimum allowable value is 1.6 mm on at least three quarters of the tread area. Uneven tread wear indicates a violation of the geometry of the front suspension.
Body corrosion
1. Check the load-bearing elements of the car body and frame (including chassis box sections, sills, cross members, struts, and anchor points for suspension, steering and brake components) for signs of corrosion. The thinning of the bearing elements is fraught with the creation of an emergency on the road. In this case, you will need to perform repairs with the involvement of specialists.
2. Try to remove all sharp edges and burrs that have appeared on the body elements as a result of damage to them by corrosion.
Checking the condition of the exhaust gases
Petrol models
1. Warm up the engine to normal operating temperature and check that all engine settings are correct (all related components and systems should also be in order - ignition system, air cleaner, etc.).
2. Before taking measurements, raise the engine speed to 2500 rpm and hold it there for about 20 seconds. Then again reset the speed to idle and check the condition of the exhaust. If the idle speed is clearly too high, or a clearly visible thick blue smoke comes out of the exhaust pipe for more than 5 seconds, the car cannot be considered ready for inspection. Blue exhaust smoke is a sign of oil burnout due to internal engine wear. The black color of the exhaust indicates incomplete combustion of the fuel as a result of a dirty air filter or other disturbances in the power system.
3. Using a special gas analyzer, the level of carbon monoxide in the exhaust gases can be determined (SO) and hydrocarbon compounds. If a gas analyzer is not available, you will have to rent it.
Checking the level of CO in the exhaust gases
At the time of writing this manual, the allowable CO level at idle was 3.5% for vehicles entered service after August 1986 and 4.5% for older vehicles. Since January 1996, stricter regulations have been adopted in Europe for cars equipped with a catalytic converter and entered into service from August 1992 (about 0.5%). If it is not possible to achieve the level of CO content within the limits specified by the standards (subject to the correct settings of the engine, power systems, ignition, etc.), then the cause lies in excessive carburetor wear, or another failure in the power system. It is also possible that the catalytic converter simply failed (with appropriate equipment).
Checking the level of hydrocarbons in the exhaust gases
1. At a normal level of CO, the content of hydrocarbons in the exhaust gases at idle engine speed should not exceed a concentration of 1,200 parts per million. If the result of this test is negative, it should be repeated by raising the engine speed to 2,000 per minute. If the hydrocarbon content now falls below the limit value (1,200 ppm), the car can be considered ready for inspection.
2. Excessive content of hydrocarbons in the exhaust gases of the car indicates burnout of the engine oil, or, more likely, incomplete combustion of the fuel.
Diesel models
1. The only check of the condition of the exhaust gases of a diesel engine is to measure the exhaust rate. To check, you should sharply increase the speed several times to the maximum for an unloaded engine.
Warning! To carry out this check, it is extremely important that the timing belt is in good condition!
2. Excessive intensity of exhaust gases is most often caused by contamination of the air cleaner filter element, otherwise you should seek help from car service specialists.