



Contents: Checking the condition of…⬇ Checking the condition of…⬇ Charging traditional and low…⬇ Charging maintenance-free batteries ⬇ Checking the electrolyte level ⬇
Checking the condition of traditional and low maintenance batteries
1. If the average annual mileage of the vehicle is low, it is sufficient to check the specific gravity of the battery electrolyte to determine its charge level once every three months. The measurement is performed using a standard hydrometer. The test results should be compared with the data in the table below. Please note that the standard measurement should be performed at a temperature of 15°C. In this case, for every 10°C the temperature drops below the reference point, 0.007 should be subtracted from the electrolyte density reading. For every 10°C increase in temperature above the reference value, the same value (0.007) should be added to the measurement result.
| Ambient temperature above 25°C | Ambient temperature below 25°C |
The battery is fully charged | |
| 1.210÷1.230 | 1.270÷1.290 |
The battery is charged to 70% | |
| 1.170÷1.190 | 1.230÷1.250 |
The battery is discharged | |
| 1.050÷1.070 | 1.110÷1.130 |
2. If the battery condition is suspicious, first check the electrolyte density in each of its cans. A difference in the measurement results exceeding 0.040 indicates a drop in the electrolyte level or destruction of the lamellas.
3. If the difference in specific gravity of electrolyte in different cans exceeds the specified value, the battery must be replaced. Otherwise, the charge level can be restored (see below in this Section).
Checking the condition of maintenance-free batteries
4. If your car is equipped with a sealed maintenance-free battery, there is no need to regularly add electrolyte to the cells. The battery charge level can be determined by the indicator or voltmeter built into its case.
5. Some vehicles are equipped with maintenance-free Delco batteries. These batteries have a built-in charge level indicator. The indicator is located on the top surface of the battery case and changes color depending on the charge level. A green spot in the indicator viewing window indicates a high charge level. Darkening of the spot (right up to black) indicates the need for charging. A light yellow indicator indicates an excessive decrease in the electrolyte level - in this case, further use of the battery is unacceptable and it must be replaced.
6. If a voltmeter is used to check the charge level, connect it between the battery terminals. Compare the measurement result with the requirements of the Specifications at the beginning of the Chapter. The readings taken can only be considered reliable if the measurement was taken at least 5 hours after the last charge. Otherwise, turn on the headlights of the car for about 30 seconds, then wait another five minutes and only then begin taking readings (don't forget to turn off the headlights). All other on-board power consumers must also be switched off during the test (make sure all vehicle doors, including the tailgate, are tightly closed).
7. If the measurement result is below 12.2V, the battery is discharged. The range from 12.2V to 12.4V corresponds to the normal battery charge level.
8. If it is necessary to charge the battery, remove it from the vehicle (see section Removal and installation the battery) and proceed in accordance with the instructions set out below in this Section.
Text obtained from the website www.SKODABOOK.ru
Charging traditional and low maintenance batteries
Note: The following information should be taken as a general guide only. Always read the charger manufacturer's instructions and the recommendations on the label attached to the battery.
1. Charge the battery with a current of approximately 10% of the battery capacity. Thus, the charging current for a 55 Ah battery should be 5.5 A. Continue the charging process until the electrolyte density stops changing for at least four hours.
2. Alternatively, a slow charge with a current of 1.5 A can be performed. In this case, the battery can be left connected to the charger overnight.
3. The authors of this Guide do not recommend resorting to quick methods of restoring the battery charge level in 1-2 hours - such a practice is fraught with serious damage to the lamellas as a result of their overheating.
4. During battery charging, ensure that the electrolyte temperature does not rise above 37.8°C.
Charging maintenance-free batteries
Note: The following information should be taken as a general guide only. Always read the charger manufacturer's instructions and the recommendations on the label attached to the battery.
1. Full restoration of the charge level of such batteries takes a little longer than the norms accepted for standard type batteries. In particularly difficult cases, charging can last up to three days.
2. Prepare a constant current charger. Set the output voltage of the power source to 13.9÷14.9 V. The charging current should not exceed 25 A. With this charging method, the battery charge level should be restored to a weak (12.5 V) in about three hours. Fully charging the battery, as mentioned above, may take much longer.
3. When restoring a completely discharged battery (with output voltage below 12.2 V) it would be best to entrust the proper charging to car service specialists.
Checking the electrolyte level
Warning! The electrolyte inside the battery is a sulfuric acid solution. Wear rubber gloves when performing all work. When adjusting the electrolyte level, make sure that it does not overflow through the openings in the cans. Immediately wash away any spilled electrolyte with clean water. After completing the work, rinse the entire battery case with water. Never try to pump out excess electrolyte from the cans.
1. The standard model kit includes batteries that do not require checking the electrolyte level. During the operation of the car, the battery may be replaced with a traditional one.
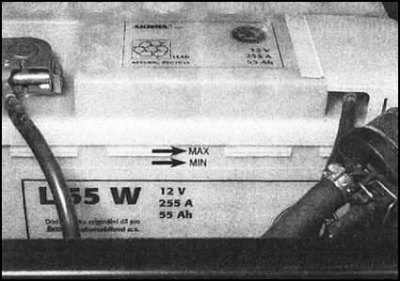
2. Batteries that need checking and adjusting the electrolyte level can always be distinguished by the presence of removable covers on the upper surfaces of the cans. The battery case is usually made of translucent plastic, so the electrolyte level can be easily assessed visually - the walls are marked
minimum and maximum level marks. Before adjusting the electrolyte level, make sure that the battery is not a maintenance-free type (on the body of such batteries there is usually an inscription such as Freedom or Maintenance-Free).
3. Check the electrolyte level through the openings of the cans (after removing the lids), or by the marks on the translucent walls. The electrolyte should completely hide the lamellas. If necessary, make adjustments by adding distilled water to the jars (non-ionized) water. Replace the covers and rinse the battery case with water.