
General information
Depending on the vehicle, the auxiliary drive belt is used to drive devices such as the alternator, steering pump, and air conditioning compressor from the crankshaft pulley.
On some models, the multirib auxiliary belt is equipped with an automatic tension adjustment device (depending on the laying route and the number of driven components). On other models, the belt tension is adjusted by changing the position of the generator.
When installing the belt, care should be taken to adjust the force of its tension.
Removing
1. Park the vehicle on level ground, engage the parking brake and chock the rear wheels. Loosen the right front wheel nuts.
2. Jack up the front of the car and place it on jack stands. Remove the right front wheel.
3. Turn out screws of fastening of a cover of a belt.
4. Check up a belt on presence of factory indexes of a direction of rotation. If necessary, apply the appropriate marking yourself.
Models with automatic auxiliary belt tensioner
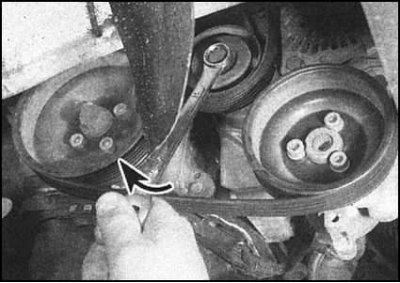
Throwing an open-end wrench on the central nut of the tensioner, turn the latter clockwise, overcoming the force of the spring.
Models without automatic auxiliary belt tensioner
1. Loosen the top and bottom alternator mounting bolts one or two turns.
2. Move the generator down until it stops, turning it around the top support and overcoming the resistance of the spring.
All models
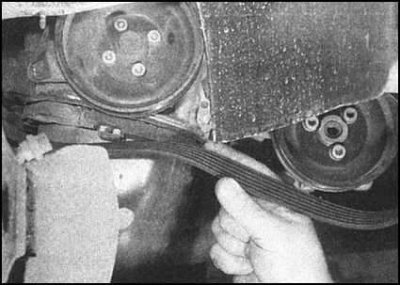
Remove the belt from the alternator pulley, then from the remaining pulleys.
Installing the belt and adjusting its tension
Attention! When installing the belt, observe the direction of its rotation, guided by the corresponding markings.
Put the belt on the crankshaft pulley. Make sure that the ribs of the belt correctly fit into the counter grooves of the pulley.
Models with automatic tensioner
1. Using a wrench, turn the belt tensioner at the center nut clockwise.
2. Insert the belt with the flat side under the tensioner pulley, then slip it over the appropriate pulleys. Make sure that the belt ribs fit correctly into the pulley grooves.
3. The tension of the belt will occur automatically when the tensioner is released.
Models without auto tensioner
1. Overcoming the resistance of the spring, several times move the generator down to the stop, checking the serviceability of returning it to its original position when released. Loosen the screws an additional half turn if necessary.
2. While holding the generator in the depressed position, put the belt on its pulley. Release the generator - the belt should be stretched under the action of the spring.
3. Without tightening the alternator bolts, start the engine, let it idle for about 10 seconds.
4. Switch off the engine and tighten with the demanded effort at first the bottom bolt, then top.
All models
1. Replace the belt cover. Firmly tighten the bolts of its fastening.
2. Install the right front wheel and lower the vehicle to the ground. Tighten the wheel nuts to the required torque.