



Warning! Hydraulic fluid is highly toxic - avoid contact with exposed skin and eyes. Rinse off accidental splashes immediately with plenty of clean water. Remember that getting even a small amount of brake fluid into the digestive tract is fraught with the most serious consequences, even death. Some types of hydraulic fluids are also flammable and may ignite on contact with hot surfaces - take appropriate fire precautions. Along with toxicity, brake fluid is characterized by increased chemical aggressiveness and can easily damage the paintwork of car body panels. If liquid gets on body parts, immediately wash off its traces with plenty of water. Finally, the reader's attention should be drawn to the high hygroscopicity of the brake fluid. The latter means the ability to absorb the moisture contained in it from the air, which indicates the inadmissibility of using a liquid stored for a long time in an unhermetically sealed container. Add only fresh hydraulic fluid of the correct grade to the system.
On models equipped with ABS, be sure to disconnect the battery before disconnecting the hydraulic brake lines. Connect the battery only after connecting all the hydraulic lines of the brake path. Violation of this requirement is fraught with air entering the hydraulic modulator, the removal of which during normal system bleeding is not possible and requires the use of a special electronic tester (VAG 1552).
General information
It is possible to achieve the correct functioning of any hydraulic system only by completely removing air plugs from its tract. Air is removed from the brake system by "pumping".
In the process of bleeding the brake system, add only fresh hydraulic fluid of the required grade to it. The fluid drained from the system cannot be reused. Before proceeding with the procedure, make sure that there is an adequate supply of fresh brake fluid.
If there is the slightest suspicion of the presence of low-quality brake fluid in the system, the hydraulic path must be thoroughly flushed with fresh fluid of the required grade. In addition, it is necessary to replace all cuffs and o-rings used in the components and lines of the system.
In the event of a loss of hydraulic fluid or air entering the system as a result of the development of leaks, all existing defects should be eliminated before pumping.
Drive the car onto a flyover/view hole, muffle the distance, cock the parking brake and engage first or reverse gear, then chock the rear wheels. Alternatively, the vehicle can be jacked up and placed on secure jack stands (remove wheels for easier access).
Check the reliability of the fastening of the union connections of the brake lines and the caliper/wheel cylinder bleed valves. Thoroughly wipe the outside of the valves and their surroundings.
Remove the cap and add fresh hydraulic fluid to the GTZ reservoir, bringing its level to the MAX mark. Loosely screw on the cover again. Remember that in the process of pumping the system, the liquid level in the reservoir should not fall below the MIN·mark, otherwise air may enter the cylinder and all the efforts made will go down the drain.
Currently, in car accessories stores, you can always purchase special kits that allow you to bleed the car's brake system by one person. The use of this type of kit greatly simplifies the bleeding procedure and reduces the risk of sucking back the hydraulic fluid and air already pumped out of it. If there is no special kit at hand, you should resort to the help of an assistant. The description of the procedures for bleeding the brake system by one and two people is set out below in the relevant subsections.
When bleeding a hydraulic circuit using a special kit, the car must be prepared for the procedure in accordance with the instructions above. Next, follow the instructions that come with the kit. The general principle of using such sets is described below in the relevant subsections.
Regardless of which pumping method is chosen, the sequence of the procedure must remain unchanged, being the key to the complete removal of air from the hydraulic tract.
Pumping sequence
1. If the system is bled to remove air that has entered the tract as a result of disconnecting the components of only one of the parts of the hydraulic circuit, it will be enough to bleed only this particular brake mechanism.
2. If it is necessary to remove air pockets from the entire system, the bleeding sequence should be as follows:
- a) Brake mechanism of the right rear wheel;
- b) Brake mechanism of the left rear wheel;
- c) The brake mechanism of the right forward wheel;
- d) The brake mechanism of the left forward wheel.
Basic method for bleeding the brake system with two people
1. Prepare a suitable drain container with transparent walls, a piece of plastic tube or rubber hose that fits snugly on the bleed valve, and a ring wrench to turn the valve. Enlist the support of a friend.
2. Remove the dust cap from the bleed valve of the corresponding brake mechanism, put the head of the spanner on the valve, then tighten the hose, the other end of which should be lowered into a transparent container partially filled with clean brake fluid. The end of the hose must be completely immersed in the liquid.
3. Make sure that the fluid level in the GTZ reservoir is sufficient. Remember that during the entire procedure, the liquid level must not fall below the MIN·mark.
4. Ask an assistant to depress the foot brake pedal a little to the stop in order to create pressure in the system. On the last stroke, the pedal should be fixed in the lower position.
5. With the foot brake pedal depressed, unscrew (about one turn) bleed valve and observe the release through the hose into the drain container containing air bubbles. The assistant must constantly press the pedal until it rests on the floor. When fluid stops flowing from the hose, tighten the bleed valve and have an assistant release the pedal slowly. Immediately check the fluid level in the GTZ reservoir, correct if necessary.
6. Repeat the procedures in paragraphs 4 and 5 until a clear, air-free fluid comes out of the hose. If the system's first brake mechanism is bled after the GTZ is emptied, the pause between cycles must be at least five seconds, which is necessary to fill the internal cavities of the cylinder with liquid.
7. When finished priming, tighten the valve firmly, remove the hose and ring wrench from it, and install the dust cap.
Note. Do not overtighten the valve.
8. If necessary, repeat the procedure, pumping the brake mechanisms of the remaining wheels of the vehicle in the required order in order to completely remove air from the hydraulic path.
How to bleed the brake system using a one-way valve kit
1. As the name of the kit suggests, the main component is a one-way valve built into the drain tube and ensuring its one-way patency. A transparent drain container must be installed in such a way that it is freely visible from the driver's seat in the car.
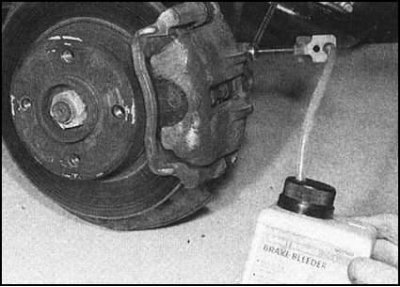
2. The drain tube is put on the bleed valve at one end, which is left open for the entire duration of the procedure. Next, the operator sits in the driver's seat and begins to squeeze and release the foot brake pedal with smooth, uniform movements until a transparent brake fluid free from air bubbles begins to come out of the tube.
3. Do not forget about the need to maintain the liquid level in the GTZ reservoir.
How to bleed the brake system using a compressed air kit
1. As an independent source of compressed air, a spare tire of a car is usually used, the pressure in which should be relieved slightly below normal (see kit manufacturers' instructions).
2. By connecting a container filled with hydraulic fluid and connected to a compressed air source to the GTZ tank, the operator is freed from the need to manipulate the foot brake pedal. Now it is enough just to open and close the valve, observing the liquid displaced from the system.
3. The method is good in that the presence of a sufficient supply of hydraulic fluid in a container connected to the GTZ tank allows you not to worry about the need to monitor its level.
4. This method is especially effective when bleeding tracts with reduced traffic, as well as when replacing brake fluid during routine vehicle maintenance.
All Methods
1. Upon completion of bleeding the system and restoring the feeling of normal hardness when depressing the foot brake pedal, check the reliability of the tightening of the bleeding valves, collect traces of spilled liquid with a rag and make sure that you do not forget to put dust caps on the valves.
2. Check the hydraulic fluid level in the GTZ reservoir, correct if necessary.
5. The hydraulic fluid drained from the system cannot be reused and must be handed over to a special collection point for the disposal of toxic waste.
4. Make sure that the foot brake pedal functions properly. If the feeling of softness when depressing the pedal remains, therefore, not all air has been removed from the system and the pumping procedure should be repeated. If it is not possible to remove air from the duct and during repeated pumping, check the condition of the GTZ sealing collars.
Note. If there is the slightest doubt about the correct functioning of the brake system on models equipped with ABS, the car should be immediately driven to a service station to diagnose the condition of the hydraulic modulator using a special tester VAG 1552.