



Contents: Simos Static Ignition System ⬇ All other systems ⬇ Checking the condition of ignition…⬇ Distributor cap ⬇ Distributor runner ⬇ Ignition coil ⬇
Warning! When performing any maintenance work on system components with the ignition on, special precautions must be taken. Receiving an electric shock can lead to the most serious consequences. Persons with an implanted pacemaker are prohibited from performing maintenance on system components. When connecting or disconnecting any components, as well as when using a universal circuit tester to determine electrical resistance, do not forget to turn off the ignition!
Simos Static Ignition System
On models equipped with the Simos 2P ignition system, where the distributor is not provided, only a very narrow range of checks can be carried out by the average amateur mechanic.
In case of any problems related to malfunction of the ignition system, always first check the quality of the contact connections of the electrical wiring on the coil module and the speed and crankshaft position sensor. Also assess the condition of the electrical wiring insulation.
Check the quality of the coil module fit on all spark plugs. Also check the condition of the spark plugs themselves - remember that spark plugs in waste spark ignition systems are subject to increased wear.
Remove the speed and crankshaft position sensor and carefully examine its condition (see section Removal and installation of ignition system information sensors).
If the cause of the malfunction cannot be identified during the above checks, the vehicle should be taken to a Skoda service station for a more detailed diagnosis of the ignition system.
All other systems
The most typical reasons for failures
Most ignition system failures are related to poor quality of circuit contact connections or current leaks in the high-voltage circuit. Leaks usually occur due to the formation of carbon tracks that appear as a result of electrical breakdowns due to excessive contamination, moisture, or mechanical destruction of components. Before deciding to replace a suspected component, always check the wiring first. Work slowly, methodically checking each of the individual sections of the circuit, trying to identify the damaged sector by the method of elimination. In the vast majority of cases, spraying the surface of the components of the high-voltage circuit of the system with a special moisture absorber such as WD40 helps.
Checking for a spark in the usual way by bringing the power wire to the engine block is not recommended in this case, not only because of the increased risk of electric shock, but also to avoid failure of the high-voltage circuit of the coil. You should also not try to identify the cylinder in which misfires occur by disconnecting the wires from each of the spark plugs one by one.
The engine does not start
If the engine does not turn over at all or turns too slowly, check the condition of the battery and starter. Connect a voltmeter between the battery terminals (observing the polarity: "+" to "+"; "-" to "-"). Disconnect the ignition coil wire from the distributor cap and ground it to the car service workshop. Read the instrument reading when turning the engine with the starter (do not crank the engine continuously for more than 10 seconds). If the measurement result is less than 9.5 V, check the battery condition and the proper functioning of the starting and charging systems.
If the engine turns over at normal speed but does not start, the ignition system's high-voltage circuit should be checked. Following the manufacturer's instructions, connect a stroboscope, then crank the engine with the starter. If the stroboscope flashes correctly, voltage is supplied to the spark plugs and the condition of the spark plugs should be checked. If the stroboscope does not respond to cranking the engine, check the condition of the high-voltage wires themselves, then the distributor cap, carbon contact brushes and rotor.
If there are no problems with spark formation, check the proper functioning of the power supply system.
The cause of the spark formation failure may be a malfunction in the low-voltage part of the ignition system. Check the serviceability of the 12 V power supply to the ignition coil. Assess the condition of the contact connections and wiring. Check the coil itself. The reason for the lack of power to the coil may be a malfunction of the ignition switch or a blown fuse.
Remember that a faulty anti-theft alarm system or engine immobilizer may cause the engine to refuse to start. Before continuing with the checks, make sure that the anti-theft alarm system is properly disabled.
If the cause of the spark failure cannot be identified during the tests, the vehicle should be taken to a service station to have the engine management system diagnosed.
There are misfires
The disruption of spark stability most often occurs as a result of poor quality contact connections or the appearance of an intermittent defect in the low-voltage circuit of the system. The second cause of misfires is a malfunction of the high-voltage circuit of the system, or damage to the coil side of the runner. In some cases, disruption of ignition stability is caused by failures of the speed sensor and crankshaft/Hall position sensor (see section Removal and installation of ignition system information sensors).
With the ignition off, carefully check the external condition of all system components, paying particular attention to the quality of the contact connections. If you have the necessary equipment at hand, check the condition of the electrical wiring and the quality of the contact connections of the low-voltage ignition circuit.
Make sure the high voltage ignition coil, distributor cap and high voltage wires are free of dirt and moisture. Using the substitution method, check the condition of the high voltage wires and spark plugs, then inspect the cap, carbon brushes and distributor rotor.
Regular misfires are most likely due to damage to the distributor cap, high-voltage wires or spark plugs. Use a stroboscope to check for high-voltage supply voltage at the spark plugs.
If there is no high-voltage signal on one of the spark plugs, the cause of the failure is a malfunction of the high-voltage wire or the distributor cap. If there is voltage on all spark plugs, the condition of each of them should be checked separately.
The absence of high voltage on all spark plugs indicates a malfunction of the ignition coil - its secondary winding may be broken as a result of exposure to high electrical loads.
Other violations
If it is not possible to identify the cause of the violation during the above checks, you should seek help from car service specialists.
Checking the condition of ignition system components
Note: The information provided in this section applies to distributor ignition systems only.
1. The condition of the BB (spark plug) wires must be checked every time the spark plugs are replaced.
2. When disconnecting the wire from the spark plug, pull only by its tip. Otherwise, there is a risk of damaging the contact terminals.
Note: Before disconnecting the spark plug wires, make sure they have factory markings. If necessary, mark the wires yourself using tape, writing the numbers of the corresponding cylinders on them.
3. Check the inside of the wire tip for signs of corrosion in the form of a white powdery coating. Pull the tip tightly onto the spark plug tail, making sure it fits securely. If necessary, disconnect the wire again and adjust the position of the contact terminal inside the tip.
4. Using a clean cloth, carefully wipe the high-voltage wires along their entire length, removing traces of dirt and grease from the surface of the insulation. After cleaning the wires, check them for burnouts, cracks, and other damage to the insulation. Try not to bend the wires excessively to avoid the risk of damaging the conductor cores.
5. Disconnect the other end of the wire from its terminal on the distributor cap (again, pull only by the tip!). Check the tip for signs of corrosion. If you have an ohmmeter at hand, determine the specific resistance of the wire. Compare the measurement result with the requirements Specifications. When connecting the wire, make sure that the tip is securely seated on the terminal.
6. Proceeding in a similar manner, check the condition of all high-voltage wires of the ignition system, including the main one, which goes from the central terminal on the distributor cap to the ignition coil.
7. Replacement high-voltage wires should be purchased as a set, specially produced for use on vehicles of this brand.
Distributor cap
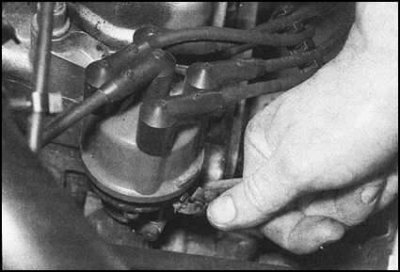
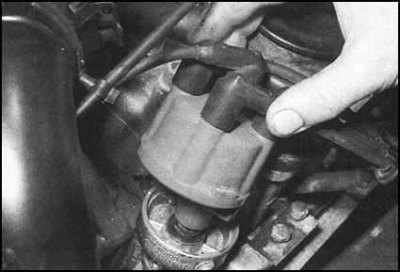
1. Release the spring clips and remove the distributor cap. Wipe the cap thoroughly and inspect it carefully from the inside and outside for cracks, carbon tracks, burnt contacts and other damage. Assess the degree of wear of the carbon brushes, check their freedom of movement in the holders and the density of their pressure on the contact surface of the runner.
 |
 |
2. To avoid disruption of the ignition sequence, do not disconnect all the wires from the cover to be replaced at the same time. After transferring the wires one by one to the terminals of the new cover, securely fasten the latter with the mounting screws/spring clamps.
3. After completing the system maintenance, spray the surface of its high-voltage components with a desiccant.
Distributor runner
1. Remove the distributor cap.
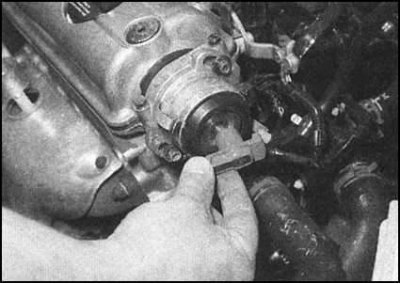
2. Check the external condition of the rotor. Strictly speaking, it is customary to change the rotor together with the distributor cap, regardless of their condition, simultaneously with the installation of new high-voltage wires. However, due to the fact that on 1.3 L models the rotor is very tightly seated on the distributor shaft, you should first consult with car service specialists. On 1.6 L models the rotor is easily removed from the shaft
3. Check the condition of the runner contacts - one of them is located in the central part of the component and constantly contacts the carbon contact of the central terminal of the distributor cap, the second is the working part of the spout, which alternately contacts the segment contacts of the spark plug wire terminals inside the cap. Using fine-grained sandpaper, clean the contact surfaces, completely removing traces of carbon deposits from them.
4. Installation is carried out in the reverse order. Make sure that the guide protrusion of the runner enters the corresponding recess of the distributor shaft, only then proceed to install the cover.
Ignition coil
1. Disconnect the ignition coil HV connector and also disconnect the main distributor HV wire from it.
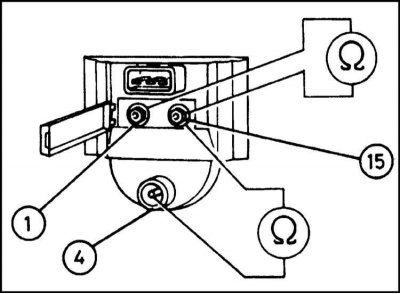
2. Connect a multi-meter between terminals 1 (1) and 15 (+) (see accompanying illustration) and measure the resistive resistance of the primary winding of the coil. Compare the measurement result with the requirements Specifications.
3. Now connect the device between the high-voltage terminal (4) and terminal 15 (+) and measure the resistance of the secondary winding. Compare the result with the one specified in Specifications meaning.
4. Restore the original electrical wiring connection.
5. If the coil body is hot to the touch immediately after the engine has stopped, this may indicate damage to the internal insulation.