



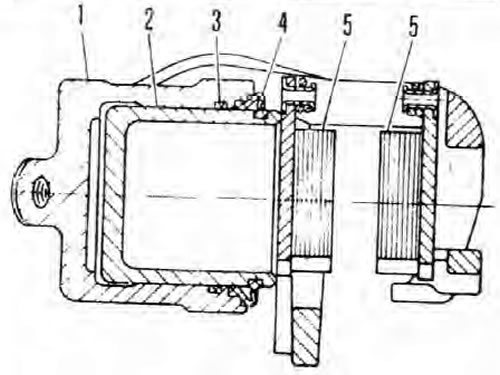
Fig. 9.11. Front brake caliper in section
1. Support; 2. Piston; 3. Piston seal; 4. Piston dust seal; 5. Brake pads.
Note: Before you begin, please refer to the Note given at the beginning Chapters 9 and the Warning given at the beginning Chapters 13 (regarding asbestos dust).
1. Prepare to remove the caliper as described in points 1-3 of the previous Chapter.
2. Remove the caliper guide pin bolts, using a thin open-ended wrench if necessary to lock the heads of the pins themselves. Remove the caliper by unscrewing it from the hose coupling. If a sealing washer is used at this joint, discard it - these washers must be replaced after each removal. Cap the hose coupling (or wrap it tightly in plastic).
3. Remove and check the condition of the brake pads (see Chapter 13).
4. Remove the guide pins. If necessary, screw their mounting bolts into them and pull the bolt head using a self-locking wrench or similar tool. Remove the rubber dust boot from each guide pin and inspect it for cracks or other damage; the covers can be replaced separately if required.
5. Remove the caliper bracket from the steering knuckle.
6. Place a small wooden block in the caliper and remove the piston by directing a stream of low pressure compressed air (for example, using a tire pump) into the caliper inlet.
Warning: Be careful, the piston may jump out of the caliper with some acceleration.
7. Remove the dust seal and use a blunt tool such as a knitting needle to pry the seal out of the caliper bore.
8. Clean all components thoroughly using only methyl or isopropyl alcohol, or clean brake fluid. Never use mineral solvents such as gasoline or kerosene for this purpose - they will damage the rubber components of the brake hydraulic system. Dry the components using compressed air or a clean, dense (lint-free) cloth. Blow compressed air into the channels.
9. Inspect all components and replace any that are worn or damaged. Pay particular attention to the inner walls of the caliper bore and the piston - the caliper should be replaced if they are scratched, worn or corroded. Also check the condition of the guide pins and the holes in the mounting bracket intended for them; both guide pins must not be damaged and (when cleared) quite tightly but smoothly slide in the mounting bracket. If there is any doubt about the condition of any of the components, replace them accordingly.
10. If the caliper is suitable for further use, purchase the components required for its assembly. Be sure to replace all rubber seals, dust seals and covers, as well as any sealing washers found during disassembly - they should not be reused.
11. Before assembly, make sure all components are absolutely clean and dry.
12. Soak the piston and its new seal with clean brake fluid (within an hour before assembly). Lubricate the caliper cylinder bore with clean fluid and install the new seal into its inner groove without using any tools.
13. Install a new dust seal onto the inner end of the piston, then place its outer edge into the outer groove of the caliper cylinder. Press the piston into the caliper using a twisting motion and making sure the piston does not tilt. When the base of the piston is immersed in the caliper, install the inner edge of the dust seal into the groove of the piston.
14. Unplug the hose and screw the caliper onto its coupling, tightening it firmly by hand. If a sealing washer was found during the overhaul, be sure to replace it.
15. Install the caliper mounting bracket onto the steering knuckle and tighten its two mounting bolts to the specified tightening torque Specifications.
16. Install a new rubber dust boot onto each of the guide pins and apply a small amount of grease to the pins before installing; you can use any high-quality high-temperature brake grease or anti-lock compound (for example Holts Copaslip).
17. Install the brake pads (see Chapter 13).
18. Fit the caliper into the mounting bracket over the brake pads, then screw in the guide pin bolts. Skoda recommends replacing these bolts every time they are removed, as they are coated with a blocking compound that loses its effectiveness. For this reason, Skoda's original brake pad kits are supplied with new bolts. If new bolts are not available, carefully clean the bolt threads with a wire brush and apply a drop or two of the special blocking compound to them just before installation. Tighten the bolt to the specified tightening torque Specifications.
19. Make sure the caliper slides smoothly in the mounting bracket.
20. Make sure the hose is routed correctly, not kinked, and secured with a clamp and tighten the coupling securely.
21. Bleed the system (see Chapter 9), then press the brake pedal several times until the pads are pressed firmly against the brake disc and normal pedal travel is restored.
22. Wash away any spilled fluid from adjacent components and check the system joints for leaks by asking an assistant to press the brake pedal all the way down. Install the wheel.
23. Repeat this procedure on the opposite brake caliper, then lower the vehicle to the ground and tighten the wheel bolts to the specified torque Specifications.
24. Check the brake fluid level (see Section 1). Inspect the system joints for leaks.