
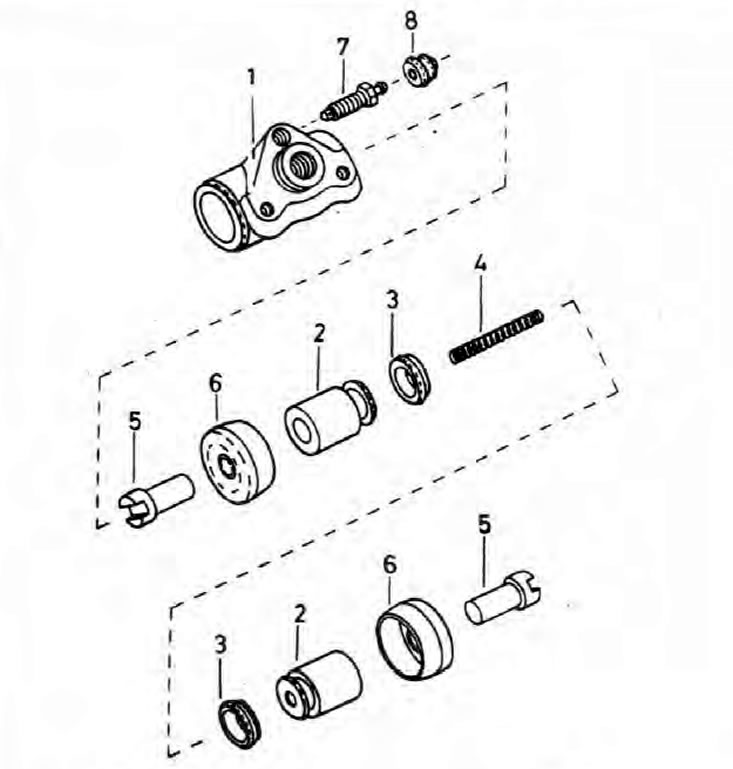
Pic. 9.15. Rear brake cylinder components
1. Cylinder; 2. Piston; 3. Piston seal; 4. Spring; 5. Plunger; 6. Rubber protective cover; 7. Bleed fitting; 8. Dust cap.
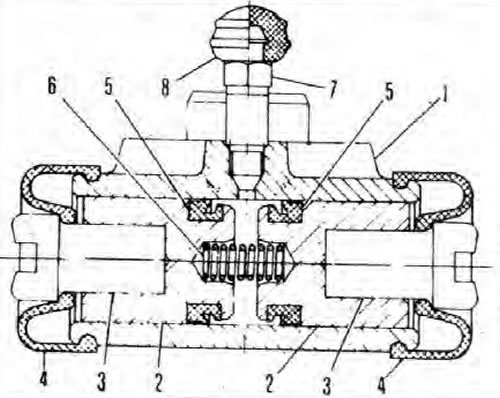
Pic. 9.16. Sectional rear brake cylinder
1. Cylinder; 2. Piston; 3. Plunger; 4. Rubber protective cover; 5. Piston seal; 6. Spring; 7. Bleed fitting; 8. Dust cap.
Note: Please refer to the note given at the beginning of the Chapter 9, and the warning given at the beginning Chapter 21 (regarding asbestos dust).
Removing
1. Remove the brake drum (see chapter 20).
2. Remove the brake pads (paragraphs 10-14 of Chapter 21).
3. Minimize fluid loss. To do this, remove the cover of the main cylinder feed tank and tighten it again by placing a piece of polyethylene under the cover (do not damage the level sensor). This will give an airtight seal and prevent fluid from escaping. Alternatively, pinch the hose with a hose clamp, clamp, or similar tool, or plug the metal brake pipe immediately after separating it from the cylinder (see chapter 10). Unscrew the bleed valve and plug both cylinder holes; work very carefully to prevent foreign particles from entering the system.
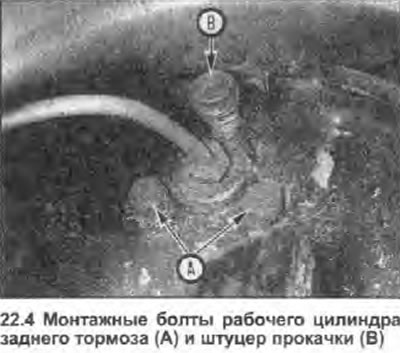
4. Unfasten the cylinder from the drum brake support plate (see photo).
Bulkhead
Note: Before proceeding to overhaul the cylinder, check the availability of the necessary components and their prices, compare them with the price of a new or already remanufactured cylinder in the workshop, and only then make a decision on the feasibility of overhauling.
5. Remove the working brake cylinder and clean it completely.
6. Clamp the brake cylinder in a vice, the jaws of which are equipped with soft pads, then remove the rubber protective covers and plungers. Remove piston assemblies and spring.
7. Thoroughly clean all components. using only methyl or isopropyl alcohol, or clean brake fluid. Never use mineral solvents such as gasoline or kerosene for this purpose - they will damage the rubber components of the brake hydraulic system. Dry the components using compressed air or a clean, dense (lint-free) textile.
8. Inspect all components and replace any that are worn or damaged. Pay special attention to the inner walls of the cylinder and the pistons - the complete cylinder assembly should be replaced if they are scratched, worn or corroded. If there is any doubt about the condition of the assembly or any of its components, perform the appropriate replacement. Make sure the cylinder inlet and bleed port are not clogged.
9. If the caliper is suitable for further use, purchase the components necessary to assemble it. Be sure to replace all rubber seals, cuffs and covers, and dust cap - they should not be reused.
10. Soak pistons and new seals in clean brake fluid. Lubricate the inner walls of the cylinder with clean fluid.
11. Install new seals in the piston grooves without using any tools. Make sure all components are installed in the correct order and properly oriented.
12. Insert the pistons into the caliper cylinder. using a rotary motion so that they do not get stuck due to the sealing lips. Apply a small amount of rubber component lubricant to each piston before installing new rubber caps and pistons.
13. Establish the working brake cylinder.
Installation
14. Install in the reverse order of removal paying attention to the following:
- a) Tighten the cylinder mounting bolts with a tightening torque specified specifications.
- b) Install the bleeder valve, then connect the metal brake pipe to the cylinder (see chapter 10) and install brake pads and drum (Chapter 21 and 20).
- c) Bleed the system (see chapter 9), then check its joints for leaks by having an assistant depress the brake pedal all the way. Wash off any spilled fluid and recheck the system for leaks.