
Company vehicles Hyundai Company vehicles Kia Company vehicles Lada Company vehicles Mazda Company vehicles Mercedes-Benz Company vehicles Opel Company vehicles Mitsubishi
English Русский
Български
Беларускі
Український
Српски
Hrvatski
Română
Polski
Slovenský
Magyar
Articles   
Bookmark Contacts Sitemap
SkodaBook.ru


Fabia Rapid Octavia Superb Kodiaq Yeti Others
Fabia 2 (2007-2014) Fabia 1 (1999-2007)

Replacing the camshaft oil seal (Skoda Fabia 6Y)

  • Main
  • Fabia
  • 6Y (1999-2007)
  • Power unit
  • Engine repair
  • Replacing the camshaft oil seal
0
Contents: Diesel engines ⬇ Petrol engines 1.4 l, 55 and 74 kW ⬇

Diesel engines


The oil seal is made of PTFE. Do not lubricate the seal lip or the camshaft before installation.

1. Remove the camshaft drive belt (see subsection 2.4.1).
1. Remove the camshaft drive belt (see subsection…


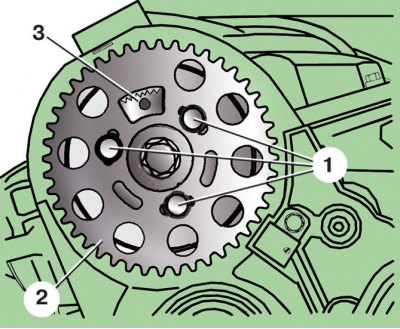
2. While holding the camshaft from turning, unscrew the mounting bolts 1 and remove the camshaft pulley 2 (3 – toothed sector).
2. While holding the camshaft from turning,…


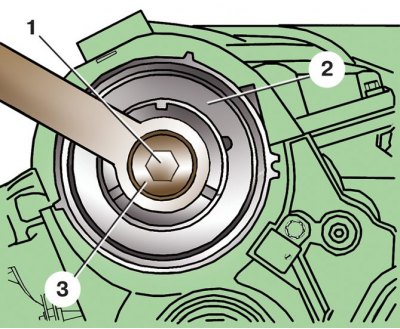
3. Loosen bolt 1 securing the camshaft pulley hub by two turns, while holding the shaft from turning. At service stations, the T 10051 device is used for this purpose (2 – hub; 3 – device T 10051).
3. Loosen bolt 1 securing the camshaft pulley hub…


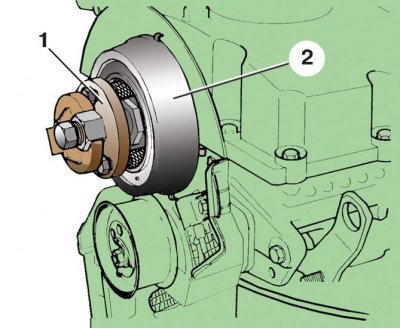
4. Using puller 1, move hub 2 off the camshaft cone. Then remove the puller, unscrew the hub mounting bolt and remove the camshaft pulley hub.


5. Remove the oil seal. At service stations, the T 30003 sealing ring puller is used for this purpose.

Source of the article web resource [skodabook.ru]

6. Wipe the camshaft thoroughly to remove any oil or dirt. To avoid damaging the working edge of the oil seal, tape over the groove on the camshaft cone.

7. Carefully place the new oil seal onto the camshaft and press it in using a suitable mandrel until it stops.

8. Install the pulley hub and tighten its mounting bolt to a torque of 100 Nm.

4. Using puller 1, move hub 2 off the camshaft cone. Then remove the puller, unscrew the hub mounting bolt and remove the camshaft pulley hub.

9. Place the camshaft pulley onto the hub, with toothed sector 3 (see above) facing upwards. Screw in the pulley mounting bolts 1 by hand.

10. Install the camshaft drive belt and adjust it.

Petrol engines 1.4 l, 55 and 74 kW


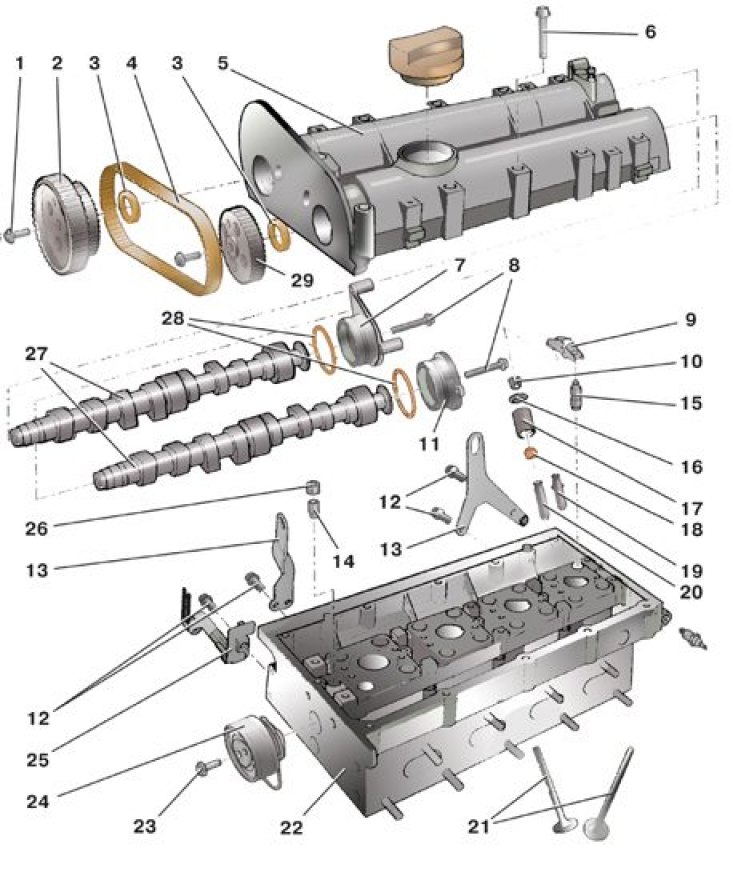
Cylinder head parts for 1.4L, 55 and 74 kW engines


1 – pulley mounting bolt; 2 – intake camshaft…

1 – pulley mounting bolt; 2 – intake camshaft pulley; 3 – camshaft oil seal; 4 – exhaust camshaft drive belt; 5 – camshaft bearing housing; 6 – housing mounting bolt; 7 – rear cover of the intake camshaft; 8 – rear cover mounting bolt; 9 – valve rocker arm; 10 – cracker; 11 – rear cover of the exhaust camshaft; 12 – bolts; 13 – eye; 14 – check valve; 15 – hydraulic valve lifter; 16 – valve spring plate; 17 – valve spring; 18 – oil seal; 19 – valve guide repair sleeve; 20 – valve guide sleeve; 21 – valves; 22 – cylinder head; 23 – tension roller bolt; 24 – tension roller; 25 – bracket; 26 – screw plug; 27 – camshafts; 28 – sealing rings; 29 – exhaust camshaft pulley


1. Remove the camshaft drive belts (see subsection 2.4.2).

2. While holding the camshafts from turning, unscrew the mounting bolts 1 and remove the camshaft pulleys 2 and 29.

3. Using a sealing ring puller or by prying with a screwdriver, remove the seals 3.

4. Wipe the camshafts and seal seats to remove any dirt and oil.

5. Lubricate the working lip of the new oil seals with a thin layer of engine oil.

6. Carefully place the oil seals on the camshafts and press them in until they stop using a suitable mandrel.

7. Install pulleys 2 and 29 of the camshafts and tighten bolts 1 of their fastening first to a torque of 20 Nm, and then tighten another 90°.

8. Install the camshaft drive belts and adjust their tension.

9. To replace sealing rings 28, remove the ignition module.

10. Unscrew bolts 8 and remove rear covers 7 and 11 of the camshafts.

11. Remove sealing rings 28.

12. Apply a thin layer of engine oil to the new rings and install them in place.

13. Install covers 7 and 11 in place and tighten their mounting bolts to a torque of 10 Nm.
This article is available at russian, bulgarian, belarusian, ukrainian, serbian, croatian, romanian, polish, slovak, hungarian
Article verified: Timur Komissarov
Share with friends:
◀ Previous
Skoda Fabia 1: Engine repair
Next ►

Replacing the cylinder head gasket
Selection of crankshaft timing gear
Replacing the camshaft drive chain
Gasoline engine camshaft drive belt
Diesel engine camshaft drive belt
Replacing valve stem seals
Replacing the front crankshaft oil seal
Rear crankshaft oil seal
Disassembling the cylinder head
Cylinder head defect detection
Read similar articles on other Skoda models

➧ Replacing the Teflon seal and support ring on the fuel injector (1.4L… Skoda Rapid 1 (2012-2022)
➧ Replacing the crankshaft seal on the pulley side Skoda Octavia 3 (2013-2019)
➧ Removal and installation the crankshaft pulley, replacing the front… Skoda Superb 2 (2008-2015)
➧ Replacing the gear shift control shaft seal Skoda Kodiaq 1 (2016-2024)
➧ Removal and installation the crankshaft pulley, replacing the front… Skoda Yeti (2009-2017)
➧ Replacing the camshaft seal Skoda Felicia (1994-2001)
Link to this article in various formats
Reviews and comments of visitors
No comments yet


Add two numbers: 28 + 41


Fabia 2 (2007-2014) 
  • General information
  • User manual
  • Maintenance
  • Petrol engines 1.2 l
  • Engine repair
  • Cooling and lubrication system
  • Power and control system
  • Petrol engines 1.4 l
  • Engine repair
  • Cooling and lubrication system
  • Power and control system
  • Petrol engines 1.6 l
  • Engine repair
  • Cooling and lubrication system
  • Power and control system
  • Diesel engines 1.4 l
  • Engine repair
  • Cooling and lubrication system
  • Power and control system
  • Diesel engines 1.9 l
  • Engine repair
  • Cooling and lubrication system
  • Power and control system
  • Transmission
  • Manual gearbox 02R
  • Manual gearbox 02T
  • Automatic gearbox 09G
  • Cardan shaft
  • Chassis (running gear)
  • Front suspension
  • Rear suspension
  • Wheels and tires
  • Brake system
  • Steering system
  • Body and interior
  • Exterior (external elements)
  • Interior (internal elements)
  • Heating and air conditioning
  • Electrical equipment
  • Equipment and devices
  • Headlights and lighting
  • Power devices
  • Electrical circuits
Fabia 1 (1999-2007) 
  • User manual
  • Introduction to manual
  • Governing bodies
  • Salon equipment
  • Driving and maintenance
  • Power unit
  • Engine repair
  • Lubrication system
  • Supply system
  • Cooling system
  • Exhaust system
  • Transmission
  • Mechanical gearbox 002
  • Mechanical gearbox 02T
  • Chassis (running gear)
  • Front suspension
  • Rear suspension
  • Steering
  • Steering gear without power
  • Power steering
  • Brake system
  • Body and interior
  • Body and interior repair
  • Interior heating
  • Electrical equipment
  • Equipment and devices
  • Ignition system
  • Windshield wipers
  • Electrical circuits
SkodaBook.ru © 2018–2026 | Mobile version | Articles on Skoda | Sitemap EN BG BY UA RS HR RO PL SK HU | Feedback | Site search | Bookmark
Fabia 1 (1999-2007) | Fabia 2 (2007-2014) | Rapid 1 (2012-2022) | Octavia 1 (1996-2004) | Octavia 3 (2013-2019) | Superb 2 (2008-2015) | Kodiaq 1 (2016-2024) | Yeti (2009-2017) | Favorit (1987-1994) | Felicia (1994-2001) |
By continuing to use the site, you agree to the use of cookies.